Weider 7400 Weight English Manual - Page 14
Slide
 |
View all Weider 7400 Weight manuals
Add to My Manuals
Save this manual to your list of manuals |
Page 14 highlights
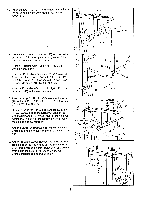
35. Attach the Large Backrest (41) to the Front 35 Upright (42) with two 1/4" x 2 1/2" Screws (43) and 1/4" Flat Washers (10). i L.._ i . 41 43 10 36. Press a 1 1/2" Inner Cap (32) into the Seat Frame (36). Insert 1/4" x 2 1/4" Carriage Bolts (38) through the centers of two Seat Plates (37). Attach the Seat Plates to the Seat (13) with four 1/4" x 3/4" Screws (18). Insert the two 1/4" x 2 1/4" Carriage Bolts (38) down through the Seat Frame (36). The wide end of the Seat (13) must be towards the 1 1/2" Inner Cap (32). Tighten two 1/4" Nylock Nuts (7), with 1/4" Flat Washers (10), onto the Carriage Bolts. 37. Press a 1 1/2" Inner Cap (32) into the Leg Lever (29). Attach the Leg Lever (29) to the Seat Frame (36) with a 5/16" x 2 1/4" Bolt (33) and 5/16" Nylock Nut (3). No not overtighten the Nylock Nut; the Leg Lever must be able to pivot freely. Insert the 5/16" x 2" Eyebolt (35) through the Leg Lever (29) from the indicated side. Slide a 5/16" Flat Washer (8) onto the Eyebolt and tighten a 5/16" Nylock Nut (3) onto the Eyebolt. 38. Set the bracket on the Seat Frame (36) on the indicated pins on the Front Upright (42). Attach the Seat Frame to the Front Upright with the 5/16" x 2 3/4" Carriage Bolt (14) and Seat Knob (40). Press two 3/4" Inner Caps (34) into the 13 1/2" Pad Tube (2). Insert the Pad Tube into the Seat Frame (36). Slide a 6" Pad (21) onto each end of the Pad Tube. Press two 3/4" Inner Caps (34) into the 13" Pad Tube (31). Insert the Pad Tube into the Leg Lever (29). Slide a 6" Pad (30) onto each end of the Pad Tube. ) . -....- -, 42 36 13 Wide End 37 38 . . ' . 37 32 o , 18 . t,` ' , o eN 10-------®. 36 7____.e 37 Q) 36 3 o 33----"I' Y 35 29 8 o • 3 32 38 40 36 o o , 14 21 42 O 34 0 21 24> C1 34 29 30 31 30 14
-
 1
1 -
2
-
3
-
4
-
5
-
6
-
7
-
8
-
 9
9 -
 10
10 -
 11
11 -
 12
12 -
 13
13 -
 14
14 -
 15
15 -
 16
16 -
 17
17 -
 18
18 -
 19
19 -
20
 |
 |
