Weider 7400 Weight English Manual - Page 9
swivel freely.
 |
View all Weider 7400 Weight manuals
Add to My Manuals
Save this manual to your list of manuals |
Page 9 highlights
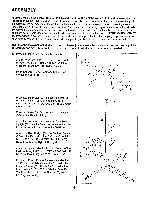
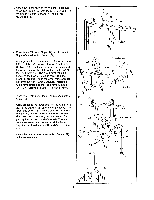
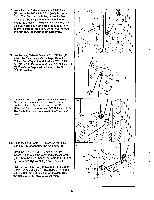
16. Insert the two 4 1/2" "L" Pins (60) down through the 16 indicated holes in the Arm Frame (52) and the Arms (46). 52 . .. • . 60 . -. . .. 46 46 17. Wet the lower ends of the Arms (46) and the insides of the two 7" Pads (45) with soapy water. Slide a Pad about halfway up each Arm. Press a 1" Round Cap (49) into a 7" Handle (47) with a Handgrip (48). Insert the 7" Handle (47) into one of the Arms (46). Attach the Handle to the Arm with a 5/16" x 2 1/4" Bolt (33), two 5/16" Flat Washers (8), a 1/2" x 3/8" Spacer (51) and a 5/16" Nylock Nut (2). Attach a 7" Handle (47) with a Handgrip (48) to the other Arm (46) in the same manner. 18. Attach a Large "U" Bracket (56) to one of the Arms (46) with a 3/8" x 2 3/4" Bolt (104), 3/8" Flat Washer (9) and 3/8" Jam Nut (6). Grease a 5/16" x 2 1/4" Bolt (33). Attach a Narrow Swivel Bracket (58) to the Large "U" Bracket (56) with the Bolt and 5/16" Nylock Nut (3). Do not overtighten the Nylock Nut; the Narrow Swivel Bracket must be able to swivel freely. Attach a Large "U" Bracket (56) and Narrow Swivel Bracket (58) to the other Arm (46) in the same manner. 17 48 46 49 0 45 46 ,-51 47 -- . 8 c, 33 45 47 48 18 . 33-Grease 58----- )56 • 46 33-Grease ,6 58- 11. . 4.(. . 56 3 . ' - 46 6 -a! 104 19. Attach the Wide Swivel Bracket (71) to the bracket 19 on the side of the Top Frame (67) with the 5/16" x 3 1/4" Bolt (105) and a 5/16" Nylock Nut (3). Do not overtighten the Nylock Nut; the Wide Swivel Bracket must be able to swivel freely. 0 67 105 . ° 71 o . 3 4 r.. 9
-
 1
1 -
2
-
3
-
 4
4 -
 5
5 -
 6
6 -
 7
7 -
 8
8 -
 9
9 -
 10
10 -
 11
11 -
 12
12 -
 13
13 -
 14
14 -
15
-
16
-
17
-
18
-
19
-
20
 |
 |
