Weider Cobra 1000 English Manual - Page 5
Stabiliser
 |
View all Weider Cobra 1000 manuals
Add to My Manuals
Save this manual to your list of manuals |
Page 5 highlights
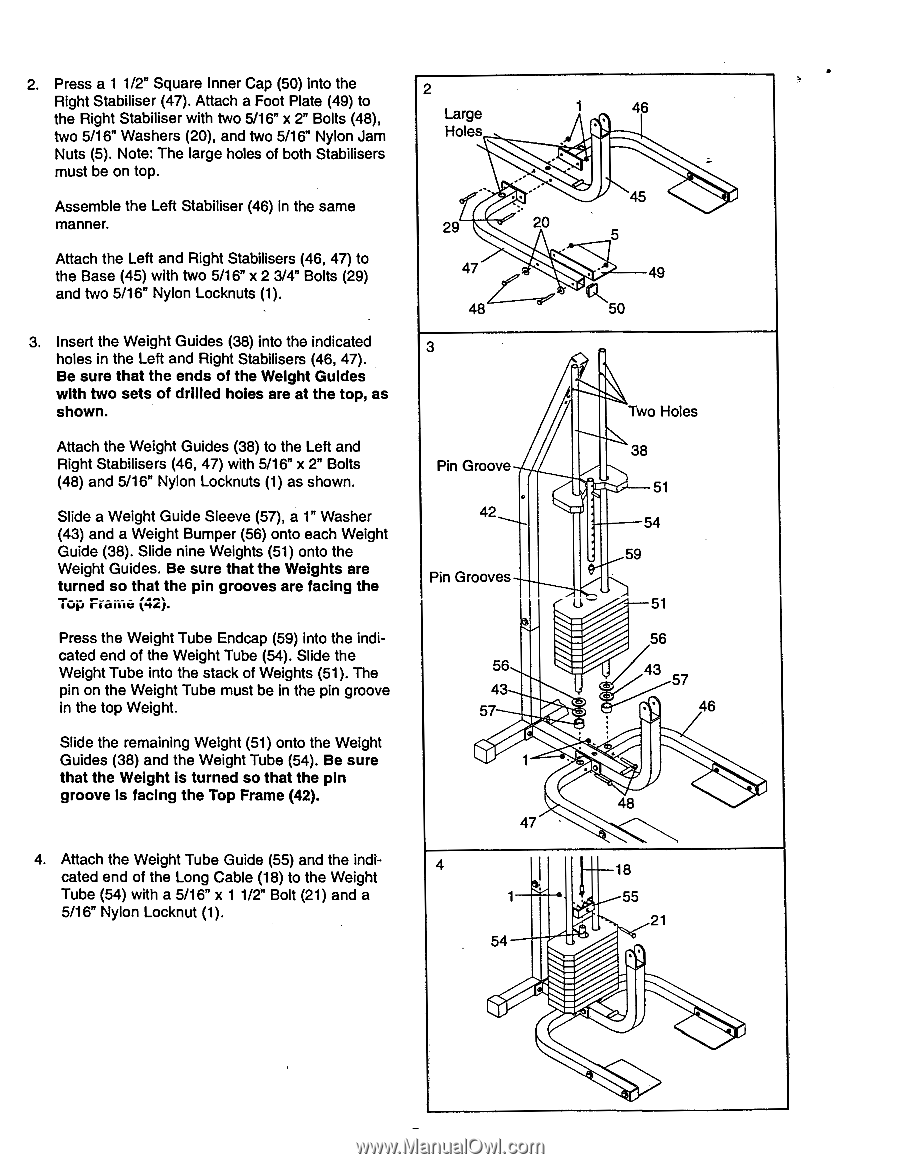
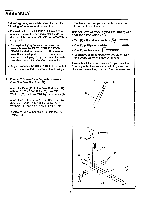
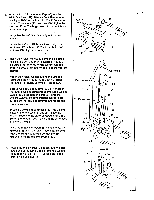
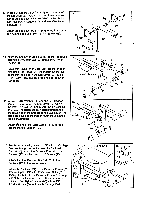
2. Press a 1 1/2" Square Inner Cap (50) into the Right Stabiliser (47). Attach a Foot Plate (49) to the Right Stabiliser with two 5/16" x 2" Bolts (48), two 5/16" Washers (20), and two 5/16" Nylon Jam Nuts (5). Note: The large holes of both Stabilisers must be on top. Assemble the Left Stabiliser (46) in the same manner. Attach the Left and Right Stabilisers (46, 47) to the Base (45) with two 5/16" x 2 3/4" Bolts (29) and two 5/16" Nylon Locknuts (1). 3. Insert the Weight Guides (38) into the indicated holes in the Left and Right Stabilisers (46, 47). Be sure that the ends of the Weight Guides with two sets of drilled holes are at the top, as shown. Attach the Weight Guides (38) to the Left and Right Stabilisers (46, 47) with 5/16" x 2" Bolts (48) and 5/16" Nylon Locknuts (1) as shown. Slide a Weight Guide Sleeve (57), a 1" Washer (43) and a Weight Bumper (56) onto each Weight Guide (38). Slide nine Weights (51) onto the Weight Guides. Be sure that the Weights are turned so that the pin grooves are facing the Top Fraiiie (42). Press the Weight Tube Endcap (59) into the indicated end of the Weight Tube (54). Slide the Weight Tube into the stack of Weights (51). The pin on the Weight Tube must be in the pin groove in the top Weight. Slide the remaining Weight (51) onto the Weight Guides (38) and the Weight Tube (54). Be sure that the Weight is turned so that the pin groove is facing the Top Frame (42). 4. Attach the Weight Tube Guide (55) and the indicated end of the Long Cable (18) to the Weight Tube (54) with a 5/16" x 1 1/2" Bolt (21) and a 5/16" Nylon Locknut (1). 2 Large Holes 29 20 47 48 3 Pin Groove 42 Pin Grooves 56 43 57 47 4 54 46 45 5 49 50 Two Holes 38 51 54 59 51 56 43 57 • 46 48 18 55 21
-
 1
1 -
 2
2 -
 3
3 -
 4
4 -
 5
5 -
 6
6 -
 7
7 -
 8
8 -
 9
9 -
 10
10 -
 11
11 -
12
-
13
-
14
-
15
-
16
-
17
-
18
-
19
-
20
 |
 |