Weider Cobra 1000 English Manual - Page 6
Locknut
 |
View all Weider Cobra 1000 manuals
Add to My Manuals
Save this manual to your list of manuals |
Page 6 highlights
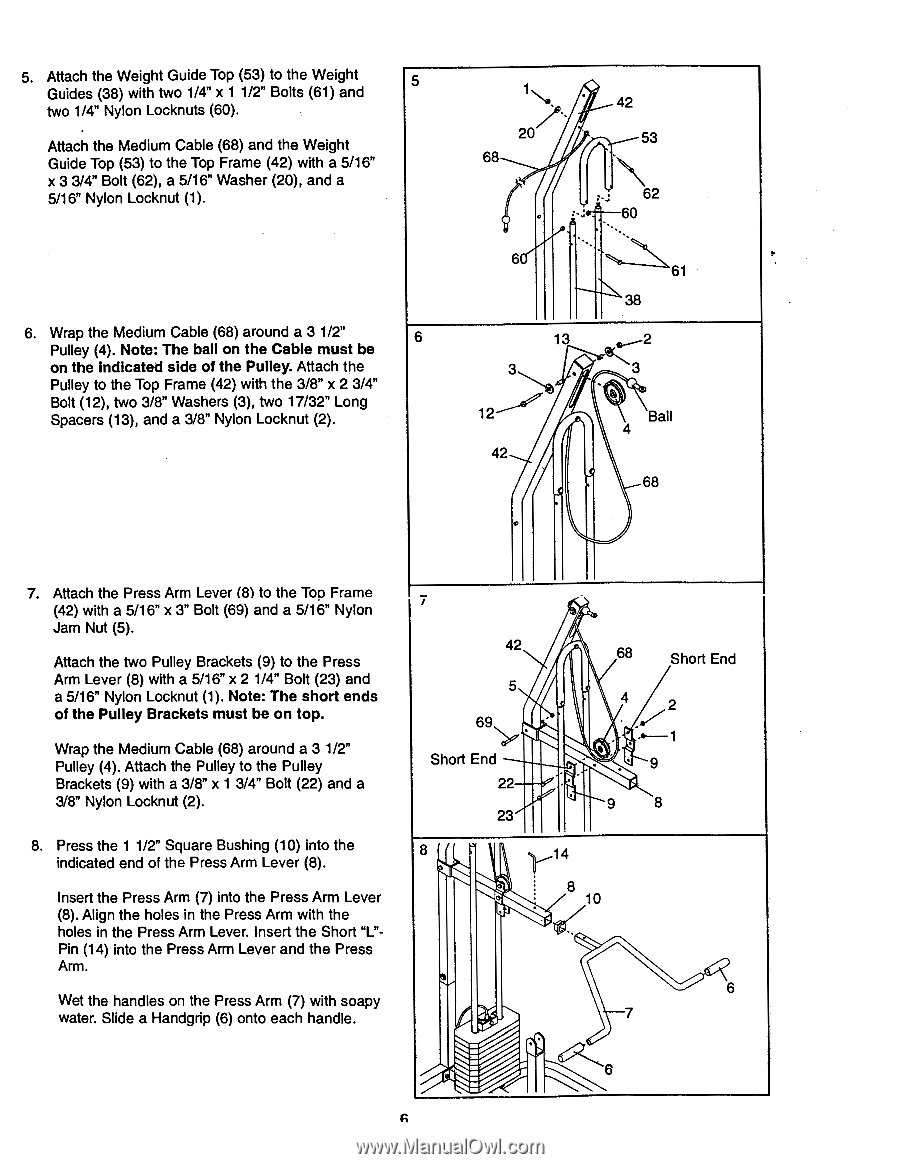
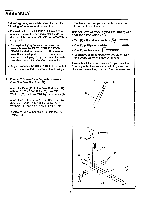
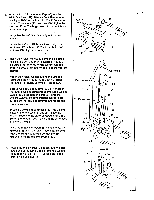
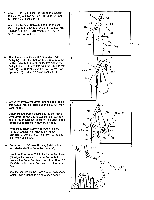
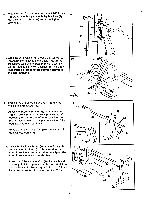
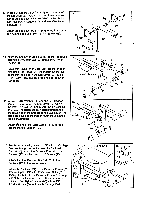
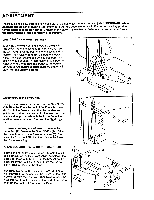
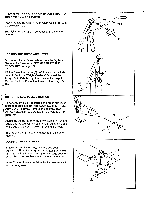
5. Attach the Weight Guide Top (53) to the Weight 5 Guides (38) with two 1/4" x 1 1/2" Bolts (61) and two 1/4" Nylon Locknuts (60). Attach the Medium Cable (68) and the Weight Guide Top (53) to the Top Frame (42) with a 5/16" x 3 3/4" Bolt (62), a 5/16" Washer (20), and a 5/16" Nylon Locknut (1). 6. Wrap the Medium Cable (68) around a 3 1/2" 6 Pulley (4). Note: The ball on the Cable must be on the Indicated side of the Pulley. Attach the Pulley to the Top Frame (42) with the 3/8" x 2 3/4" Bolt (12), two 3/8" Washers (3), two 17/32" Long Spacers (13), and a 3/8" Nylon Locknut (2). 1 . 20 68 . f 42 53 • 62 . . ' '.1. 60 . . .... 61 38 13 3\ . 0.__-2 3 12 42 . Ball 4 68 7. Attach the Press Arm Lever (8) to the Top Frame (42) with a 5/16" x 3" Bolt (69) and a 5/16" Nylon Jam Nut (5). Attach the two Pulley Brackets (9) to the Press Arm Lever (8) with a 5/16" x 2 1/4" Bolt (23) and a 5/16" Nylon Locknut (1). Note: The short ends of the Pulley Brackets must be on top. Wrap the Medium Cable (68) around a 3 1/2" Pulley (4). Attach the Pulley to the Pulley Brackets (9) with a 3/8" x 1 3/4" Bolt (22) and a 3/8" Nylon Locknut (2). 8. Press the 1 1/2" Square Bushing (10) into the indicated end of the Press Arm Lever (8). Insert the Press Arm (7) into the Press Arm Lever (8). Align the holes in the Press Arm with the holes in the Press Arm Lever. Insert the Short "L"Pin (14) into the Press Arm Lever and the Press Arm. Wet the handles on the Press Arm (7) with soapy water. Slide a Handgrip (6) onto each handle. g 7 42 68 Short End 5 69 . - 4 2 . 1 Short End •. 9 22 .9 8 23 8 -----14 0 . 8 10 6 7 6
-
 1
1 -
 2
2 -
 3
3 -
 4
4 -
 5
5 -
 6
6 -
 7
7 -
 8
8 -
 9
9 -
 10
10 -
 11
11 -
 12
12 -
13
-
14
-
15
-
16
-
17
-
18
-
19
-
20
 |
 |