Weider Pro 450 English Manual - Page 10
Attach the Curl Pad 44 to the Curl Post 42
 |
View all Weider Pro 450 manuals
Add to My Manuals
Save this manual to your list of manuals |
Page 10 highlights
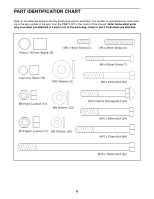
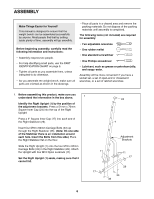
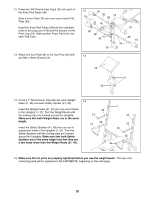
12. Press two 3/4" Round Inner Caps (35) into each of the three Pad Tubes (38). Slide a Foam Pad (10) onto one end of each Pad Tube (38). Insert the three Pad Tubes (38) into the indicated holes in the Leg Lever (18) and the bracket on the Front Leg (19). Slide another Foam Pad (10) onto each Pad Tube. 13. Attach the Curl Pad (44) to the Curl Post (42) with two M6 x 16mm Screws (3). 12 35 10 38 19 35 18 35 38 35 35 10 10 38 10 13 44 3 42 14. Press a 1" Round Inner Cap (32) into each Weight 14 Rest (21, 46) and each Safety Spotter (41, 45). Insert the Weight Rests (21, 46) into one set of holes in the Uprights (1, 37). Turn the Weight Rests until the locking clips are hooked around the Uprights. Make sure that both Weight Rests are at the same height. 32 21 32 41 1 37 32 Insert the Safety Spotters (41, 45) into one set of adjustment holes in the Uprights (1, 37). Turn the Safety Spotters until the locking clips are hooked around the Uprights. Make sure that both Safety Spotters are at the same height and that they are a few holes lower than the Weight Rests (21, 46). 46 32 45 15. Make sure that all parts are properly tightened before you use the weight bench. The use of all remaining parts will be explained in ADJUSTMENTS, beginning on the next page. 10
-
 1
1 -
2
-
3
-
4
-
 5
5 -
 6
6 -
 7
7 -
 8
8 -
 9
9 -
 10
10 -
 11
11 -
 12
12 -
 13
13 -
 14
14 -
 15
15 -
16
-
17
-
18
 |
 |
