Weider Pro 9300 English Manual - Page 16
Pulley 82. Attach the Pulley and a Cable
 |
View all Weider Pro 9300 manuals
Add to My Manuals
Save this manual to your list of manuals |
Page 16 highlights
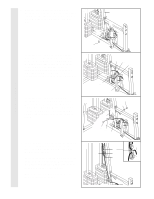
35. Wrap the Press Cable (87) around a 3 1/2" 35 Pulley (82). Attach the Pulley and a Cable Trap (80) to the bracket on the Press Base (13) closest to the Press Upright (4) with a 3/8" x 2" Bolt (50) and a 3/8" Nylon Locknut (42). Be sure that the Cable Trap is turned to hold the Cable in place. 4 87 82 80 42 36. Wrap the Press Cable (87) around a 3 1/2" Pulley (82). Attach the Pulley and a Cable Trap (80) to the other bracket on the Press Base (13) with a 3/8" x 2" Bolt (50) and a 3/8" Nylon Locknut (42). Be sure that the Cable Trap is turned to hold the Cable in place. 13 50 36 80 42 82 87 CABLE ASSEMBLY 37. Attach the end of the Press Cable (87) to the Large "U" Bracket (83) with a 1/4" Washer (37) and a 1/4" Nylon Locknut (44). Do not completely tighten the Nylon Locknut. It should be threaded onto the end of the Cable so only a couple of threads are showing above the Nylon Locknut, as shown in the inset drawing. 37 37 44 50 13 44 37 83 87 38. Identify the High Cable (84)-this is the shortest remaining Cable. Wrap the High Cable around a 3 1/2" Pulley (82). Attach the Pulley to the Top Frame (2) with a 3/8" x 3 3/4" Bolt (76), a 3/8" Washer (38), and a 3/8" Nylon Locknut (42). Wrap the High Cable (84) around another 3 1/2" Pulley (82). Attach the Pulley and a Cable Trap (80) to the Top Frame (2) with a 3/8" x 3 3/4" Bolt (76), a 3/8" Washer (38), and a 3/8" Nylon Jam Nut (43). Be sure that the Cable Trap is positioned to hold the Cable in place. 87 83 38 76 38 42 38 2 80 82 76 82 43 84 16
-
 1
1 -
2
-
3
-
4
-
5
-
6
-
7
-
8
-
9
-
10
-
 11
11 -
 12
12 -
 13
13 -
 14
14 -
 15
15 -
 16
16 -
 17
17 -
 18
18 -
 19
19 -
 20
20 -
 21
21 -
22
-
23
-
24
-
25
-
26
-
27
-
28
-
29
-
30
-
31
-
32
-
33
 |
 |
