Weider Pro 9300 English Manual - Page 19
Seat Assembly
 |
View all Weider Pro 9300 manuals
Add to My Manuals
Save this manual to your list of manuals |
Page 19 highlights
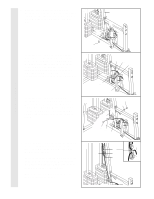
SEAT ASSEMBLY 46. Locate and open the parts bag labeled 46 "SEAT ASSEMBLY." Attach the Small Backrest (18) to the Ab Upright (1) with two 1/4" Washers (37) and two 1/4" x 2 1/2" Machine Screws (64). 1 37 64 47. Press a 1 1/2" Square Inner Cap (57) into the Rear Seat Frame (16). Insert a 1/4" x 2" Carriage Bolt (61) through the center hole in a Seat Plate (41). Attach the Seat Plate to the Seat (17) with two 1/4" x 3/4" Screws (59). Insert the 1/4" x 2" Carriage Bolt (61) through the indicated hole in the Rear Seat Frame (16). Attach a 1/4" Washer (37) and a 1/4" Nylon Locknut (44) onto the Carriage Bolt. Attach the other end of the Seat (17) to the Rear Seat Frame (16) with a 1/4" Washer (37) and a 1/4" x 2" Machine Screw (63). 48. Press a 1 1/2" Square Inner Cap (57) into the Leg Lever (15). Lubricate the 5/16" x 2 1/4" Bolt (62). Attach the Leg Lever (15) to the Rear Seat Frame (16) with the Bolt and a 5/16" Nylon Locknut (40). Do not over tighten the Nylon Locknut; the Leg Lever must pivot freely. Insert the 3/8" x 2" Eyebolt (79) into the Leg Lever (15) from the direction shown. Tighten a 3/8" Nylon Locknut (42) and a 3/8" Washer (38) onto the Eyebolt. 49. Rest the slot in the Rear Seat Frame (16) on the indicated post in the Ab Upright (1). Attach the Rear Seat Frame to the Ab Upright with a 5/16" x 2 3/4" Carriage Bolt (77), 5/16" Washer (20) and the Seat Knob (30). 18 47 17 61 57 41 59 16 37 63 44 48 40 15 38 42 49 16 Lubricate 62 79 57 20 30 16 1 77 Post Slot 19
-
 1
1 -
2
-
3
-
4
-
5
-
6
-
7
-
8
-
9
-
10
-
11
-
12
-
13
-
 14
14 -
 15
15 -
 16
16 -
 17
17 -
 18
18 -
 19
19 -
 20
20 -
 21
21 -
 22
22 -
 23
23 -
 24
24 -
25
-
26
-
27
-
28
-
29
-
30
-
31
-
32
-
33
 |
 |
