Weider X2 Uk Manual - Page 11
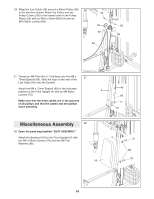
Lubricate an M10 x 80mm Bolt 56. Attach the Butterfly
 |
View all Weider X2 manuals
Add to My Manuals
Save this manual to your list of manuals |
Page 11 highlights
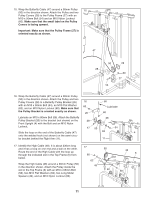
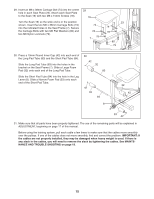
15. Wrap the Butterfly Cable (47) around a 90mm Pulley 15 (50) in the direction shown. Attach the Pulley and two Pulley Covers (28) to the Pulley Frame (27) with an M10 x 50mm Bolt (54) and an M10 Nylon Locknut (60). Make sure that the small label on the Pulley Covers is facing upward. Important: Make sure that the Pulley Frame (27) is oriented exactly as shown. 47 50 28 28 60 27 54 16. Wrap the Butterfly Cable (47) around a 90mm Pulley (50) in the direction shown. Attach the Pulley and two Pulley Covers (28) to a Butterfly Pulley Bracket (26) 16 with an M10 x 50mm Bolt (54), an M10 Flat Washer 60 (62), and an M10 Nylon Locknut (60). Make sure that the Pulley Bracket is oriented exactly as shown. 26 56 Lubricate 60 Lubricate an M10 x 80mm Bolt (56). Attach the Butterfly 28 Pulley Bracket (26) to the bracket (not shown) on the 28 Front Upright (4) with the Bolt and an M10 Nylon Locknut. 47 50 54 Slide the loop on the end of the Butterfly Cable (47) 62 4 onto the welded hook (not shown) on the semi-circu- lar bracket behind the Right Arm (11). 11 17. Identify the High Cable (48). It is about 236cm long and it has a loop on one end and a ball on the other. Route the end of the High Cable with the loop up through the indicated slot in the Top Frame (6) from below. 17 60 62 50 Slot 48 6 Wrap the High Cable (48) around a 90mm Pulley (50) in the direction shown. Attach the Pulley inside the slot in the Top Frame (6) with an M10 x 65mm Bolt (58), two M10 Flat Washers (62), two Long Metal Spacers (49), and an M10 Nylon Locknut (60). 49 62 58 11
-
 1
1 -
2
-
3
-
4
-
5
-
 6
6 -
 7
7 -
 8
8 -
 9
9 -
 10
10 -
 11
11 -
 12
12 -
 13
13 -
 14
14 -
 15
15 -
 16
16 -
17
-
18
-
19
-
20
-
21
-
22
-
23
-
24
-
25
 |
 |
