Weider X2 Uk Manual - Page 14
Miscellaneous Assembly
 |
View all Weider X2 manuals
Add to My Manuals
Save this manual to your list of manuals |
Page 14 highlights
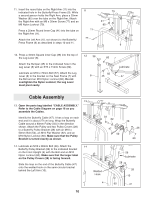
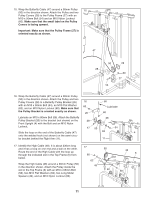
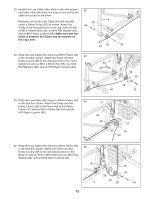
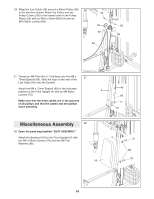
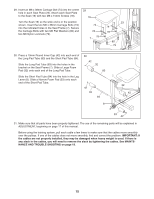
26. Wrap the Low Cable (40) around a 90mm Pulley (50) 26 in the direction shown. Attach the Pulley and two Pulley Covers (28) to the lowest holes in the Pulley Plates (25) with an M10 x 50mm Bolt (54) and an M10 Nylon Locknut (60). 54 28 50 40 25 60 28 27. Thread an M8 Plain Nut (71) halfway onto the M8 x 27 75mm Eyebolt (69). Slide the loop on the end of the Low Cable (40) onto the Eyebolt. Attach the M8 x 75mm Eyebolt (69) to the indicated bracket on the Front Upright (4) with an M8 Nylon Locknut (70). 40 4 69 Make sure that the three cables are in the grooves of all pulleys and that the cables and the pulleys move smoothly. 71 70 Miscellaneous Assembly 28 28. Open the parts bag labelled "SEAT ASSEMBLY." Attach the Backrest (18) to the Front Upright (4) with 4 two M6 x 65mm Screws (76) and two M6 Flat Washers (80). 18 76 80 76 14
-
 1
1 -
2
-
3
-
4
-
5
-
6
-
7
-
8
-
 9
9 -
 10
10 -
 11
11 -
 12
12 -
 13
13 -
 14
14 -
 15
15 -
 16
16 -
 17
17 -
 18
18 -
 19
19 -
20
-
21
-
22
-
23
-
24
-
25
 |
 |
