Weider X2 Uk Manual - Page 6
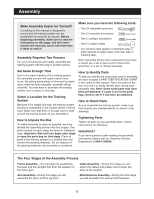
Frame Assembly
 |
View all Weider X2 manuals
Add to My Manuals
Save this manual to your list of manuals |
Page 6 highlights
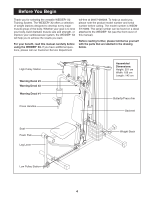
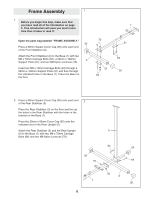
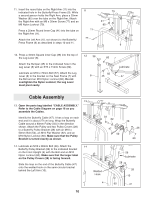
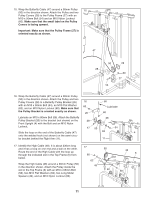
Frame Assembly 1 1. Before you begin this step, make sure that you have read all of the information on page 5. This introduction will save you much more time than it takes to read it! Open the parts bag labelled "FRAME ASSEMBLY." 35 Press a 50mm Square Cover Cap (35) onto each end of the Front Stabiliser (2). Attach the Front Stabiliser (2) to the Base (1) with two M8 x 70mm Carriage Bolts (64), a 50mm x 102mm 2 Support Plate (21), and two M8 Nylon Locknuts (70). Insert two M8 x 70mm Carriage Bolts (64) through a 50mm x 102mm Support Plate (21) and then through the indicated holes in the Base (1). Place the Base on the floor. 70 21 64 1 21 64 35 2. Press a 50mm Square Cover Cap (35) onto each end 2 of the Rear Stabiliser (3). Place the Rear Stabiliser (3) on the floor and line up the holes in the Rear Stabiliser with the holes in the bracket on the Base (1). Press the 25mm x 50mm Cover Cap (53) onto the indicated end of the Rear Upright (5). Attach the Rear Stabiliser (3) and the Rear Upright 5 (5) to the Base (1) with two M8 x 70mm Carriage Bolts (64) and two M8 Nylon Locknuts (70). 64 53 35 70 64 1 6 70 3 35
-
 1
1 -
 2
2 -
 3
3 -
 4
4 -
 5
5 -
 6
6 -
 7
7 -
 8
8 -
 9
9 -
 10
10 -
 11
11 -
 12
12 -
13
-
14
-
15
-
16
-
17
-
18
-
19
-
20
-
21
-
22
-
23
-
24
-
25
 |
 |
