Whirlpool KDSS907SSS Installation Instructions - Page 18
Replace Oven Racks and Warming Drawer, Complete Installation - lowes
 |
View all Whirlpool KDSS907SSS manuals
Add to My Manuals
Save this manual to your list of manuals |
Page 18 highlights
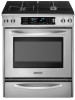
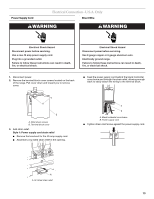
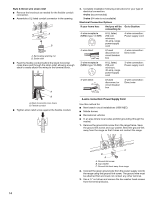
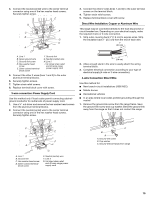
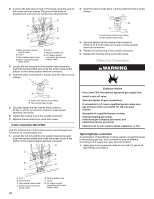
Check Operation of Cooktop Burners Standard Surface Burners Push in and turn each control knob to the "LITE" position. The flame should light within 4 seconds. The first time a burner is lit it may take longer that 4 seconds to light because of air in the gas line. TripleTier® Flame Burner To start simmer burner: Push in and turn control knob to "LITE." The flame should light within 4 seconds. The first time a burner is lit it may take longer that 4 seconds to light because of air in the gas line. To start power burner: Push in control knob again and turn to "POWER BURNER HI" to light the outer burner. The flame should light within 4 seconds. The first time a burner is lit it may take longer that 4 seconds to light because of air in the gas line. If burners do not light properly: ■ Turn cooktop control knob to the "OFF" position. ■ Check that the range is plugged in and the circuit breaker has not tripped or the household fuse has not blown. ■ Check that the gas shutoff valves are set to the "open" position. ■ Check that burner caps are properly positioned on burner bases. Repeat start-up. If a burner does not light at this point, turn control knobs to "Off" and contact your dealer or authorized service company for assistance. Adjust Flame Height Adjust the height of top burner flames. The cooktop "low" burner flame should be a steady blue flame approximately ¼" (0.64 cm) high. If the "low" flame needs to be adjusted: 1. Remove the control knob. 2. Hold the knob stem with a pair of pliers. Use a small flat- blade screwdriver to turn the screw located in the center of the control knob stem until the flame is the proper size. 3. Replace the control knob. 4. Test the flame by turning the control from "LO" to "HI," checking the flame at each setting. To adjust TripleTier® Flame burner: 1. Remove the control knob. 2. Insert a flat-blade screwdriver into adjustment locations shown in the following illustration and engage the slotted screw. Turn the screw until the flame is the proper size. A B A. Simmer burner regulation B. Power burner regulation 3. Replace the control knob. 4. Test the flame by turning the control from "LO" to "HI," checking the flame at each setting. Replace Oven Racks and Warming Drawer Replace oven racks in oven cavity. Replace warming drawer or storage drawer. To Replace Warming Drawer: 1. Align the drawer glides with the receiving guides. A B A. Low flame B. High flame To adjust standard burners: The flame can be adjusted using the adjustment screw in the center of the valve stem. The valve stem is located directly underneath the control knob. A A. Valve stem 18 2. Push drawer in all the way. Gently open and close the drawer to ensure it is seated properly on the slides. Complete Installation 1. Check that all parts are now installed. If there is an extra part, go back through the steps to see which step was skipped. 2. Check that you have all of your tools. 3. Dispose of/recycle all packaging materials. 4. Check that range level. See "Level Range." 5. Use a mild solution of liquid household cleaner and warm water to remove waxy residue caused by protective shipping material. Dry thoroughly with a soft cloth. For more information, see the "Range Care" section of the Use and Care Guide. 6. Read "Range Use" in the Use and Care Guide. 7. Turn on surface burners and oven. See the Use and Care Guide for specific instruction on range operation.
-
 1
1 -
2
-
3
-
4
-
5
-
6
-
7
-
8
-
9
-
10
-
11
-
12
-
 13
13 -
 14
14 -
 15
15 -
 16
16 -
 17
17 -
 18
18 -
 19
19 -
 20
20 -
 21
21 -
 22
22 -
 23
23 -
24
-
25
-
26
-
27
-
28
-
29
-
30
-
31
-
32
-
33
-
34
-
35
-
36
-
37
-
38
-
39
-
40
 |
 |