Whirlpool RS675PXGT Use and Care Guide - Page 29
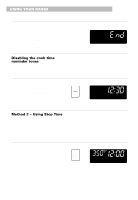
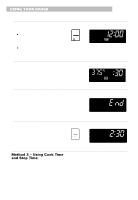
Set temperature optional., Press STOP TIME., Set stop time., Start oven
 |
View all Whirlpool RS675PXGT manuals
Add to My Manuals
Save this manual to your list of manuals |
Page 29 highlights
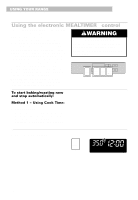
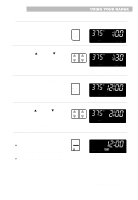
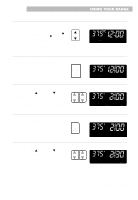
USING YOUR RANGE 3. Set temperature (optional). Do this step if you want to set a temperature other than 350°F. Press v to raise the temperature or w to lower the temperature in 5°F amounts. Use this pad until the desired temperature shows on the small display. (If the Temp pad is held down, the temperature will change faster.) PRESS TEMP 4. Press STOP TIME. PRESS STOP TIME YOU SEE F BAKE (example shows Bake at 375°F [or 191°C]) YOU SEE F BAKE STOP TIME 5. Set stop time. PRESS Press the "up" (v) or "down" (w) pad(s) until the correct time shows on the display. HR MIN Example at right shows a desired stop time of 2 o'clock. This provides a 2-hour cook time (the difference between the time of day and the stop time). YOU SEE F BAKE STOP TIME (example shows 2 o'clock stop time) 6. Start oven. NOTES: • You can change the temperature or time settings any time after pressing START/ENTER by repeating Steps 2 through 5. • The display will show "door" and the heating elements will not heat if the door is open when you try to bake/roast. • When you press START/ENTER, the display will count down the baking/ roasting time in hours and minutes (if cook time is more than 1 hour) or in minutes and seconds (if cook time is less than 1 hour). PRESS START ENTER 5 SEC YOU SEE HEAT TIMED F BAKE ON COOK TIME continued on next page 29
-
 1
1 -
2
-
3
-
4
-
5
-
6
-
7
-
8
-
9
-
10
-
11
-
12
-
13
-
14
-
15
-
16
-
17
-
18
-
19
-
20
-
21
-
22
-
23
-
 24
24 -
 25
25 -
 26
26 -
 27
27 -
 28
28 -
 29
29 -
 30
30 -
 31
31 -
 32
32 -
 33
33 -
 34
34 -
35
-
36
-
37
-
38
-
39
-
40
-
41
-
42
-
43
-
44
-
45
-
46
-
47
-
48
-
49
-
50
-
51
-
52
-
53
-
54
-
55
-
56
 |
 |
