Whirlpool RS675PXGT Use and Care Guide - Page 39
Before setting the controls, USING THE SELF-CLEANING CYCLE
 |
View all Whirlpool RS675PXGT manuals
Add to My Manuals
Save this manual to your list of manuals |
Page 39 highlights
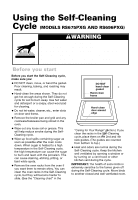
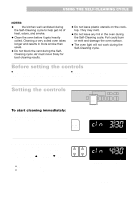
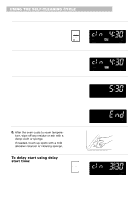
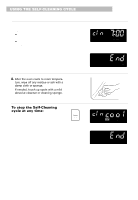
USING THE SELF-CLEANING CYCLE NOTES: • Keep the kitchen well ventilated during the Self-Cleaning cycle to help get rid of heat, odors, and smoke. • Clean the oven before it gets heavily soiled. Cleaning a very soiled oven takes longer and results in more smoke than usual. • Do not block the vent during the Self- Cleaning cycle. Air must move freely for best cleaning results. • Do not leave plastic utensils on the cook- top. They may melt. • Do not leave any foil in the oven during the Self-Cleaning cycle. Foil could burn or melt and damage the oven surface. • The oven light will not work during the Self-Cleaning cycle. Before setting the controls •Make sure clock is set to correct time of day. (See the "Setting the clock" section.) •Make sure the oven door is completely closed. Setting the controls ELECTRONIC OVEN CONTROL TIMER TIMER SET OFF CLOCK LIGHT BAKE CUSTOM TEMP BROIL AUTO CLEAN COOK TIME DELAY START TIME STOP TIME HR MIN START ENTER 5 SEC OFF CANCEL To start cleaning immediately: 1. Press AUTO CLEAN. A 31⁄2-hour Self-Cleaning cycle will be set automatically. PRESS AUTO CLEAN YOU SEE CLEAN TIME 2. Set cleaning time (optional). If you want a Self-Cleaning cycle longer or shorter than 31⁄2 hours, use the Hour pad to set the desired cleaning time. Press the "up" (s) or "down" (t) pad(s) until a time between 21⁄2-41⁄2 hours shows on the display. • Use 21⁄2 hours for light soil. • Use 31⁄2-41⁄2 hours for moderate to heavy soil. PRESS YOU SEE HR MIN CLEAN TIME (example for 41⁄2-hour cycle) continued on next page 39
-
 1
1 -
2
-
3
-
4
-
5
-
6
-
7
-
8
-
9
-
10
-
11
-
12
-
13
-
14
-
15
-
16
-
17
-
18
-
19
-
20
-
21
-
22
-
23
-
24
-
25
-
26
-
27
-
28
-
29
-
30
-
31
-
32
-
33
-
 34
34 -
 35
35 -
 36
36 -
 37
37 -
 38
38 -
 39
39 -
 40
40 -
 41
41 -
 42
42 -
 43
43 -
 44
44 -
45
-
46
-
47
-
48
-
49
-
50
-
51
-
52
-
53
-
54
-
55
-
56
 |
 |