Whirlpool WEG730H0DS Installation Guide - Page 14
Remove/Replace Drawer, Oven Door - model
 |
View all Whirlpool WEG730H0DS manuals
Add to My Manuals
Save this manual to your list of manuals |
Page 14 highlights
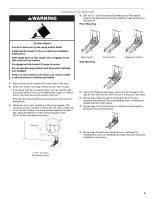
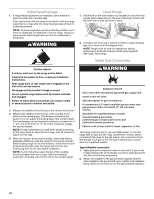
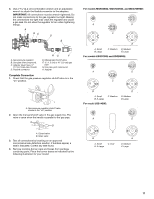
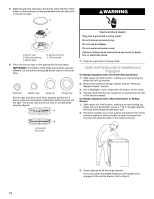
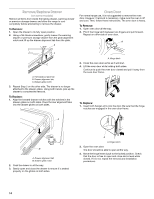
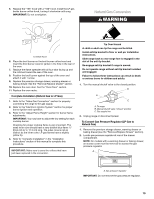
Remove/Replace Drawer (on some models) Remove all items from inside the baking drawer, warming drawer or premium storage drawer, and allow the range to cool completely before attempting to remove the drawer. To Remove: 1. Open the drawer to its fully open position. 2. Using a flat-blade screwdriver, gently loosen the warming drawer or premium storage drawer from the glide alignment notch and lift up the drawer alignment tab from the glide. A Oven Door For normal range use, it is not suggested to remove the oven door. However, if removal is necessary, make sure the oven is off and cool. Then, follow these instructions. The oven door is heavy. To Remove: 1. Open oven door all the way. 2. Pinch the hinge latch between two fingers and pull forward. Repeat on other side of oven door. A B C A. Flat-blade screwdriver B. Drawer alignment tab C. Drawer glide notch 3. Repeat Step 2 on the other side. The drawer is no longer attached to the drawer glides. Using both hands, pick up the drawer to complete the removal. To Replace: 1. Align the forward drawer notches with the notches in the drawer glides on both sides. Place the rear alignment tabs into the drawer glides on both sides. A. Hinge latch 3. Close the oven door as far as it will shut. 4. Lift the oven door while holding both sides. Continue to push the oven door closed and pull it away from the oven door frame. To Replace: 1. Insert both hanger arms into the door. Be sure that the hinge notches are engaged in the oven door frame. A B A. Drawer alignment tab B. Drawer glide notch 2. Push the drawer in all the way. 3. Gently open and close the drawer to ensure it is seated properly on the glides on both sides. A A. Hinge notch 2. Open the oven door. The door should be able to open all the way. 3. Move the hinge levers back to the locked position. Check that the door is free to open and close and is level while closed. If it is not, repeat the removal and installation procedures. 14
-
 1
1 -
2
-
3
-
4
-
5
-
6
-
7
-
8
-
 9
9 -
 10
10 -
 11
11 -
 12
12 -
 13
13 -
 14
14 -
 15
15 -
 16
16 -
 17
17 -
 18
18 -
 19
19 -
20
-
21
-
22
-
23
-
24
-
25
-
26
-
27
-
28
-
29
-
30
-
31
-
32
-
33
-
34
-
35
-
36
-
37
-
38
-
39
-
40
-
41
-
42
-
43
-
44
-
45
-
46
-
47
-
48
 |
 |
