Xerox N2125 User Guide - Page 113
Ready, Replacing the Laser Print Cartridge, Maintaining the Printer
 |
UPC - 095205010176
View all Xerox N2125 manuals
Add to My Manuals
Save this manual to your list of manuals |
Page 113 highlights
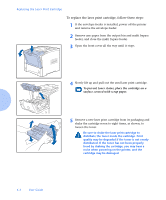
Replacing the Laser Print Cartridge 6 Place the cartridge on a flat surface, hold it firmly with one hand and with the other hand grasp the end tab of the sealing tape and pull the tape straight out horizontally. If pulled at an angle, the tape may break. After pulling out the tape, do not shake the cartridge or subject it to shocks. 7 Holding the cartridge as shown, lower it into the printer, inserting the cartridge's two projecting parts into the printer's guide channels. Be sure to push the cartridge all the way into the printer. 8 Slowly close the front cover. Press the center part of the top cover until it latches into place. 9 If the envelope feeder was removed, reinstall it and power on the printer. 10 Check the Control Panel display. Wait until Ready is displayed. If an error message appears, refer to Table 5.1 on page 5-4 for instructions. 11 Recycle the used cartridge using the packaging from the new cartridge, following the directions provided. Chapter 4: Maintaining the Printer y 4-5
-
 1
1 -
2
-
3
-
4
-
5
-
6
-
7
-
8
-
9
-
10
-
11
-
12
-
13
-
14
-
15
-
16
-
17
-
18
-
19
-
20
-
21
-
22
-
23
-
24
-
25
-
26
-
27
-
28
-
29
-
30
-
31
-
32
-
33
-
34
-
35
-
36
-
37
-
38
-
39
-
40
-
41
-
42
-
43
-
44
-
45
-
46
-
47
-
48
-
49
-
50
-
51
-
52
-
53
-
54
-
55
-
56
-
57
-
58
-
59
-
60
-
61
-
62
-
63
-
64
-
65
-
66
-
67
-
68
-
69
-
70
-
71
-
72
-
73
-
74
-
75
-
76
-
77
-
78
-
79
-
80
-
81
-
82
-
83
-
84
-
85
-
86
-
87
-
88
-
89
-
90
-
91
-
92
-
93
-
94
-
95
-
96
-
97
-
98
-
99
-
100
-
101
-
102
-
103
-
104
-
105
-
106
-
107
-
 108
108 -
 109
109 -
 110
110 -
 111
111 -
 112
112 -
 113
113 -
 114
114 -
 115
115 -
 116
116 -
 117
117 -
 118
118 -
119
-
120
-
121
-
122
-
123
-
124
-
125
-
126
-
127
-
128
-
129
-
130
-
131
-
132
-
133
-
134
-
135
-
136
-
137
-
138
-
139
-
140
-
141
-
142
-
143
-
144
-
145
-
146
-
147
-
148
-
149
-
150
-
151
-
152
-
153
-
154
-
155
-
156
-
157
-
158
-
159
-
160
-
161
-
162
-
163
-
164
-
165
-
166
-
167
-
168
-
169
-
170
-
171
-
172
-
173
-
174
-
175
-
176
 |
 |
