Yamaha AW4416 Additions And Changes In Version 1.2, 1.3
Yamaha AW4416 Manual
 |
View all Yamaha AW4416 manuals
Add to My Manuals
Save this manual to your list of manuals |
Yamaha AW4416 manual content summary:
- Yamaha AW4416 | Additions And Changes In Version 1.2, 1.3 - Page 1
fications that have been added or changed in AW4416 version 1.2 and 1.3. Please also refer to the pages of the Operation Guide / Reference Guide as specified within the various topics of this manual. The functions added or changed in version 1.3 are "Mastering" and "Defrag." The rest are additions or - Yamaha AW4416 | Additions And Changes In Version 1.2, 1.3 - Page 2
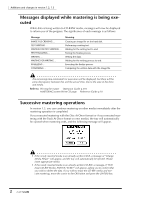
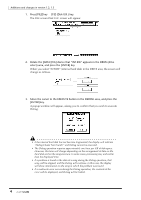
due to the state of the drive and media. Refer to: Writing the master → Operation Guide p.259 MASTERING screen Write CD page → Reference Guide p.10 Successive mastering operations In version 1.3, you can continue mastering on other media immediately after the mastering operation is completed. If you - Yamaha AW4416 | Additions And Changes In Version 1.2, 1.3 - Page 3
end. Refer to: Writing the master → Operation Guide p.259 MASTERING screen Write CD page → Reference Guide p.10 Defrag the internal hard disk A "Defrag" function that defragments the internal hard disk has been added to the FILE screen Disk Util. page. Ì About the Defrag function When you record on - Yamaha AW4416 | Additions And Changes In Version 1.2, 1.3 - Page 4
the DRIVE (drive select) area, and press the [ENTER] key. When you select "INT.IDE" (internal hard disk) in the DRIVE area hard disk and on the song structure. In some cases, processing may end earlier than the displayed time. • If a problem is found in the data of a song during the Defrag operation - Yamaha AW4416 | Additions And Changes In Version 1.2, 1.3 - Page 5
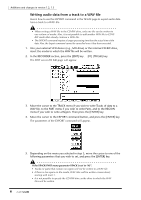
. page with the FORMAT field type set to ORIGINAL. For details refer to Operation Guide p.251 and p.253. In the case of a CD-RW, all previously-existing data will be erased when the data is written. In order to write a WAV file, the song and hard disk must contain work area that is equal to or longer - Yamaha AW4416 | Additions And Changes In Version 1.2, 1.3 - Page 6
the internal CD-RW drive, insert the media to which the WAV file will be written. 2. In the RECORDER section, press the [EDIT] key → [F1] (TR Edit) key. The EDIT screen TR Edit page will appear. 3. Move the cursor to the TRACK menu if you wish to write Tracks of data to a WAV file, to the PART menu - Yamaha AW4416 | Additions And Changes In Version 1.2, 1.3 - Page 7
monaural WAV file (or a stereo WAV file if the track is paired) will be created. If you select "AL," 16 tracks of monaural WAV files will be created. If you select "ST," a stereo WAV file will be created. r If you selected the PART menu • TRACK Select the track(s) that will be written as a WAV file. The - Yamaha AW4416 | Additions And Changes In Version 1.2, 1.3 - Page 8
the [ENTER] key. The following display will appear. 1 2 1 DRIVE field Select the internal CD-RW drive or an external SCSI device. B FROM If you selected the TRACK/PART menu in step 4, the track number (TR field), virtual track number (V field), and track name (NAME field) will be displayed. If you - Yamaha AW4416 | Additions And Changes In Version 1.2, 1.3 - Page 9
of the EXPORT command. Tip • For details on operations in the NAME EDIT popup window, refer to p.60 of the Operation Guide. • If you selected "AL" for the TRACK parameter, it is not possible to change the filename. • If you are writing to CD-R/RW media, the characters usable in the filename are - Yamaha AW4416 | Additions And Changes In Version 1.2, 1.3 - Page 10
page to write audio data from a desired virtual track to a WAV file. With the difference that you will first access the EDIT screen V.TR Edit page ([EDIT] key → [F2] key) and select a virtual track 1-8 as the object of the operation, the procedure is the same as for the EXPORT command. Refer to the - Yamaha AW4416 | Additions And Changes In Version 1.2, 1.3 - Page 11
the RECORDER section [EDIT] key → [F1] (TR Edit) key. The EDIT screen TR Edit page will appear. 2. If you wish to join the regions of the entire track, move the cursor to the TRACK menu and press the [ENTER] key. If you wish to join only the regions within the selected area (part), move - Yamaha AW4416 | Additions And Changes In Version 1.2, 1.3 - Page 12
track (part) will be joined into one. Region Execute APPEND • When you execute the APPEND command of the PART track (the absolute time zero location) to the last region recorded in the track. Areas for which there is no region will be silent audio data. Ì Joining regions within a virtual track - Yamaha AW4416 | Additions And Changes In Version 1.2, 1.3 - Page 13
[SET] key and press the [IN]/[OUT] key The in/out point will be set at the current pointer location. Refer to: WAVE DISPLAY popup window → Reference Guide p.93 Locate operations → Operation Guide p.115 To locate to the pointer location, move the cursor to the LOCATE button and press the [ENTER] key - Yamaha AW4416 | Additions And Changes In Version 1.2, 1.3 - Page 14
/ marker in the TRACK screen Mark Adj. page has changed. The procedure is as follows. 1. In the RECORDER section, press the [TRACK] key → [F4] (Mark Adj.) key. The TRACK screen Mark Adj. page ([IN]/[OUT] key or [A]/[B] key) will go dark. Refer to: Deleting a locate point → Operation Guide p.125 14 - Yamaha AW4416 | Additions And Changes In Version 1.2, 1.3 - Page 15
to: Tempo Map page → Reference Guide p.5 Use the [REC TRACK SELECT] keys to specify tracks When using the EDIT screen / TR Edit page to edit tracks, you can now use the [REC TRACK SELECT] keys to specify the track number (1-16). In the TR Edit page TRACK/PART menu when a parameter requiring you - Yamaha AW4416 | Additions And Changes In Version 1.2, 1.3 - Page 16
specify the bank (A/B) and pad number (1-8). Refer to: SAMP. PAD screen → Reference Guide p.80 Use pads 1-8 to select a pad track You can now use pads 1-8 to directly turn on/off the recording button for the corresponding pad track (a track used to record/play pad trigger events). To do this - Yamaha AW4416 | Additions And Changes In Version 1.2, 1.3 - Page 17
] key to directly output the signal of the desired track from the MONITOR OUT jacks, the output from the MONITOR OUT jacks will now be stereo only if the stereo track is selected. (Tracks 1-16 will be output in monaural, just as in version 1.0.) Refer to: TRACK [CUE] → Operation Guide p.40, 104 17 - Yamaha AW4416 | Additions And Changes In Version 1.2, 1.3 - Page 18
] key → Operation Guide p.44 Automatic updating of the end point When the length of the song has changed as a result of an editing operation such as deleting or moving a track, the end point is now set automatically to the last location in the song. Refer to: End point → Reference Manual p.97 Use - Yamaha AW4416 | Additions And Changes In Version 1.2, 1.3 - Page 19
the tracks of the AW4416 may not play back at the correct pitch. < Connection example > MTC OUT connector DIGITAL STEREO OUT connector PROFESSIONAL AUDIO WORKSTATION MIDI IN connector DIGITAL STEREO IN connector PROFESSIONAL AUDIO WORKSTATION AW4416 AW4416 Word clock master MTC master Word - Yamaha AW4416 | Additions And Changes In Version 1.2, 1.3 - Page 20
IP 20 Printed in Japan YAMAHA CORPORATION Pro Audio & Digital Musical Instrument Division P.O. Box 3, Hamamatsu, 430-8651, Japan
-
 1
1 -
 2
2 -
 3
3 -
 4
4 -
 5
5 -
 6
6 -
 7
7 -
8
-
9
-
10
-
11
-
12
-
13
-
14
-
15
-
16
-
17
-
18
-
19
-
20
 |
 |

E
Additions and changes
in version 1.2, 1.3
This manual explains the functions and specifications that have been added or
changed in AW4416 version 1.2 and 1.3. Please also refer to the pages of the
Operation Guide / Reference Guide as specified within the various topics of this
manual.
The functions added or changed in version 1.3 are “Mastering” and “Defrag.” The
rest are additions or changes from version 1.2.
Table of Contents
Messages displayed while mastering is being executed
...........................................
2
Successive mastering operations
.............................................................................
2
Defrag the internal hard disk
...................................................................................
3
About the Defrag function
..................................................................................
3
Executing Defrag
................................................................................................
3
Using the EXPORT command to write a WAV file
...................................................
5
Writing audio data from a track to a WAV file
....................................................
6
Writing audio from a virtual track to a WAV file
...............................................
10
Use the APPEND command to join regions
...........................................................
10
Joining regions within a track
...........................................................................
11
Joining regions within a virtual track
................................................................
12
WAVE DISPLAY popup window linked with Locate operations
.............................
13
Changed procedure for deleting a Locate Point or Marker
.....................................
14
Tempo map editing
...............................................................................................
15
Use the [REC TRACK SELECT] keys to specify tracks
..............................................
15
Use the [BANK] key / pads 1–8 to specify a pad
....................................................
16
Use pads 1–8 to select a pad track
........................................................................
16
Changed range for the Rollback Time setting
.........................................................
17
Changed range for the Fade Time setting
...............................................................
17
Lit/dark status of the [UNDO]/[REDO] keys
..........................................................
17
Shortcut for saving the current song
......................................................................
17
Use the TRACK [CUE] key to monitor the stereo track
...........................................
17
Cue/Review function
.............................................................................................
18
Automatic updating of the end point
.....................................................................
18
Use the [SEL] key to temporarily cancel fader grouping
.........................................
18
Synchronized operation as MTC and word clock slave
..........................................
19