Yamaha DGX-202 Owner's Manual - Page 75
Function parameters, CATEGORY, SELECT, Display, Range, Settings, Description
 |
View all Yamaha DGX-202 manuals
Add to My Manuals
Save this manual to your list of manuals |
Page 75 highlights
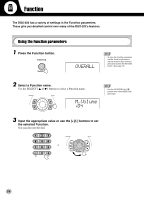
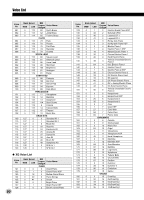
Function G Function parameters CATEGORY SELECT Display Overall Transpose Transpos Tuning Tuning Split Point SplitPnt Touch TouchSns Sensitivity Main Voice Volume Octave Pan M.Volume M.Octave M.Pan Dual Voice Reverb Send Level Chorus Send Level DSP Send Level Voice Volume M.RevLvl M.ChoLvl M.DspLvl D.Voice D.Volume Octave D.Octave Pan D.Pan Split Voice Reverb Send Level Chorus Send Level DSP Send Level Voice Volume D.RevLvl D.ChoLvl D.DspLvl S.Voice S.Volume Octave S.Octave Pan S.Pan Reverb Send Level Chorus Send Level DSP Send Level S.RevLvl S.ChoLvl S.DspLvl Range/ Description Settings -12-12 This determines the transposition of the entire DGX-202 sound. * -100-100 This determines the pitch of the entire DGX-202 sound . * 000-127 This determines the highest key for the Split voice and sets the Split * "point" - in other words, the key that separates the Split (lower) and Main (upper) voices. (The Split voice sounds up to and including the Split Point key.) The default Split Point is 054 (F#2). The Split Point setting and Ac- companiment Split Point setting are automatically set to the same value. 1-3 A setting of "1" results in limited touch response; this setting produces a * relatively narrow dynamic range, no matter how lightly or strongly you play the keys. "2" lets you play over a normal dynamic range (soft to loud), while "3" is designed for playing very soft passages, giving you slightly more detailed control in the soft volume range. When Touch is turned off (page 30), a constant velocity value of 80 is produced (total velocity range = 0-127). 0-127 This determines the volume of the Main voice, letting you create an opti- * mum mix with the Dual or Split voice. -2-2 (octave) This determines the octave range for the Main voice. Use this to set the * most suitable range for the Main voice. 0 (full left)-64 This determines the pan position of the Main voice in the stereo image. * (center) -127 (full right) 0-127 This determines how much of the Main voice's signal is sent to the Re- * verb effect. Higher values result in a louder Reverb effect. 0-127 This determines how much of the Main voice's signal is sent to the Cho- * rus effect. Higher values result in a louder Chorus effect. 0-127 This determines how much of the Main voice's signal is sent to the DSP * effect. Higher values result in a louder DSP effect. 1-605 This select the dual voice. 0-127 This determines the volume of the Dual voice, letting you create an opti- * mum mix with the Main voice. -2-2 (octave) This determines the octave range for the Dual voice. Use this to create * an octave layer with the Main voice. 0 (full left)-64 This determines the pan position of the Dual voice in the stereo image. * (center) -127 (full right) For a spacious sounding effect, set this value at or near 0, and set the Main Voice Pan at the opposite positive value. 0-127 This determines how much of the Dual voice's signal is sent to the Re- * verb effect. Higher values result in a louder Reverb effect for the Dual voice. 0-127 This determines how much of the Dual voice's signal is sent to the Cho- * rus effect. Higher values result in a louder Chorus effect for the Dual voice. 0-127 This determines how much of the Dual voice's signal is sent to the DSP * effect. Higher values result in a louder DSP effect for the Dual voice. 1-605 This select the split voice. 0-127 This determines the volume of the Split voice, letting you create an opti- * mum mix with the Main voice. -2-2 This determines the octave range for the Split voice. Use this to set the * (octave) most suitable range for the Split (lower) voice. 0 (full left)-64 This determines the pan position of the Split voice in the stereo image. * (center) -127 (full right) For a spacious sounding effect, set this value at or near 0, and set the Main Voice Pan at the opposite positive value. 0-127 This determines how much of the Split voice's signal is sent to the Reverb * effect. Higher values result in a louder Reverb effect for the Split voice. 0-127 This determines how much of the Split voice's signal is sent to the Chorus * effect. Higher values result in a louder Chorus effect for the Split voice. 0-127 This determines how much of the Split voice's signal is sent to the DSP * effect. Higher values result in a louder DSP effect for the Split voice. * The "*" mark indicates that the setting can be restored to default value by pressing both [+]/[-] buttons simultaneously. 75
-
 1
1 -
2
-
3
-
4
-
5
-
6
-
7
-
8
-
9
-
10
-
11
-
12
-
13
-
14
-
15
-
16
-
17
-
18
-
19
-
20
-
21
-
22
-
23
-
24
-
25
-
26
-
27
-
28
-
29
-
30
-
31
-
32
-
33
-
34
-
35
-
36
-
37
-
38
-
39
-
40
-
41
-
42
-
43
-
44
-
45
-
46
-
47
-
48
-
49
-
50
-
51
-
52
-
53
-
54
-
55
-
56
-
57
-
58
-
59
-
60
-
61
-
62
-
63
-
64
-
65
-
66
-
67
-
68
-
69
-
 70
70 -
 71
71 -
 72
72 -
 73
73 -
 74
74 -
 75
75 -
 76
76 -
 77
77 -
 78
78 -
 79
79 -
 80
80 -
81
-
82
-
83
-
84
-
85
-
86
-
87
-
88
-
89
-
90
-
91
-
92
-
93
-
94
-
95
-
96
-
97
-
98
 |
 |
