Yamaha DVD-CX1 Owners Manual - Page 12
CONNECTIONS, Audio connections
 |
View all Yamaha DVD-CX1 manuals
Add to My Manuals
Save this manual to your list of manuals |
Page 12 highlights
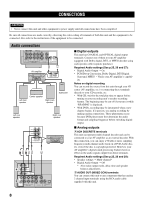
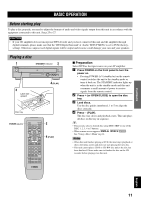
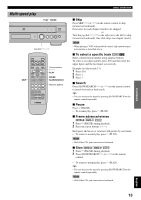
CONNECTIONS CAUTION • Never connect this unit and other equipment to power supply until all connections have been completed. Be sure all connections are made correctly, observing the color-coding of terminals of both this unit and the equipment to be connected. Also refer to the instructions of the equipment to be connected. Audio connections L 1 6CH DISCRETE 1 R 2 MIXED 2CH Y PB PR AUDIO OUT COMPONENT VIDEO OUT (480p/480i) 2 S VIDEO VIDEO VIDEO OUT COAXIAL PCM/ DTS OPTICAL DIGITAL AV amplifier STANDBY /ON INPUT SELECTOR INPUT MODE SPEAKERS A B 6CH INPUT BASS PROGRAM TREBLE SILENT STEREO FM/AM A/B/C/D/E PRESET /TUNING PRESET TUNING /TUNING MEMORY MODE EFFECT PROCESSOR BASS DIRECT EXTENSION ON OFF VIDEO AUX BALANCE L R EDIT MAN'L/AUTO FM AUTO/MAN'L MONO SOURCE/REMOTE D-TV/LD DVD CABLE MD/TAPE SAT CD-R VCR 1 TUNER VCR 2 CD VCR 3/DVR PHONO VIDEO AUX REC OUT/ZONE 2 PHONES S VIDEO VIDEO L AUDIO R OPTICAL VOLUME C O COAXIAL OPTICAL IN IN Left main speaker Center speaker Right main speaker Subwoofer Left rear speaker Right rear speaker R L MAIN SURROUND SUB CENTER WOOFER 6CH INPUT STANDBY /ON INPUT SELECTOR INPUT MODE SPEAKERS A B 6CH INPUT BASS PROGRAM TREBLE SILENT STEREO FM/AM A/B/C/D/E PRESET /TUNING PRESET TUNING /TUNING MEMORY MODE EFFECT PROCESSOR BASS DIRECT EXTENSION ON OFF VIDEO AUX BALANCE L R EDIT MAN'L/AUTO FM AUTO/MAN'L MONO SOURCE/REMOTE D-TV/LD DVD CABLE MD/TAPE SAT CD-R VCR 1 TUNER VCR 2 CD VCR 3/DVR PHONO VIDEO AUX REC OUT/ZONE 2 PHONES S VIDEO VIDEO L AUDIO R OPTICAL VOLUME RL RL R A MAIN L SORROUND CENTER SUB WOOFER 6CH DISCRETE L 1 1 B R 2 MIXED 2CH Y PB PR AUDIO OUT COMPONENT VIDEO OUT (480p/480i) 2 S VIDEO VIDEO VIDEO OUT COAXIAL PCM/ DTS OPTICAL DIGITAL I Digital outputs This unit has COAXIAL and OPTICAL digital output terminals. Connect one of them to your AV amplifier equipped with Dolby digital, DTS, or MPEG decoder using each specific cable (separate purchase). Required Audio settings (See p.25, 26 and 27): • Digital Audio Output ^ On • PCM Down Conversion, Dolby Digital, DTS Digital Surround, MPEG ^ Verify your AV amplifier's capability. Notes on digital recording You can record the source from this unit through your AV center (AV amplifier, etc.) or connecting these terminals directly to your CD recorder, etc. • With CD, wait for the total play time to appear before turning on your recording unit's synchro recording feature. The beginning may be cut off if you turn it while 'READING' is displayed. • With DVDs, recording may be interrupted when a new chapter begins. If it persists, use analog recording by making analog connections. These phenomena occur because DVD player must first determine the audio format and sampling frequency before switching digital output. I Analog outputs A6CH DISCRETE terminals This unit incorporates multi-channel decoder and can be connected to your AV amplifier as an external decoder. With this connection, you can enjoy a 96 kHz or more sampling frequency multi-channel audio track on a DVD-Audio disc, etc. even if the disc is copyright-protected. However, your AV amplifier's digital sound processing features have no effect on the audio signals output from these terminals. Required Audio settings (See p.25, 26 and 29): • Speaker settings ^ Multi-channel* • Digital Audio Output ^ Off * Also make output mode, delay time and speaker balance adjustments. BAUDIO OUT (MIXED 2CH) terminals You can connect this unit to any component that has analog 2 channel input terminals using the RCA audio cable supplied with this unit. 8
-
 1
1 -
2
-
3
-
4
-
5
-
6
-
 7
7 -
 8
8 -
 9
9 -
 10
10 -
 11
11 -
 12
12 -
 13
13 -
 14
14 -
 15
15 -
 16
16 -
 17
17 -
18
-
19
-
20
-
21
-
22
-
23
-
24
-
25
-
26
-
27
-
28
-
29
-
30
-
31
-
32
-
33
-
34
-
35
-
36
 |
 |
