Yamaha DVD-S2300MKII DVD-S2300MKII Manual - Page 7
Checking The Accessories, Installing Batteries In The Remote Control
 |
View all Yamaha DVD-S2300MKII manuals
Add to My Manuals
Save this manual to your list of manuals |
Page 7 highlights
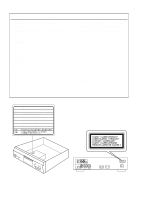
CHECKING THE ACCESSORIES Check your package to make sure it contains the following items: Remote control Batteries (x2) (AA, R6, UM-3) Audio/Video cable Power cable INTRODUCTION INSTALLING BATTERIES IN THE REMOTE CONTROL Insert the batteries in the correct direction by aligning the + and - marks on the batteries with the polarity markings (+ and -) inside the battery compartment. • If the batteries leak, dispose of them immediately. Avoid touching the leaked material or letting it come into contact with clothing, etc. Clean the battery compartment thoroughly before installing new batteries. ■ Using the remote control 1 Remote control 2 sensor 3 1 Slide off the battery compartment cover. Point the remote control at the sensor, within approximately 6 m (20 feet) of the unit. 30° 30° 2 Insert two batteries (AA, R06, UM-3 type) ori- ented properly (+ and -). 3 Slide the cover back into place. Replace worn batteries Worn batteries limit the operating range of the remote control. Replace both batteries at the same time. Note • Replace both batteries if you notice a decrease in the operating range of the remote control. • Do not use old batteries with new ones. • Do not use different types of batteries (such as alkaline and manganese) together. Read the battery packaging carefully. Different types of batteries may be the same shape or color. Handling the remote control • Do not spill water or other liquids on the remote control. • Do not drop the remote control. • Do not leave or store the remote control in the following types of conditions: - high humidity or temperature, such as near a heater, stove or bath; - dusty places; or - places subject to extremely low temperatures. 3 English
-
 1
1 -
 2
2 -
 3
3 -
 4
4 -
 5
5 -
 6
6 -
 7
7 -
 8
8 -
 9
9 -
 10
10 -
 11
11 -
 12
12 -
13
-
14
-
15
-
16
-
17
-
18
-
19
-
20
-
21
-
22
-
23
-
24
-
25
-
26
-
27
-
28
-
29
-
30
-
31
-
32
-
33
-
34
-
35
-
36
-
37
-
38
-
39
-
40
-
41
-
42
 |
 |
