Yamaha EL-200 Owner's Manual
Yamaha EL-200 Manual
 |
View all Yamaha EL-200 manuals
Add to My Manuals
Save this manual to your list of manuals |
Yamaha EL-200 manual content summary:
- Yamaha EL-200 | Owner's Manual - Page 1
- Yamaha EL-200 | Owner's Manual - Page 2
instruction section. CAUTION RISK OF ELECTRIC SHOCK. DO NOT OPEN CAUTION: TO REDUCE THE RISK OF ELECTRIC SHOCK, DO NOT REMOVE COVER (OR BACK). NO USER-SERVICEABLE PARTS INSIDE. REFER SERVICING TO QUALIFIED SERVICE this manual as a permanent record of your purchase. IMPORTANT NOTICE: All Yamaha - Yamaha EL-200 | Owner's Manual - Page 3
or modify them in any way. The instrument contains no user-serviceable parts. If it should appear to be malfunctioning, discontinue use immediately and have it inspected by qualified Yamaha service personnel. • Do not expose the instrument to rain, use it near water or in damp or wet conditions - Yamaha EL-200 | Owner's Manual - Page 4
fine electronic organ, Electone EL-200. The Yamaha EL-200 Electone combines the most hardware products that support the General MIDI standard. XG is a new MIDI format created by Yamaha, which significantly as shown in this owner's manual are for instructional purposes only, and may appear somewhat - Yamaha EL-200 | Owner's Manual - Page 5
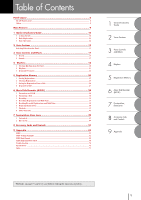
Table of Contents Panel Layout 6 EL-200 Panel Layout ...6 Others ...8 Main Features 9 1 Quick Introductory Guide 10 1 Getting Started ...10 2 Basic MIDI Implementation Chart ...68 Troubleshooting ...70 Specifications ...72 Index ...73 1 Quick Introductory Guide 2 Voice Sections 3 Voice - Yamaha EL-200 | Owner's Manual - Page 6
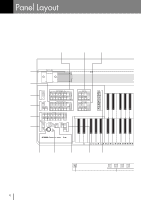
Panel Layout EL-200 Panel Layout UPPER KEYBOARD VOICE (page 13) LEAD VOICE (page 13) PEDAL VOICE (page 13) Monitor Speaker LOWER KEYBOARD VOICE (page 13) REVERB (page 17) - Yamaha EL-200 | Owner's Manual - Page 7
SONG REPEAT FROM TO SONG COPY SONG DEL. PAUSE STOP PLAY SONG SELECT RECORD CUSTOM PLAY MUSIC DISK RECORDER TEMPO FORMAT POWER Floppy Disk Slot LED (Lamp in-use) Eject D. D. (Disable) (page 25) MUSIC DISK RECORDER (page 28) POWER (page 10) 7 - Yamaha EL-200 | Owner's Manual - Page 8
Others Monitor Speakers Jacks (page 51) Speaker Unit Keyboard Cover/Music Stand Upper Keyboard Lower Keyboard MIDI Jacks (page 51) Knee Lever (page 49) Right-Footswitch (page 27) Left-Footswitch (page 49) Expression Pedal (page 10) Pedalboard 8 - Yamaha EL-200 | Owner's Manual - Page 9
lets you create resonant and wide dimension to each voice group. (page 17) 4 Dynamic Rhythm and Percussion sounds The Rhythm section of the Electone features authentic drum and percussion sounds, used by expert rhythm programmers in creating a total of 10 various rhythm patterns. (page 18) Keyboard - Yamaha EL-200 | Owner's Manual - Page 10
Guide 1 Getting Started 1 Plug the power cord in to an appropriate electrical outlet. 2 Turn on the Electone by pressing the POWER switch. POWER Only use the voltage specified as correct for the Electone. The required voltage is printed on the name plate of the Electone. Yamaha products - Yamaha EL-200 | Owner's Manual - Page 11
: Some of the voices, hidden voices, cannot be accessible from the panel. Quick Introductory Guide 1 If you have made panel settings you wish to keep, save them to Registration Memory before turning the Electone off. (See page 25 for more information.) You can, however, restore the panel settings - Yamaha EL-200 | Owner's Manual - Page 12
Set-up Select the keyboard to play Quick Introductory Guide Select the voice (Voice Menu) Select the rhythm (Rhythm Menu) Add effects (Effect Set) Add reverb Adjust the total volume (Master Volume) Playing Electone Expression Pedal Setting Registration Shift/Footswitch /Knee Lever Loading - Yamaha EL-200 | Owner's Manual - Page 13
EL-200 features 21 different high quality AWM/FM voices. All voices are divided in to four voice groups. There are two voice groups on the Upper keyboard, one each on the Lower keyboard and Pedalboard. Each voice section can, of course with one of the upper models, EL-900/700/500/400, or when you - Yamaha EL-200 | Owner's Manual - Page 14
balance between each voice group as you play the keyboards. About TO LOWER - Playing (Upper) Lead Voice and Pedal Voice from the Lower keyboard: The Electone has a special "To Lower" function that lets you assign Lead or Bass voices to the Lower keyboard. Simply press the TO LOWER button on the - Yamaha EL-200 | Owner's Manual - Page 15
. Voice Sections 2 NOTE: 173 voices including the panel voices in the list are built in the EL-200 for playback. Accordingly, the EL-200 can correspond to the song data created with an upper model like EL-500/400 and reproduce it precisely. See page 16 for the information on the additional voices - Yamaha EL-200 | Owner's Manual - Page 16
voices including panel voices that can be played back on the EL-200. Group Upper/Lower STRINGS Lead VIOLIN Pedal CONTRABASS Upper/Lower . Synth. Cla. 1 Synth. Cla. 2 q Saxophone 1 Saxophone 2 Sopra. Sax. Sax. Ens. 1 Sax. Ens. 2 Synth. Sax. Synth. Lead 1 Synth. Lead 2 Synth. Lead 3 Synth. Lead 4 - Yamaha EL-200 | Owner's Manual - Page 17
in a large room or concert hall. Reverb effect affects the entire system at one time. You can control the amount of Reverb applied to the Electone by pressing one of the Reverb buttons. 3 The controls have seven volume settings, from a minimum of 0, or no effect, to a maximum of full Reverb - Yamaha EL-200 | Owner's Manual - Page 18
use actual drum and percussion sampled sounds to automatically play various rhythms. In addition, the Electone has a Keyboard Percussion feature that allows you to play drum and percussion sounds from the Lower keyboard and Pedalboard. 1 Selecting Rhythms from the Panel Ten - Yamaha EL-200 | Owner's Manual - Page 19
minimum of 0, or no sound, to a maximum of full volume. RHYTHM SEQ. SEQ. MARCH WALTZ SWING BOUNCE SLOW 1 1 2 ROCK MAX NOTE: When the Electone is turned on, the Rhythm Volume is automatically set to 0. SEQ. SEQ. TANGO LATIN LATIN 8 BEAT 16 BEAT 2 3 4 1 2 MIN 4Set the rhythm tempo - Yamaha EL-200 | Owner's Manual - Page 20
regular rhythms, all Fill In patterns have been designed to perfectly match the bass and chord parts of the Automatic Accompaniment feature. 1 Select and play a rhythm. 2 As you play the Electone along with the rhythm, occasionally press the FILL IN button. RHY THM INTRO. ENDING SYNCHRO START - Yamaha EL-200 | Owner's Manual - Page 21
lists all 10 of the rhythms available on the Electone. s March s Waltz s Swing s Bounce s Slow Rock s Tango s Latin 1 s Latin 2 s 8 Beat s 16 Beat NOTE: 66 voices including the panel voices are built in the EL-200 for playback. Accordingly, the EL-200 can correspond to the song data created with - Yamaha EL-200 | Owner's Manual - Page 22
3 Keyboard Percussion The keyboard Percussion function features a total of 43 different drum and percussion sounds, playable from the keyboards and pedalboard. 1 Turn off the Lower and/or Pedal voices by setting each voice's volume to MIN. 2 Turn on the Keyboard Percussion function by pressing - Yamaha EL-200 | Owner's Manual - Page 23
Preset Keyboard Percussion Percussion Assignments for the Lower Keyboard (43) ClavSeysnth.STyonmth.3STyonmth2.STnoamreS1nBarureshBrRuoslhl Shot 1 Tom 3 TOormch2esTtroamS1naSrneaDreruDmrumTrRiaonlgl leTCrlioasnegdle OpCeonWwboeoldl 1BWloocokdLBowlock HigAhgogoALgoowgo HHigahnd Clap - Yamaha EL-200 | Owner's Manual - Page 24
different rhythm patterns, and can be programmed by the other Electone such as EL-700 and EL-500. The EL-200 doesn't have Rhythm Sequence function, but containing rhythm sequence data into the EL-200's MDR slot. The rhythm sequence data is recorded as a part of registration data (explained on page - Yamaha EL-200 | Owner's Manual - Page 25
; 1 through 8. Additional eight locations, 9 through 16, are accessible when playing back or using the data created with an upper model like EL-900/700/500. 2 Selecting Registrations Simply press the numbered button that corresponds to the registration you wish to select. Using the D (Disable - Yamaha EL-200 | Owner's Manual - Page 26
is either blank or has data you can erase. If the disk is new and unformatted, you will have to format it. Refer to the instructions how to format a disk (page 30). NOTE: See pages 37 and 38 for the details on saving/recalling registrations to/from the M.D.R. 5 2 Select a song number - Yamaha EL-200 | Owner's Manual - Page 27
• Although the number of the Registration Memory buttons of EL-200 is limited to eight, from Registration Memory 1 through Registration function "wraps around" to select the first preset again. Resetting the Electone to the Factory Preset (Power On Reset) All current settings including - Yamaha EL-200 | Owner's Manual - Page 28
can be used. A blank 2HD floppy disk has been included with your Electone for you to record your performances. To eject a floppy disk: Be sure . Music Disk Recorder Floppy disk slot LED (Lamp in-use) Eject button NOTE: When the EL-200 is turned on, the LED below the floppy disk slot will be - Yamaha EL-200 | Owner's Manual - Page 29
position, "Prot (Protected)" will appear on the LED display in the M.D.R. section indicating that the operation they are not in use. s Data backup Yamaha recommends that you keep two copies of 6 deformed shutter or housing. The M.D.R. of the EL-200 begins reading all data as soon as you insert - Yamaha EL-200 | Owner's Manual - Page 30
, the disk must first be formatted. 1 Put the disk, label facing up, into the disk drive (floppy disk slot). "Fort" will appear on the LED display indicating that the inserted disk requires to be formatted. 2 While holding down the SHIFT button, press the FORMAT button. This step puts the format - Yamaha EL-200 | Owner's Manual - Page 31
song: 1 Set the desired registrations on the Electone. Make all the Electone settings necessary for the song you will record. song number already contains recorded data, small bars ("--") appear at the left part of LED display and flash along with the song number, warning you that the selected - Yamaha EL-200 | Owner's Manual - Page 32
MUSIC DISK RECORDER TEMPO FORMAT 7 When you finish playing, press the STOP button. After the small bars flash to draw a square on the LED to indicate the processing for stop, the STOP lamp lights up, indicating the recording process is finished. RECORD PLAY UPPER LOWER PEDAL CONTROL UPPER - Yamaha EL-200 | Owner's Manual - Page 33
the beginning of a song, before the actual recording of your performance. Performance data The M.D.R. records your performance on the keyboards and pedalboard of the Electone exactly as you play it, even recording the strength at which you play the keys and how hard you press them down while playing - Yamaha EL-200 | Owner's Manual - Page 34
. Pressing the RECORD button in the procedure 1-4. above turns on the all parts' LEDs in the upper left row indicating that each part is ready to record. Press the RECORD buttons for each part in the upper left row to turn off the parts you don't want to record. For this example, press RECORD/UPPER - Yamaha EL-200 | Owner's Manual - Page 35
the performance data of the Lower and Pedal in addition to the registration and setup data. The small bars ("--") appear at the left part of LED display and flash along with the song number, warning you that the selected song number already contains recorded data. 6 Press the RECORD button - Yamaha EL-200 | Owner's Manual - Page 36
being played back, start playing the melody on the Upper keyboard. Since registration data has already been recorded with the first parts of the song, recording begins immediately. When the end of the recorded performance is reached, playback is automatically stopped and the STOP status is resumed - Yamaha EL-200 | Owner's Manual - Page 37
There are two ways to record the registrations and bulk data: [1] 1 On the Electone, set the registrations and all other data you want to record. 2 Select the the STOP button as soon as you see the small bars flash across the LED display from left to right. This is the same procedure as the one - Yamaha EL-200 | Owner's Manual - Page 38
Registrations (and Bulk Data) The registrations (and bulk data) recorded to song numbers in the above operation can be loaded back to the Electone by simply selecting the appropriate song number and pressing the PLAY button. When the operation has been completed, the M.D.R. returns to STOP status - Yamaha EL-200 | Owner's Manual - Page 39
the location of normal Electone song data as the LED. Playback automatically stops at the end of a song. You can, however, stop playback in the middle of a song by pressing the STOP button. NOTE: Although EL-200 itself doesn't have the detailed Registration Shift settings and sequence programming - Yamaha EL-200 | Owner's Manual - Page 40
part separately: On the EL-200 the Lead/Keyboard Percussion part(s) you have recorded separately will automatically set to on when you start playback. NOTE: When you play back the data made with other Electone models such as EL-90 and "ALL" appears on the LED display. 40 RECORD PLAY UPPER LOWER - Yamaha EL-200 | Owner's Manual - Page 41
To repeatedly play back only the selected song: 1. While holding down the SHIFT button, press the SONG REPEAT button again. "SinG" appears on the LED display to indicate that a single song will be repeatedly played back. RECORD PLAY UPPER LOWER PEDAL CONTROL UPPER LOWER PEDAL CONTROL SHIFT SONG - Yamaha EL-200 | Owner's Manual - Page 42
+ causes the song faster and TEMPO - slower. (The Tempo dial on the Electone panel cannot be used to change the tempo on the Music Disk Recorder.) To DISK RECORDER TEMPO FORMAT NOTE: When tempo is changed, the LED display indicates the change as a percentage of the original recorded tempo - Yamaha EL-200 | Owner's Manual - Page 43
with the SONG SELECT buttons. NOTE: This function is available with the Electone data only, not with the XG data. RECORD PLAY UPPER LOWER PEDAL to copy. If all songs numbers contain recorded data, "FULL" appears on the LED display. In this case, you should erase one of the songs on the disk - Yamaha EL-200 | Owner's Manual - Page 44
. 2 While holding down the SHIFT button, press the SONG COPY FROM button. The song number to be copied from appears at the left of the LED display. RECORD PLAY UPPER LOWER PEDAL CONTROL UPPER LOWER PEDAL CONTROL SHIFT SONG REPEAT FROM TO SONG COPY SONG DEL. PAUSE STOP PLAY SONG SELECT - Yamaha EL-200 | Owner's Manual - Page 45
DEL. button. The letters "dL" appear on the left side of the LED display, next to the selected song number. RECORD lamp flashes to indicate that Disk Copy You can duplicate a floppy disk by copying the contents. Yamaha recommends that you keep two copies of important data on separate floppy disks - Yamaha EL-200 | Owner's Manual - Page 46
in a disk by pressing PAUSE button while holding down SHIFT button. (LEAD) (K.PERC.) (LEAD) (K.PERC.) The amount of available memory will be displayed on the LED. The maximum amount of memory is ca.700 for 2DD disks and ca.1400 PAUSE for 2HD disks. REM.MEM. 46 - Yamaha EL-200 | Owner's Manual - Page 47
*) message will appear on the LED display. The data cannot be saved to the disk. *XX: song number 11) Loading the Data Created with an Upper Electone Model The data created with an upper model such as EL-900/700/500/400 can be reproduced with EL-200 even if EL-200 itself doesn't have the functions - Yamaha EL-200 | Owner's Manual - Page 48
blank song number by pressing the SONG SELECT buttons. XX: song number When you insert the "copy-protected" disk to the Electone, this message will appear on the LED display. You cannot overwrite or save the changes. XX: song number This message indicates that an incompatible disk is inserted in - Yamaha EL-200 | Owner's Manual - Page 49
functions without taking your hands from the keyboards. 1 Footswitch The Electone has two Footswitches on the main expression pedal that can be used available on EL-200, created with an upper model such as EL-900/700/500/400 and loaded to EL-200 can be reproduced with EL-200's Registration Shift - Yamaha EL-200 | Owner's Manual - Page 50
3 Press the Knee Lever to the right with your knee when you want to have sustain. Sustain effect is applied while the Knee Lever is pressed. 1 ON 3 ON OFF 2 1 When the Knee Lever is folded up: The sustain effect is on. 2 When the Knee Lever is vertical: The sustain effect is cancelled. 3 When the - Yamaha EL-200 | Owner's Manual - Page 51
8 Accessory Jacks and Controls Various input/output terminals and controls are equipped on the EL-200. On the underside of the Electone keyboard is a separate panel equipped with various input/output terminals and controls, the functions of which are described below. HOST SELECT TO HOST 1 2 -1 2 - Yamaha EL-200 | Owner's Manual - Page 52
(between the TO HOST terminal of your Electone and the Serial Port of the personal computer pin MINI DIN to D-SUB 9-pin Cable TO HOST Macintosh EL-200 RS-232C (DB9) Windows 95(98) (Computer) HOST SELECT MIDI driver at the following web site http://www.yamaha-xg.com/english/xg/ index.html. NOTE: - Yamaha EL-200 | Owner's Manual - Page 53
SYNTHESIZER REALTIME CONTROL EXTENDED SYNTHESIS MIDI Interface MIDI Keyboard PC 1 Control an external device using the EL-200 Using an extenral MIDI k eyboard or MIDI tone generator q Playing your Electone can cause the MIDI keyboard (or tone generator) to be played using its own voices. You - Yamaha EL-200 | Owner's Manual - Page 54
EL-200 can receive/transmit. Channel Messages Key related messages These are transmitted every time you play the keyboards on your Electone. Reversely, the Electone page 58 and MIDI Implementation Chart on page 68. Program Change The Program Change messages allow you to change voices in the middle - Yamaha EL-200 | Owner's Manual - Page 55
allow you to execute bulk dump operation, sending and receiving all the data of the EL-200 including registrations to and from an external device. This is especially useful for you to ) to "F0,43,70,70,17,F7," the Electone will send the Keyboard Percussion Assignment data only. Appendix 9 55 - Yamaha EL-200 | Owner's Manual - Page 56
on the Electone. 2 Send the Program Change message, "CF, 00" from the PC to EL-200. Once the Program Change message is received, the EL-200 automatically turns the Registration Memory button 1 on. Sending the Note-On Messages 3 Send the Note-On message, "90, 30, 7F" from the PC to EL-200. EL-200 - Yamaha EL-200 | Owner's Manual - Page 57
) and the internal XG tone generator. The internal tone generator section of the EL-200 is normally set to EL Mode for playing as an "Electone." Sending an appropriate system exclusive message from the sequencing software (PC) to the EL-200 changes the mode to XG Mode, in which you can use the - Yamaha EL-200 | Owner's Manual - Page 58
MIDI Data Format 1. Channel Messages 1.1 EL Mode Code (Hexadecimal) 8n,nn,00-7F Function Note Off 9n,nn,00 9n,nn,01-7F Appendix 9 Bn,00,00-7F Bn,20,00- - Yamaha EL-200 | Owner's Manual - Page 59
Code (Hexadecimal) Cn,nn Function Program Change Dn,00-7F After Touch En,00-7F,00-7F * Can be changed in the MIDI settings. Pitch Bend 1.2 XG Mode Code (Hexadecimal) 8n,nn,00-7F 9n,nn,00 9n, - Yamaha EL-200 | Owner's Manual - Page 60
All Sounds Off Reset All Controllers All Note Off Omni Off Omni On Mono Poly Program Change After Touch En,00-7F,00-7F * Can be changed in the MIDI settings. Pitch Bend Transmit ,MM,LL,cc,F7 F0,43,1N,4C,00,00,7E,00,F7 Electone/Single Keyboard Common Messages Code (Hexadecimal) F0,43,73,01,02,F7 - Yamaha EL-200 | Owner's Manual - Page 61
Electone Exclusive Code (Hexadecimal) F0,43,70,70,00,...(Data)...F7 78 ID F0,43,70, 43,70,70,73,F7 F0,43,70,70,78,SC,NC,F7 X : don't care N : Device Number("0" on EL-200) Message Bulk Dump Data Model ID Data Request-to-Send Data Request-to-Receive Data Request-to-Send Voice parameter data Request-to - Yamaha EL-200 | Owner's Manual - Page 62
9 *4 Switch Codes Selectors Code Switch 02 UK Voice 1 03 LK Voice 1 04 UK Voice 2 05 LK Voice 2 06 LEAD Voice 07 Pedal Voice 1 08 Pedal Voice 2 0B Rhythm 0F Registration Memory Volume Code Switch 12 UK Voice 1 13 LK Voice 1 14 UK Voice 2 15 LK Voice 2 16 LEAD Voice 17 Pedal Voice 1 18 Pedal Voice 2 - Yamaha EL-200 | Owner's Manual - Page 63
Sustain Code Switch 50 Upper Keyboard 51 Lower Keyboard 52 Pedalboard Keyboard Percussion Code Switch 5B Lower Keyboard 5C Pedal Board Disable Code Switch 5F Disable Tremolo Code Switch 60 Tremolo Rhythm Sequence Code Switch 61 Sequence 1 62 Sequence 2 63 Sequence 3 64 Sequence 4 Transmit Tx Range - Yamaha EL-200 | Owner's Manual - Page 64
Appendix 9 *5 EL MIDI Parameters Voice Section Parameters Panel Voice Parameters Address 00 00-04, 06, 07 00 00-04, 06, 07 00 00-04, 06, 07 00 - Yamaha EL-200 | Owner's Manual - Page 65
Effect Parameters (Voice Sections) Address Size Data 00-01 00-04, 06, 07 3F 1 00-05 Parameter Effect Select 00-01 00-04, 06, 07 40-42 1 00-7F 00-01 00-04, 06, 07 48-4A 1 00-7F 00-01 00-04, 06, 07 50 1 00-7F 00-01 00-04, 06, 07 58-5B 1,2 00-7F 00-01 00-04, 06, 07 60-62 1 00-7F 00-01 00-04, 06, - Yamaha EL-200 | Owner's Manual - Page 66
Rhythm Sequence Parameters Address Size Data Parameter 03 01 00-03 1 00-01 Rhythm Sequence Content 00:OFF 01:ON Transmit Receive Rx Range Remarks ˛ Ø [00] [01-7F] Accompaniment Parameters Address Size Data 03 02 10 1 00-03 Parameter Pattern Selector Number 03 02 11 1 00-01 Volume - Yamaha EL-200 | Owner's Manual - Page 67
:Glide 03:Tremolo 05 1 3C-4F Pitch 3C:PitchDown 40:Normal 4F:PitchUp 06 1 00-04 Glide Speed 01:Slow 05:Fast 07 1 34-4C Manual Balance 34:Upper 40:Center 4C:Lower 09 1 00-01 L.I.T. 00:Mode1 01:Mode2 0A 1 00-01 Expression INT/EXT 00:Internal 01:External Effect - Yamaha EL-200 | Owner's Manual - Page 68
Chart YAMAHA [Electone-EL mode] / Model: EL-200 Function Transmit 2000 Version: 1.00 Remarks Transmit with EL-200: fixed to 80. PK after touch with EL-200: not transmit. Bank Select 2nd Expression Pedal Data Entry Expression Pedal Data Entry SW Sound Controller NRPN, RPN Appendix 9 Program - Yamaha EL-200 | Owner's Manual - Page 69
YAMAHA [Electone-XG mode] / Model: EL-200 ˛ 0-127 Ø 9nH, v=1-127 Ø 9nH, v=0, 8nH ˛ Ø Ø Program Change Ø 0-15, 112-116 Ø Range System Exclusive Ø Ø System Song Position same as the one in the EL Mode Date: 1. Dec. 2000 Version: 1.00 Remarks Transmit with EL-200: fixed to 80. Bank Select - Yamaha EL-200 | Owner's Manual - Page 70
Troubleshooting Appendix 9 Problem Possible Cause and Solution GENERAL OPERATION A cracking noise is sometimes heard. Noise may be produced when either an electrical appliance is turned on or off, or an electric power tool (such as drill) is used in the proximity of the Electone EL-200. 70 - Yamaha EL-200 | Owner's Manual - Page 71
Problem you load the data of an upper model to EL-200 and the reverb volume for each voice group is of the SEQ buttons are different from Electone's default settings (you may have loaded the . The PLAY or RECORD section buttons for selecting parts may be turned off. Turn on the appropriate PLAY - Yamaha EL-200 | Owner's Manual - Page 72
EL-200 in Recording, XG Song Playback, Remaining Memory; LED Display; Eject Rhythm (Stop) Regist. Shift On Volume 3.5" Floppy Disk; Song Sheet; FUN TO PLAY ELECTONE Disk; Keyboard Cover/Music Stand; Headphone Jack; Rhythm In this Owner's Manual are information purposes only. Yamaha Corp. reserves the - Yamaha EL-200 | Owner's Manual - Page 73
49 RHYTHM IN 51 Rhythm Sequence 24 Right Footswitch 27 I INTRO. ENDING 18 K KEYBOARD PERCUSSION 22 Knee Lever 49 L LEAD IN 19 LEAD VOlCE 13 LED Display 30 Left Footswitch 49 Loading the Data 47 LOWER KEYBOARD VOlCE 13 S Saving the Registration Data to Disk 26 SHIFT 30 Song Copy 43 - Yamaha EL-200 | Owner's Manual - Page 74
RED. Making sure that neither core is connected to the earth terminal of the three pin plug. (2 wires) • This applies only to products distributed by Yamaha-Kemble Music (U.K.) Ltd. - Yamaha EL-200 | Owner's Manual - Page 75
S.A. Viamonte 1145 Piso2-B 1053, Buenos Aires, Argentina Tel: 1-4371-7021 PANAMA AND OTHER LATIN AMERICAN COUNTRIES/ CARIBBEAN COUNTRIES Yamaha de Panama S.A. Torre Banco General, Piso 7, Urbanización Marbella, Calle 47 y Aquilino de la Guardia, Ciudad de Panamá, Panamá Tel: 507-269-5311 AFRICA - Yamaha EL-200 | Owner's Manual - Page 76
V697020 011MWAP3.2-01A0 Yamaha Manual Library (English versions only) http://www2.yamaha.co.jp/manual/english/ This document is printed on recycled chlorine free (ECF) paper with soy Ink. M.D.G., Pro Audio & Digital Musical Instrument Division, Yamaha Corporation © 2000 Yamaha Corporation
-
 1
1 -
 2
2 -
 3
3 -
 4
4 -
 5
5 -
 6
6 -
 7
7 -
8
-
9
-
10
-
11
-
12
-
13
-
14
-
15
-
16
-
17
-
18
-
19
-
20
-
21
-
22
-
23
-
24
-
25
-
26
-
27
-
28
-
29
-
30
-
31
-
32
-
33
-
34
-
35
-
36
-
37
-
38
-
39
-
40
-
41
-
42
-
43
-
44
-
45
-
46
-
47
-
48
-
49
-
50
-
51
-
52
-
53
-
54
-
55
-
56
-
57
-
58
-
59
-
60
-
61
-
62
-
63
-
64
-
65
-
66
-
67
-
68
-
69
-
70
-
71
-
72
-
73
-
74
-
75
-
76
 |
 |