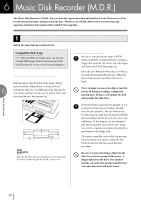
Yamaha EL-200 Owner's Manual - Page 30
Formatting a Disk, About SHIFT Button
 |
View all Yamaha EL-200 manuals
Add to My Manuals
Save this manual to your list of manuals |
Page 30 highlights
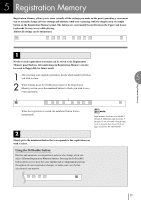
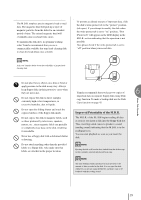
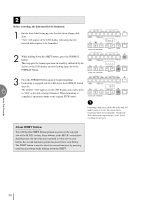
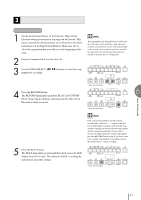
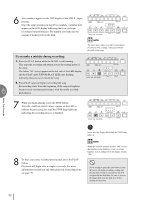
6 2 Formatting a Disk Before recording, the disk must first be formatted. 1 Put the disk, label facing up, into the disk drive (floppy disk slot). "Fort" will appear on the LED display indicating that the inserted disk requires to be formatted. 2 While holding down the SHIFT button, press the FORMAT button. This step puts the format operation on stand-by, indicated by the dashes on the LED display and the flashing lamp above the FORMAT button. 3 Press the FORMAT button again to begin formatting. Formatting is engaged and the LED above the FORMAT button stays lit. The number "160" appears on the LED display and counts down to "001" as the disk is being formatted. When formatting is completed, operation returns to the original STOP status. RECORD PLAY UPPER LOWER PEDAL CONTROL UPPER LOWER PEDAL CONTROL SHIFT SONG REPEAT FROM TO SONG COPY SONG DEL. PAUSE STOP PLAY SONG SELECT RECORD CUSTOM PLAY MUSIC DISK RECORDER TEMPO FORMAT RECORD PLAY UPPER LOWER PEDAL CONTROL UPPER LOWER PEDAL CONTROL SHIFT SONG REPEAT FROM TO SONG COPY SONG DEL. PAUSE STOP PLAY SONG SELECT RECORD CUSTOM PLAY MUSIC DISK RECORDER TEMPO FORMAT RECORD PLAY UPPER LOWER PEDAL CONTROL UPPER LOWER PEDAL CONTROL SHIFT SONG REPEAT FROM TO SONG COPY SONG DEL. PAUSE STOP PLAY SONG SELECT RECORD CUSTOM PLAY MUSIC DISK RECORDER TEMPO FORMAT Music Disk Recorder Formatting a disk erases all the data in the disk and make it ready to record. The erased data by formatting will be lost permanently. Check if the disk contains your important data, or not, before executing the operation. About SHIFT Button You will find the SHIFT button (printed in green) at the top right side of the M.D.R. section. Some buttons in the M.D.R. section have dual functions: the first function is printed in white above each button; the second function is printed in green below each button. The SHIFT button is used to select the second functions by pressing each function button while holding down the SHIFT. 30
-
 1
1 -
2
-
3
-
4
-
5
-
6
-
7
-
8
-
9
-
10
-
11
-
12
-
13
-
14
-
15
-
16
-
17
-
18
-
19
-
20
-
21
-
22
-
23
-
24
-
 25
25 -
 26
26 -
 27
27 -
 28
28 -
 29
29 -
 30
30 -
 31
31 -
 32
32 -
 33
33 -
 34
34 -
 35
35 -
36
-
37
-
38
-
39
-
40
-
41
-
42
-
43
-
44
-
45
-
46
-
47
-
48
-
49
-
50
-
51
-
52
-
53
-
54
-
55
-
56
-
57
-
58
-
59
-
60
-
61
-
62
-
63
-
64
-
65
-
66
-
67
-
68
-
69
-
70
-
71
-
72
-
73
-
74
-
75
-
76
 |
 |