Yamaha EL-200 Owner's Manual - Page 18
Rhythms, 1 Selecting Rhythms from the Panel
 |
View all Yamaha EL-200 manuals
Add to My Manuals
Save this manual to your list of manuals |
Page 18 highlights
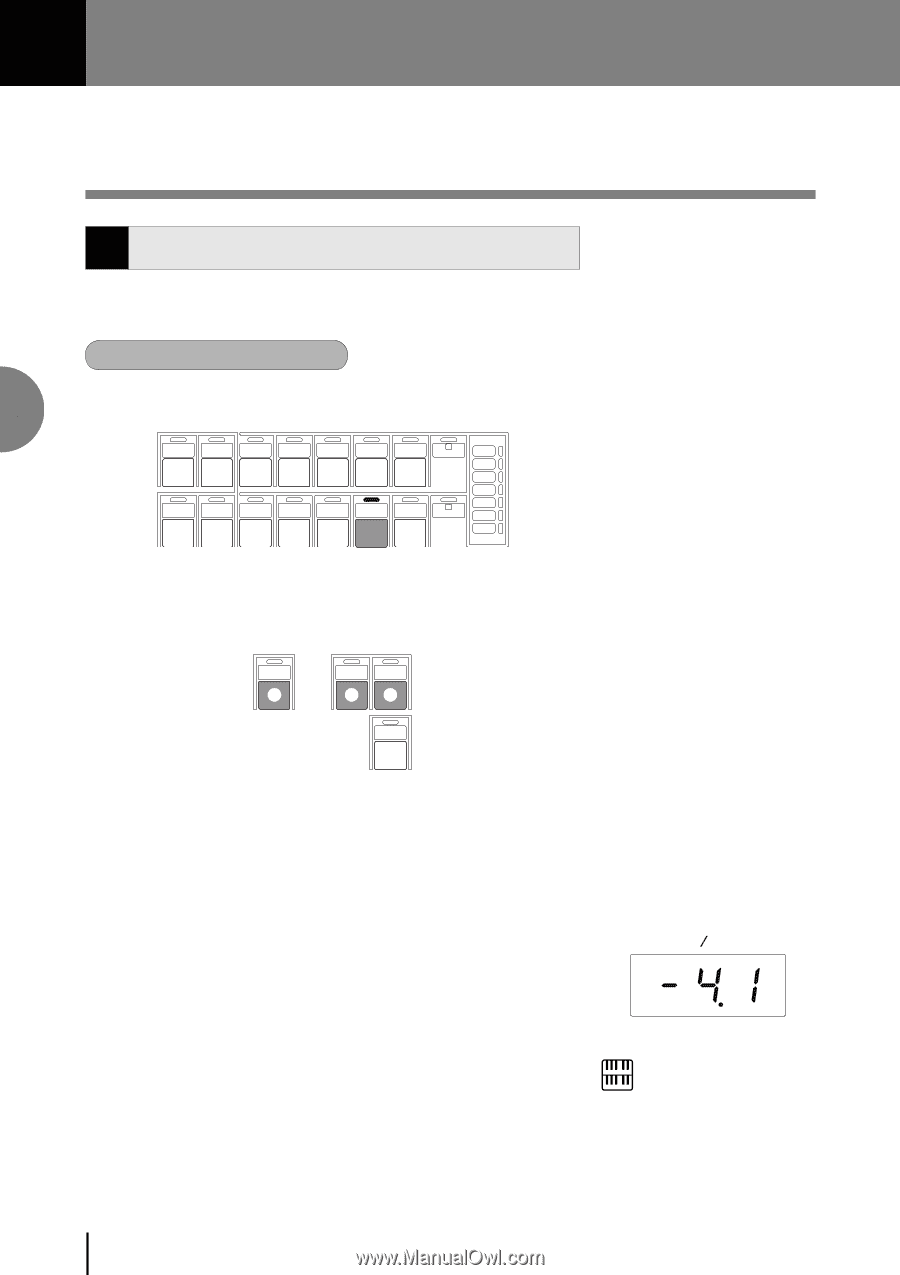
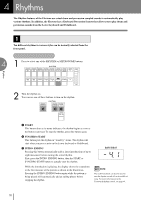
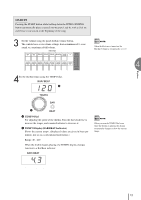
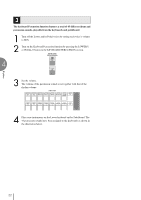
4 Rhythms The Rhythm features of the Electone use actual drum and percussion sampled sounds to automatically play various rhythms. In addition, the Electone has a Keyboard Percussion feature that allows you to play drum and percussion sounds from the Lower keyboard and Pedalboard. 1 Selecting Rhythms from the Panel Ten different rhythms in various styles can be instantly selected from the front panel. 4 1) To select and play a rhythm: 1 Press to select any of the RHYTHM or METRONOME buttons. RHYTHM SEQ. SEQ. MARCH WALTZ SWING BOUNCE SLOW 1 1 2 ROCK MAX Rhythms SEQ. SEQ. TANGO LATIN LATIN 8 BEAT 16 BEAT 2 3 4 1 2 MIN 2 Turn the rhythm on. You can use one of three buttons to turn on the rhythm: RHY THM INTRO. ENDING 3 SYNCHRO START 2 START 1 FILL IN 1 START This button does as its name indicates; the rhythm begins as soon as the button is pressed. To stop the rhythm, press this button again. 2 SYNCHRO START This button puts the rhythm in "stand-by" status. The rhythm will start when you press a note on the Lower keyboard or Pedalboard. 3 INTRO. ENDING Pressing this button automatically adds a short introduction (of up to eight measures) before starting the actual rhythm. First, press the INTRO. ENDING button, then the START or SYNCHRO START button to actually start the rhythm. BAR BEAT While the introduction is playing, the display shows the countdown to the first measure of the pattern as shown in the illustration. Pressing the INTRO. ENDING button again while the pattern is being played will automatically add an ending phrase before stopping the rhythm. NOTE: The Left Footswitch can also be used to turn the rhythm on and off in the middle of song. For more information on the Footswitch rhythm control, see page 49. 18
-
 1
1 -
2
-
3
-
4
-
5
-
6
-
7
-
8
-
9
-
10
-
11
-
12
-
 13
13 -
 14
14 -
 15
15 -
 16
16 -
 17
17 -
 18
18 -
 19
19 -
 20
20 -
 21
21 -
 22
22 -
 23
23 -
24
-
25
-
26
-
27
-
28
-
29
-
30
-
31
-
32
-
33
-
34
-
35
-
36
-
37
-
38
-
39
-
40
-
41
-
42
-
43
-
44
-
45
-
46
-
47
-
48
-
49
-
50
-
51
-
52
-
53
-
54
-
55
-
56
-
57
-
58
-
59
-
60
-
61
-
62
-
63
-
64
-
65
-
66
-
67
-
68
-
69
-
70
-
71
-
72
-
73
-
74
-
75
-
76
 |
 |