Yamaha EL-200 Owner's Manual - Page 31
Recording
 |
View all Yamaha EL-200 manuals
Add to My Manuals
Save this manual to your list of manuals |
Page 31 highlights
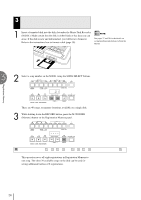
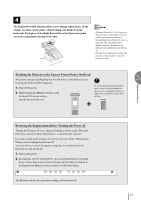
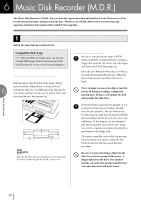
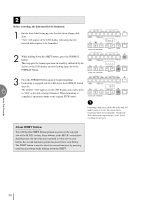
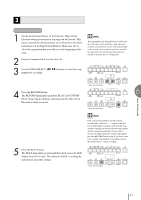
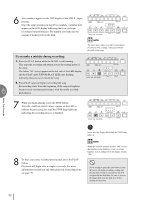
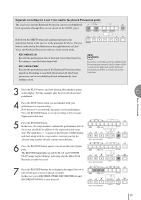
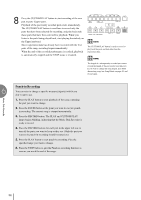
3 Recording 1) To record a song: 1 Set the desired registrations on the Electone. Make all the Electone settings necessary for the song you will record. This means entering the all registrations you will need for the entire performance in the Registration Memory. Make sure also to select the registration that you will use at the beginning of the song. 2 Insert the formatted disk in to the disk slot. 3 Use the SONG SELECT (G, H) buttons to select the song number for recording. 4 Press the RECORD button. The RECORD lamp lights up and the PLAY and CUSTOM PLAY lamps begins blinking, indicating that the Music Disk Recorder is ready to record. NOTE: The song numbers 01 through 40 are available and up to 40 songs can be stored on a disk. However, available song numbers may be reduced depending on the amount of the song data you have recorded. See page 46 for the information about the total amount of memory left on a floppy disk. RECORD PLAY UPPER LOWER PEDAL CONTROL UPPER LOWER PEDAL CONTROL SHIFT SONG REPEAT FROM TO SONG COPY SONG DEL. PAUSE STOP PLAY SONG SELECT RECORD CUSTOM PLAY MUSIC DISK RECORDER TEMPO FORMAT RECORD PLAY UPPER LOWER PEDAL CONTROL UPPER LOWER PEDAL CONTROL SHIFT SONG REPEAT FROM TO SONG COPY SONG DEL. PAUSE STOP PLAY SONG SELECT RECORD CUSTOM PLAY MUSIC DISK RECORDER TEMPO FORMAT 5 Press the PLAY button. The PLAY lamp lights up and small bars flash across the LED display from left to right. This indicates M.D.R. is reading the registrations and other settings. NOTE: If the selected song number already contains recorded data, small bars ("--") appear at the left part of LED display and flash along with the song number, warning you that the selected song number already contains recorded data. If you want to execute recording operation over the song number, press the RECORD button again. If you don't want, select another song number for recording or press the STOP button to cancel recording. RECORD PLAY UPPER LOWER PEDAL CONTROL UPPER LOWER PEDAL CONTROL SHIFT SONG REPEAT FROM TO SONG COPY SONG DEL. PAUSE STOP PLAY SONG SELECT RECORD CUSTOM PLAY MUSIC DISK RECORDER TEMPO FORMAT Music Disk Recorder 6 31
-
 1
1 -
2
-
3
-
4
-
5
-
6
-
7
-
8
-
9
-
10
-
11
-
12
-
13
-
14
-
15
-
16
-
17
-
18
-
19
-
20
-
21
-
22
-
23
-
24
-
25
-
 26
26 -
 27
27 -
 28
28 -
 29
29 -
 30
30 -
 31
31 -
 32
32 -
 33
33 -
 34
34 -
 35
35 -
 36
36 -
37
-
38
-
39
-
40
-
41
-
42
-
43
-
44
-
45
-
46
-
47
-
48
-
49
-
50
-
51
-
52
-
53
-
54
-
55
-
56
-
57
-
58
-
59
-
60
-
61
-
62
-
63
-
64
-
65
-
66
-
67
-
68
-
69
-
70
-
71
-
72
-
73
-
74
-
75
-
76
 |
 |