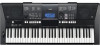
Yamaha PSR-E423 Owner's Manual
Yamaha PSR-E423 Manual
 |
UPC - 086792317021
View all Yamaha PSR-E423 manuals
Add to My Manuals
Save this manual to your list of manuals |
Yamaha PSR-E423 manual content summary:
- Yamaha PSR-E423 | Owner's Manual - Page 1
DIGITAL KEYBOARD Owner's Manual EN Appendix Reference Quick Guide Setting Up - Yamaha PSR-E423 | Owner's Manual - Page 2
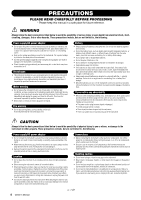
SECTION This product utilizes batteries or an external power supply (adapter). DO NOT connect this product to any power supply or adapter other than one described in the manual, on the name plate, or specifically recommended by Yamaha. WARNING: Do not place this product in a position where anyone - Yamaha PSR-E423 | Owner's Manual - Page 3
below and retain this manual as a permanent record of your purchase to Yamaha Corporation of America Address : 6600 Orangethorpe Ave., Buena Park, Calif. 90620 Telephone : 714-522-9011 Type of Equipment : Digital Keyboard Model Name : PSR-E423 municipality, your waste disposal service or the point of - Yamaha PSR-E423 | Owner's Manual - Page 4
manual instrument inspected by qualified Yamaha service personnel. • Never the following problems occur, immediately connected cables. • When setting up the product, make sure that the AC outlet you are using is easily accessible. If some trouble the gaps on the panel or keyboard. • Do not rest your - Yamaha PSR-E423 | Owner's Manual - Page 5
programs and contents in which Yamaha owns copyrights or with respect to which it has license to use others' copyrights. Such copyrighted materials include, without limitation, all computer software, style files, MIDI files, WAVE data, musical scores and sound recordings. Any unauthorized use of - Yamaha PSR-E423 | Owner's Manual - Page 6
for connecting a computer with peripheral Devices. It allows "hot swapping" (connecting peripheral devices while the power to the computer is on). Stereo Sampled Piano The instrument has a special Portable Grand Piano Voice-created by state-of-the-art stereo sampling technology and using Yamaha - Yamaha PSR-E423 | Owner's Manual - Page 7
section includes troubleshooting information and specifica- tions. Data List Voice List, MIDI Data Format, etc. MIDI Reference The MIDI Reference section contains MIDI related information. The MIDI Reference is available for downloading from the Yamaha Manual Library at: http://www.yamaha.co.jp - Yamaha PSR-E423 | Owner's Manual - Page 8
the music. Play a Variety of Instrument Voices Page 16 The instrument voice that sounds when you play the keyboard can be changed to violin, flute, harp, or any of an extensive range of voices. You can change experiment with new styles to expand your musical horizons. EuTrance 042 8 Owner's Manual - Yamaha PSR-E423 | Owner's Manual - Page 9
Song's Style 41 Record Your Own Performance 43 Computer 74 Transferring Data between the Computer and Instrument 75 Accessory CD-ROM Installation Guide 78 Important Notices about the CD-ROM 78 CD-ROM Contents 79 System Requirements 80 Software Installation 80 Appendix Troubleshooting - Yamaha PSR-E423 | Owner's Manual - Page 10
run either from an optional AC adaptor or batteries, Yamaha recommends use of an AC adaptor whenever possible. An other adaptors may result in irreparable damage to both the adaptor and the instrument. 2 Connect the AC adaptor to the power supply jack. 3 Plug the AC adaptor into an 10 Owner's Manual - Yamaha PSR-E423 | Owner's Manual - Page 11
an external output. You can connect the PHONES/OUTPUT jack to a keyboard amplifier, stereo system, mixer, tape recorder, or other line-level audio produce a natural sustain as you play by pressing a footswitch. A Yamaha FC4 or FC5 footswitch plugged into this jack can be used to switch Manual 11 - Yamaha PSR-E423 | Owner's Manual - Page 12
e [MASTER VOLUME] control page 11 r [DEMO/BGM] button page 31 t [PERFORMANCE ASSISTANT] button page 43 !2 [1]-[5], [A] buttons page 44 12 Owner's Manual f r !3 ARPEGGIO [ON/OFF] button page 20 [TYPE button page 61 [MAIN/AUTO FILL] button page 61 [SYNC STOP] button page 61 [SYNC START] - Yamaha PSR-E423 | Owner's Manual - Page 13
page 16 @2 Number buttons [0]-[9], [+] and [-] buttons page 14 @3 [PORTABLE GRAND] button page 17 @4 REGIST MEMORY [MEMORY/BANK], [1], [2] buttons to each key indicate the drum and percussion instruments assigned to the keys when "Standard Kit 1" is selected. Rear Panel @8 USB terminal page 73 - Yamaha PSR-E423 | Owner's Manual - Page 14
Style or Song. To change the instrument voice that sounds when you play the keyboard, press the [VOICE] button. If you want to play along with auto . Hold down this button until the function calls up. 14 Owner's Manual Press the [SONG] button to access the SONG functions (printed above - Yamaha PSR-E423 | Owner's Manual - Page 15
At other times the notes you play on the keyboard are displayed. NOTE • Any notes occurring below the name of the chord being played on the keyboard. (page 27) Track Display Information related to that SYNC STOP is turned on. (page 61) GrandPno 001 001 Beat Display Indicates the current - Yamaha PSR-E423 | Owner's Manual - Page 16
Voices Quick Guide In addition to piano, organ, and other "standard" keyboard instruments, this selects the main voice you will play on the keyboard. 1 Press the [VOICE] button. The voice number to individual keys, via which they can be played. Details on assigning instruments to keys are provided - Yamaha PSR-E423 | Owner's Manual - Page 17
"001 Grand Piano" voice will be selected. NOTE • When you press the [PORTABLE GRAND] button all settings other than touch sensitivity are turned off. The dual and split voices will also be turned off, so only the Grand Piano voice will play over the entire keyboard. Quick Guide Owner's Manual 17 - Yamaha PSR-E423 | Owner's Manual - Page 18
will sound that will play in addition to the main voice when you play the keyboard. The second voice is known as the "dual" voice. Quick Guide Flute 141 Appears when dual voice is on Two voices will sound at the , but you can easily select a different split voice (page 56). 18 Owner's Manual - Yamaha PSR-E423 | Owner's Manual - Page 19
tempo using the number buttons on the front panel. NOTE • You can set the time signa- ture (page 53). Tempo 090 Current Tempo value Quick Guide Owner's Manual 19 - Yamaha PSR-E423 | Owner's Manual - Page 20
be turned on. NOTE • Play a key to the left of the keyboard split point because the arpeggio function applies only to the split voice when you select a voice between 229 and 238. NOTE • When an FC4 or FC5 foot- switch is connected - Yamaha PSR-E423 | Owner's Manual - Page 21
Quick Guide Creating Arpeggios Changing the Arpeggio type The most record your performance (page 43). Please note that the arpeggio sound for the split voice cannot be recorded. NOTE • No arpeggio will sound if you turn the arpeggio function on while playing notes on the keyboard. Owner's Manual - Yamaha PSR-E423 | Owner's Manual - Page 22
will not be affected. Styles and songs will also not be affected. v-b affect styles only. 001 001 Quick Guide z Filter Filter Filter Cutoff Resonance 22 Owner's Manual Filter effects shape sound by allowing only a specified range of frequencies to pass and/or by producing a resonance peak - Yamaha PSR-E423 | Owner's Manual - Page 23
Quick Guide Create Original Sounds x Effect Reverb Chorus it takes for the sound to decay to silence after a key is released). v Style Filter Filter Filter Cutoff Resonance In this case the knobs apply the filter effect to the style being played. the initial default tempo. Owner's Manual 23 - Yamaha PSR-E423 | Owner's Manual - Page 24
to play on the keyboard. For this example left hand. Filter Cutoff Filter Resonance Quick Guide Rotating the knob to the right while volume level. If you select a different keyboard voice the knobs will be reset and the at any time. You can also record performances using original sounds you've - Yamaha PSR-E423 | Owner's Manual - Page 25
position. This should give you a majestic, organ-like sound. The attack time is quite long so play the keys and hold them to let the sound come in fully. Ideal for slow pieces. v STYLE FILTER Select style 42 a style and/or arpeggio and use Knob A to adjust the tempo. Quick Guide Owner's Manual 25 - Yamaha PSR-E423 | Owner's Manual - Page 26
Playing Styles Quick Guide This instrument has an auto accompaniment feature that produces accompaniment (rhythm + bass + chords) in the START/ STOP] button, and the accompaniment bass and chord parts will begin playing when you play a key to the left of the keyboard split point. 26 Owner's Manual - Yamaha PSR-E423 | Owner's Manual - Page 27
Quick Guide Playing Styles Play Along with accompaniment is on. When automatic accompaniment is on ... The area of the keyboard to the left of the split point (54 : F#2) becomes the " note to left of the keyboard split point. Press the button a second time to turn the sync start function off. - Yamaha PSR-E423 | Owner's Manual - Page 28
Quick Guide Playing Styles 4 Start playing. Style playback will begin as soon as you play a chord in the accompaniment range of the keyboard. Try playing the chord progression shown below. Split point NOTE • accompaniment. Refer to "Pattern Variation (Sections)" on page 60. 28 Owner's Manual - Yamaha PSR-E423 | Owner's Manual - Page 29
Guide Easy Chords This method lets you easily play chords in the accompaniment range of the keyboard using only one, two, or three fingers. For root "C" C Cm C7 the nearest black key to the left of it. To play a seventh chord Press the root note together with the nearest white key to the left - Yamaha PSR-E423 | Owner's Manual - Page 30
Quick Guide Playing Songs With this instrument the term "song" refers the data that makes up a piece of music When you need to practice backing (accompaniment) patterns, these are the songs to do it with. • Songs you record yourself. • Songs transferred from a computer (page 76) 30 Owner's Manual - Yamaha PSR-E423 | Owner's Manual - Page 31
Guide style. Play Songs in Sequence Press the [DEMO/BGM] button to play Songs 001-008 in song by using the [+] button after pressing the [DEMO/BGM] button. The [-] button can be used to DEMO/BGM] button. You can also specify the repeat playback of all preset songs or songs transferred from a computer - Yamaha PSR-E423 | Owner's Manual - Page 32
. FF Press the fast forward button to rapidly skip ahead to a later point in the song. PAUSE Press the pause button to pause playback. Quick Guide 32 Owner's Manual - Yamaha PSR-E423 | Owner's Manual - Page 33
Reference Yamaha Education (the part that is turned off) on the keyboard. You can practice both parts when both the left- and demos for performance assistant. The lesson function cannot be used with them. • You can also use songs (only SMF format 0) transferred from the computer Manual 33 - Yamaha PSR-E423 | Owner's Manual - Page 34
the [WAITING] button to start Lesson 1. Notation Waiting r1 007 In this case "r1" indicate that right-hand lesson 1 has been selected. Keyboard Display Play the note shown in the display. When you play the correct note 've mastered Lesson 1, move on to Lesson 2. Reference 34 Owner's Manual - Yamaha PSR-E423 | Owner's Manual - Page 35
the [YOUR TEMPO] button to start Lesson 2. Notation YourTemp r2 007 In this case "r2" indicate that right-hand lesson 2 has been selected. Keyboard Display Play the note shown in the display. Try to play the notes at you've mastered Lesson 2, move on to Lesson 3. Reference Owner's Manual 35 - Yamaha PSR-E423 | Owner's Manual - Page 36
[MINUS ONE] button to start Lesson 3. Notation MinusOne r3 007 In this case "r3" indicate that right-hand lesson 3 has been selected. Keyboard Display Play the note shown in the display. 3 Stop the Lesson mode. a number button [1]-[9] during repeat playback. Reference 36 Owner's Manual - Yamaha PSR-E423 | Owner's Manual - Page 37
pattern will repeat. Listen to four measures while memorizing the basic pattern. It's your turn to play the part from the fifth measure. Reference Owner's Manual 37 - Yamaha PSR-E423 | Owner's Manual - Page 38
keyboard. Before After Play the score on the left along with the accompaniment using both hands. You can even play the same keys then begin playing from the ninth measure. Play the keys shown in the illustration. Keep playing F, A and and try adding the right-hand part. NOTE • The - Yamaha PSR-E423 | Owner's Manual - Page 39
description below. NOTE • Songs transferred to the instrument from a computer can also be used with the performance assistant technology as long with your hands spread as shown in the illustration, simply play the keyboard alternately with your left and right hands (any notes will do). 's Manual 39 - Yamaha PSR-E423 | Owner's Manual - Page 40
Database You want to play music in your favorite style, but you're not sure how to select the best voice and style for the type of music you want to play ... simply select the appropriate style from chords. Split Point Press the [START/STOP] button to stop playback. 40 Owner's Manual Reference - Yamaha PSR-E423 | Owner's Manual - Page 41
a song is played. You can also change the song's melody voice and the keyboard voice for a complete change of image. Listen to the DEMO Song for Easy Song Arranger The "Hallelujah Chorus" in the preset songs lets you chord data referring to the Song List in the separate Data List. Owner's Manual 41 - Yamaha PSR-E423 | Owner's Manual - Page 42
Because the Easy Song Arranger uses song data you can't specify chords by playing in the accompaniment range of the keyboard. The [ACMP ON/ OFF] button will not function. • If the time signature of the song and style Arranger function off. The indicator will go out. Reference 42 Owner's Manual - Yamaha PSR-E423 | Owner's Manual - Page 43
numbers 031-035) contain recorded data, Song 031 will automatically be selected. In this case, you will record over and erase any recording. When you play the keyboard, recording will begin. NOTE • After you've selected the desired User Song for recording, you can select a Style to be recorded - Yamaha PSR-E423 | Owner's Manual - Page 44
1 rEC 001 Track 1 and Style Track will flash NOTICE • If you record to a track that contains previouslyrecorded data the previous data will be overwritten and lost the style track [A] for recording. • Style accompaniment cannot turned on or off while recording is in progress. 44 Owner's Manual - Yamaha PSR-E423 | Owner's Manual - Page 45
recording to a selected track, press that track button a second time. 3 Recording will start when you play on the keyboard. You can also start recording data and make more room available for recording, then do the recording again. NOTE • If you want to record only the rhythm (percussion) part, press - Yamaha PSR-E423 | Owner's Manual - Page 46
recorded tracks (the muted tracks will not appear in the display) while recording new tracks. To Re-record a Track Simple select the track you want to re-record for recording playback. Data Recording Limitations • The split voice cannot be recorded. • The following data are recorded at the beginning - Yamaha PSR-E423 | Owner's Manual - Page 47
Record Your Own Performance Song Clear-Deleting User Songs This function clears an entire user song (all tracks). 1 Press the [SONG] button, [+] button to clear the track. The clear-in-progress message will appear briefly on the display while the track is being cleared. Owner's Manual 47 Reference - Yamaha PSR-E423 | Owner's Manual - Page 48
data. NOTICE • Do not turn off the power while saving settings to the registration memory, otherwise the data may be damaged or lost. 48 Owner's Manual - Yamaha PSR-E423 | Owner's Manual - Page 49
Type, Harmony Volume Other settings Transpose, Pitch Bend Range, Knob Assign * Style settings are not available for Registration Memory when using the Song features. Owner's Manual 49 Reference - Yamaha PSR-E423 | Owner's Manual - Page 50
Point, Touch Sensitivity, Style Volume, Song Volume, Metronome Volume, Grade, Demo Group, Demo Play, Demo Cancel, Master EQ type NOTE • You can save the settings as backup data to your computer, by using the Musicsoft Downloader (MSD) software. Refer to the section "Transfer a backup file from the - Yamaha PSR-E423 | Owner's Manual - Page 51
type, use the procedure described below. 1 Press the [FUNCTION] button. Adding Chorus The chorus effect creates a thick sound that is similar to many You can check how the selected chorus type sounds by playing on the keyboard. Refer to the Effect Type List in the separate Data List for Manual 51 - Yamaha PSR-E423 | Owner's Manual - Page 52
dial to set the tuning value between -100 and +100 as required. NOTE • The pitch of Drum Kits voices cannot be changed. Reference 52 Owner's Manual - Yamaha PSR-E423 | Owner's Manual - Page 53
beat length. Select the required length for each beat: 2, 4, 8, or 16 (half note, quarter note, eighth note, or 16th note). Select 8 for this example. Owner's Manual 53 - Yamaha PSR-E423 | Owner's Manual - Page 54
selected EQ type will be displayed. MasterEQ 54 Owner's Manual Speakerl 1 The currently selected master EQ type. 3 Use the dial to select the desired Master EQ setting. Five settings are available: 1-5. Settings 1 and 2 are best for listening via the instrument's built-in speakers, setting - Yamaha PSR-E423 | Owner's Manual - Page 55
the various parameters available you can create new voices that best suit your musical needs. 1 Press the [FUNCTION] button to registration memory (page 48). If you select a different keyboard voice the parameters will be reset and the ideal settings for 000-127 f r Reference Owner's Manual 55 - Yamaha PSR-E423 | Owner's Manual - Page 56
touch response is on you can adjust the keyboard's sensitivity to dynamics in three steps. 1 the same volume no matter how hard or softly you play the keys. 2 Press and hold the [TOUCH] button for longer than 3 Use the dial in response to keyboard dynamics to select a touch sensitivity setting - Yamaha PSR-E423 | Owner's Manual - Page 57
than a second. Trio 02 The currently selected harmony type NOTE • The harmony notes can be added only to the Main Voice, not to Dual or Split Voices. • The keys left of the Split Point of the keyboard produce no harmony notes when the auto accompaniment is on (ACMP ON is lit). How to - Yamaha PSR-E423 | Owner's Manual - Page 58
"2 Thru". When "1 Original" is selected the arpeggio volume is the same regardless of changes in keyboard velocity. Thru 2 1/8 The currently selected arpeggio quantization. 3 Use the dial to select the appropriate default arpeggio quantize setting depends on the arpeggio type. 58 Owner's Manual - Yamaha PSR-E423 | Owner's Manual - Page 59
jack. Arpeggio playback will stop when the footswitch is released. Connect a footswitch (page 11), then assign the function to the footswitch as per the instructions below. 1 Press the [FUNCTION] button. 2 Press the voices will not be affected. f r Reference Arpeggio Settings Owner's Manual 59 - Yamaha PSR-E423 | Owner's Manual - Page 60
on page 26 of the Quick Guide. Here are some other ways you left hand. Fill-in section This is automatically added before changing to section A or B. ENDING Auto Accompaniment is on. 60 Owner's Manual Beat arrows will flash when the synchro keyboard. You can disengage the synchro-start standby mode - Yamaha PSR-E423 | Owner's Manual - Page 61
while you are playing chords in the accompaniment range of the keyboard. Style playback will stop when you release the keys. To turn the function on, press the [SYNC STOP] A/B. The style will play while you are playing the keys Style playback will stop when you release the keys Owner's Manual 61 - Yamaha PSR-E423 | Owner's Manual - Page 62
by pressing the [TEMPO/TAP] button just twice. StyleVol 100 3 Use the dial to set the style volume between 000 and 127. Reference 62 Owner's Manual - Yamaha PSR-E423 | Owner's Manual - Page 63
054 Split point 3 Use the dial to set the split point to any key from 036(C1) through 096(C6). Split point (54 : F#2) Split voice you can play chords in the left-hand accompaniment range of the keyboard while the style is stopped and still hear the accompaniment chords. This Owner's Manual 63 - Yamaha PSR-E423 | Owner's Manual - Page 64
and Instrument"). The procedure described below loads a style file that has already been transferred from a computer to the instrument into style number 175. 1 Press the [FUNCTION] button. The currently selected or the [+] and [-] buttons to select the other files in sequence. 64 Owner's Manual - Yamaha PSR-E423 | Owner's Manual - Page 65
"M7" (major seventh) key in the section of the keyboard labeled "CHORD TYPE". (The keyboard diagram. 2 As an example, we'll learn how to play a GM7 (G major seventh) chord. Press the "G" key in the section of the keyboard auto accompaniment section of the keyboard, checking the indications in the - Yamaha PSR-E423 | Owner's Manual - Page 66
the dial to select a repeat playback group from the table below. Demo Preset User Download Preset songs 001-008 All preset songs All User songs All songs transferred from a computer PlayMode You cannot select the repeat playback mode when "Demo" is selected as the repeat playback group. 3 Use the - Yamaha PSR-E423 | Owner's Manual - Page 67
Song volume 3 Use the dial to set the song volume between 000 and 127. NOTE • Song volume can be adjusted while a song is selected. Owner's Manual 67 - Yamaha PSR-E423 | Owner's Manual - Page 68
the song-melody, percussion, accompaniment, etc. You can mute individual tracks and play the muted part on the keyboard yourself, or simply mute tracks other than the ones you want to listen to. To mute a track, press [ ] (A-B REPEAT) button before starting playback of the song. 68 Owner's Manual - Yamaha PSR-E423 | Owner's Manual - Page 69
a few seconds, indicating that the voice selected in step #2 has replaced the song's original melody voice. Hold for longer than a second SONG MEL Reference Owner's Manual 69 - Yamaha PSR-E423 | Owner's Manual - Page 70
[+] and [-] buttons are used to make ON/OFF type settings: [+] = ON, [-] = OFF. In some cases the [+] button will initiate execution of the selected function, and the [-] will cancel the selection. StyleVol 100 3 described in the "Initialization" section on page 50. Reference 70 Owner's Manual - Yamaha PSR-E423 | Owner's Manual - Page 71
in semitone increments. 036-096 (C1-C6) Determines the highest key for the Split voice and sets the Split "point"-in other words, the key that separates the Split (lower) and Main (upper) voices. the speaker output for optimum sound in different listening situations. Owner's Manual 71 Reference - Yamaha PSR-E423 | Owner's Manual - Page 72
the MIDI settings when you connect to a computer. Determines whether the instrument's keyboard controls the internal tone generator Demo)/ 2(Preset)/ 3(User)/ 4(Download) 1(Normal)/ 2(Random) ON/OFF Sets the length of each metronome beat. Determines the volume of the Metronome. Determines the guide - Yamaha PSR-E423 | Owner's Manual - Page 73
The USB-MIDI driver allows sequence software and similar applications on your computer to transmit and receive MIDI data to and from MIDI devices via a USB cable. The USB-MIDI driver is included on the CD-ROM. Installation of the USBMIDI driver is described on page 80. CAUTION • Connect the PSR-E423 - Yamaha PSR-E423 | Owner's Manual - Page 74
Computer By connecting the instrument to a computer, the instrument's performance data can be used on the computer, and performance data from the computer Keyboard Out KbdOut These settings determine ON/ whether keyboard computer and the instrument. * Set the PC mode to PC2 when using Digital Manual - Yamaha PSR-E423 | Owner's Manual - Page 75
. In order to transfer files between your computer and the instrument you will need to install the Musicsoft Downloader application and the USB-MIDI Driver included on the Accessory CD-ROM on your computer. Refer to the Accessory CD-ROM Installation Guide on page 78 for installation details. Data - Yamaha PSR-E423 | Owner's Manual - Page 76
to a Computer Use Musicsoft Downloader To Transfer Songs From the Accessory CD-ROM To the Instrument's flash memory NOTE • If a song or style is being played, stop playback before pro- ceeding. 1 Install the Musicsoft Downloader and USB-MIDI driver to your computer, then connect the computer and - Yamaha PSR-E423 | Owner's Manual - Page 77
Connecting to a Computer USB computer computer want to set the guide track. 2 Press the computer You can use the Musicsoft Downloader computer. If you click "Electronic Musical Instruments" in the Musicsoft Downloader Downloader application, refer to the Online help "Transferring Data Between the Computer - Yamaha PSR-E423 | Owner's Manual - Page 78
displays as illustrated in this manual are for instructional purposes, and may appear somewhat different from the screens which appear on your computer. • Software such as the USB-MIDI driver may be revised and updated without prior notice. Make sure to check and download the latest version of the - Yamaha PSR-E423 | Owner's Manual - Page 79
. Refer to page 82 for installation instructions. USBdrv32_ w USBdrv64_ USB-MIDI Driver (for 32-bit version Windows 2000/XP/Vista/7) USB-MIDI Driver (for 64-bit version Windows XP/Vista/7) This driver software is necessary to connect MIDI devices to your computer via USB. Refer to page 80 for - Yamaha PSR-E423 | Owner's Manual - Page 80
, refer to the troubleshooting section on page 82. NOTE • The example displays shown in this guide are in English. Installing / Updating the USB-MIDI Driver In order to be able to communicate with and use MIDI instruments connected to your computer, the appropriate driver software must be properly - Yamaha PSR-E423 | Owner's Manual - Page 81
Accessory CD-ROM Installation Guide NOTE • This screen will not appear on Windows 7. When the message "Device driver software was not successfully installed." appears, continue the installation procedure. NOTE • This screen will not appear if you are updating the USB- MIDI driver from the previous - Yamaha PSR-E423 | Owner's Manual - Page 82
.yamaha.com/download/ IMPORTANT • Only Musicsoft Downloader can be used to transfer files between this instrument and a computer. No other file transfer application can be used. Troubleshooting The driver cannot be installed. • Is the USB cable connected correctly? Check the USB cable connection - Yamaha PSR-E423 | Owner's Manual - Page 83
USB-MIDI Driver" or "Yamaha Musicsoft Downloader" from the list in the right panel. 5 Click [Remove]. A dialog box appears. Follow the instructions to remove the software. [Windows Vista/7] 1 Disconnect all USB devices from the com- puter except for the mouse and keyboard. 2 Start the computer - Yamaha PSR-E423 | Owner's Manual - Page 84
the SOFTWARE from one computer to another or share the SOFTWARE in a network with other computers. • You may not use the SOFTWARE to distribute illegal data or data that violates public policy. • You may not initiate services based on the use of the SOFTWARE without permission by Yamaha Corporation - Yamaha PSR-E423 | Owner's Manual - Page 85
is connected to the PHONES/OUTPUT jack on the or when a song or style is being played back. rear panel. When a set of headphones is plugged into this jack, no sound is output. Check the Local Control on/off. (See page 74.) Playing keys in the right hand area of the keyboard does - Yamaha PSR-E423 | Owner's Manual - Page 86
Others: PA-3C, PA-130 or an equivalent • Footswitch: FC4/FC5 • Keyboard Stand: L-2C/L-2L • Headphones: HPE-150/30 * Specifications and descriptions in this owner's manual are for information purposes only. Yamaha Corp. reserves the right to change or modify products or specifications at any - Yamaha PSR-E423 | Owner's Manual - Page 87
Accessories Computer 73 Cutoff 22 D Default Setting 70 Delete (Songs transferred from a computer 50 Delete (User Song 47 Demo 31 Demo Cancel 72 Demo Group 66 Demo 72 Headphones 11 I Initial Send 75 Initialization 50 Intro 60 K Keyboard Out 74 L Lesson 33 Load SFF 64 Local 74 L-Part 77 - Yamaha PSR-E423 | Owner's Manual - Page 88
54 Pitch Bend Range 71 Power Adaptor 10 Preset Song 30 R Recording 43 Registration Memory 48 Release Time 23, 55 Repeat 36, 68 60 Synchro Stop 61 Transpose 52 Troubleshooting (Installation 82 Troubleshooting (Instrument 85 Tuning 52 U USB 73 USB-MIDI Driver 80 User Manual Appendix - Yamaha PSR-E423 | Owner's Manual - Page 89
or operation or failure to follow instructions according to the Owner's Manual for this product; any shipment of the product (claims must be presented to the carrier); repair or attempted repair by anyone other than Yamaha or an authorized Yamaha Service Center; (b) any unit which has been - Yamaha PSR-E423 | Owner's Manual - Page 90
90 Owner's Manual - Yamaha PSR-E423 | Owner's Manual - Page 91
- Yamaha PSR-E423 | Owner's Manual - Page 92
Kong Tel: 2737-7688 INDIA Yamaha Music India Pvt. Ltd. 5F Ambience Corporate Tower Yamaha Home Keyboards Home Page http://music.yamaha.com/homekeyboard/ Yamaha Manual Library http://www.yamaha.co.jp/manual/ U.R.G., Pro Audio & Digital Musical Instrument Division, Yamaha Corporation © 2010 Yamaha
-
 1
1 -
 2
2 -
 3
3 -
 4
4 -
 5
5 -
 6
6 -
 7
7 -
8
-
9
-
10
-
11
-
12
-
13
-
14
-
15
-
16
-
17
-
18
-
19
-
20
-
21
-
22
-
23
-
24
-
25
-
26
-
27
-
28
-
29
-
30
-
31
-
32
-
33
-
34
-
35
-
36
-
37
-
38
-
39
-
40
-
41
-
42
-
43
-
44
-
45
-
46
-
47
-
48
-
49
-
50
-
51
-
52
-
53
-
54
-
55
-
56
-
57
-
58
-
59
-
60
-
61
-
62
-
63
-
64
-
65
-
66
-
67
-
68
-
69
-
70
-
71
-
72
-
73
-
74
-
75
-
76
-
77
-
78
-
79
-
80
-
81
-
82
-
83
-
84
-
85
-
86
-
87
-
88
-
89
-
90
-
91
-
92
 |
 |
Setting Up
Reference
Appendix
Quick Guide
EN
Owner’s Manual
DIGITAL KEYBOARD