Yamaha RX-V371 Owners Manual - Page 77
Connect playback device such as BD/DVD players and recorders, Connect the AC power cord - receiver manual
 |
View all Yamaha RX-V371 manuals
Add to My Manuals
Save this manual to your list of manuals |
Page 77 highlights
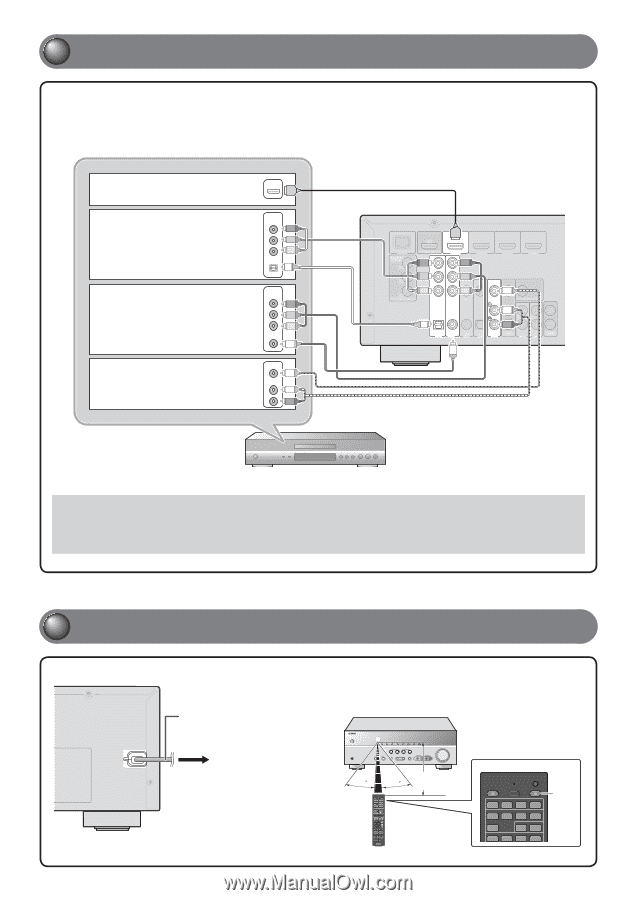
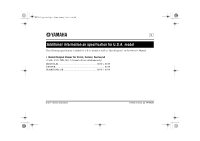
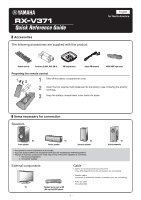
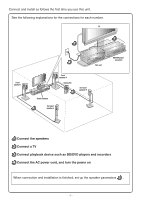
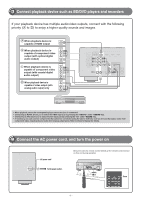
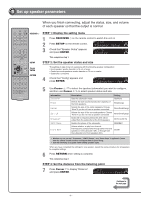
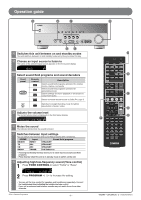
3 Connect playback device such as BD/DVD players and recorders If your playback device has multiple audio/video outputs, connect with the following priority (A to D) to enjoy a higher quality sounds and images. A When playback device is capable of HDMI output HDMI HDMI B When playback device is capable of component video output (with optical digital audio output) COMPONENT VIDEO PR PB Y OPTICAL C When playback device is capable of component video output (with coaxial digital audio output) D When playback device is capable of video output (with analog audio output) only COMPONENT VIDEO PR PB Y COAXIAL C VIDEO V AUDIO L R OO O DOCK COMPONENT VIDEO PR PB Y MONITOR OUT HDMI ARC HDMI OUT (BD/DVD) HDMI 1 HDMI 2 PR PR PR PB PB PB Y Y COMPONENT VIDEO Y VIDEO HDMI 3 HDMI 4 V MONITOR OUT L OPTICAL AV 1 COAXIAL AV 2 COAXIAL (CD) AV 3 OPTICAL ( TV ) AV 4 AV 5 R AV OUT AUDIO 1 AUDIO 2 AUDIO OUT C • When playback, select the corresponding input source the jack is connected. • Connecting to HDMI1 allows you to select the HDMI input just by pressing the "BD/DVD" under "SCENE" key. • Connecting to AV3 allows you to select the AV3 input just by pressing the "CD" under "SCENE" key. • If necessary, you can connect components that cannot be connected using the above methods, such as devices that output video from component video output jacks and audio from analog output jacks. Refer to Owner's Manual for details. 4 Connect the AC power cord, and turn the power on AC power cord Be sure to aim the remote control directly at the remote control sensor on this unit during operation. To the power outlet. within 30 30 20 ft SOURCE 1 1 5 TRANSMIT CODE SET SLEEP RECEIVER HDMI 2 3 4 AV 2 3 4 AUDIO 1 2 V-AUX [ A ] [ B ] DOCK Press - 5 -
-
 1
1 -
2
-
3
-
4
-
5
-
6
-
7
-
8
-
9
-
10
-
11
-
12
-
13
-
14
-
15
-
16
-
17
-
18
-
19
-
20
-
21
-
22
-
23
-
24
-
25
-
26
-
27
-
28
-
29
-
30
-
31
-
32
-
33
-
34
-
35
-
36
-
37
-
38
-
39
-
40
-
41
-
42
-
43
-
44
-
45
-
46
-
47
-
48
-
49
-
50
-
51
-
52
-
53
-
54
-
55
-
56
-
57
-
58
-
59
-
60
-
61
-
62
-
63
-
64
-
65
-
66
-
67
-
68
-
69
-
70
-
71
-
 72
72 -
 73
73 -
 74
74 -
 75
75 -
 76
76 -
 77
77 -
 78
78 -
 79
79 -
 80
80 -
 81
81 -
 82
82 -
83
-
84
-
85
-
86
-
87
-
88
 |
 |