Yamaha RX-V371 Owners Manual - Page 79
>Off, Information, Description, Setting, This completes step 3., To raise the volume, Speakers - check speaker
 |
View all Yamaha RX-V371 manuals
Add to My Manuals
Save this manual to your list of manuals |
Page 79 highlights
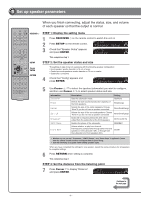
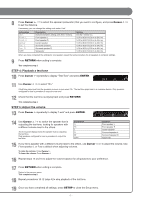
8 Press Cursor B / C to select the speaker (subwoofer) that you want to configure, and press Cursor D / E to set the distance. If necessary, you can change the setting units under "Unit." Information Unit Front L Front R Center Sur. L Sur. R SWFR Description Switches between setting units (feet / meters). Front speaker L Front speaker R Center speaker Surround speaker L Surround speaker R Subwoofer Setting feet (ft) / meters (m) 1.0 ft to 80.0 ft (0.30 m to 24.0 m) 1.0 ft to 80.0 ft (0.30 m to 24.0 m) 1.0 ft to 80.0 ft (0.30 m to 24.0 m) 1.0 ft to 80.0 ft (0.30 m to 24.0 m) 1.0 ft to 80.0 ft (0.30 m to 24.0 m) 1.0 ft to 80.0 ft (0.30 m to 24.0 m) When you have completed the settings for one speaker, repeat the same procedure for all speakers to complete settings. 9 Press RETURN when setting is complete. This completes step 3. STEP 4: Playback a test tone 10 Press Cursor C repeatedly to display "Test Tone" and press ENTER. TEST >Off On VOL. SW L CR SL SR 11 Use Cursor D / E to select "On." A test tone plays back from the speakers as soon as you select "On." The test tone plays back in a clockwise fashion. Only speakers configured for use in procedure 5 output the test tone. 12 Check that the test tone is playing back and press RETURN. This completes step 4. STEP 5: Adjust the volume 13 Press Cursor B repeatedly to display "Level" and press ENTER. LEVEL VOL. d FL----d ---- SW L CR SL SR 14 Use Cursor B / C to switch the speaker that is outputting the test tone, looking for speakers with a different volume level to the others. The front panel display shows the speaker that is outputting the test tone. Only speakers configured for use in procedure 5 output the test tone. Information FL FR C SL SR SWFR Speakers Front speaker L Front speaker R Center speaker Surround speaker L Surround speaker R Subwoofer 15 If you find a speaker with a different volume level to the others, use Cursor D / E to adjust the volume. Use Front speaker L or R as a default when adjusting volumes. To raise the volume: Press Cursor E. To lower the volume: Press Cursor D. 16 Repeat steps 14 and 15 to adjust the volume balance for all speakers to your preference. 17 Press RETURN when setting is complete. Return to the previous menu. This completes step 5. 18 Repeat procedures 10-12 (step 4) to stop playback of the test tone. 19 Once you have completed all settings, press SETUP to close the Setup menu. - 7 -
-
 1
1 -
2
-
3
-
4
-
5
-
6
-
7
-
8
-
9
-
10
-
11
-
12
-
13
-
14
-
15
-
16
-
17
-
18
-
19
-
20
-
21
-
22
-
23
-
24
-
25
-
26
-
27
-
28
-
29
-
30
-
31
-
32
-
33
-
34
-
35
-
36
-
37
-
38
-
39
-
40
-
41
-
42
-
43
-
44
-
45
-
46
-
47
-
48
-
49
-
50
-
51
-
52
-
53
-
54
-
55
-
56
-
57
-
58
-
59
-
60
-
61
-
62
-
63
-
64
-
65
-
66
-
67
-
68
-
69
-
70
-
71
-
72
-
73
-
 74
74 -
 75
75 -
 76
76 -
 77
77 -
 78
78 -
 79
79 -
 80
80 -
 81
81 -
 82
82 -
 83
83 -
 84
84 -
85
-
86
-
87
-
88
 |
 |
