2007 BMW X5 Owner's Manual - Page 120
2007 BMW X5 Manual
Page 120 highlights
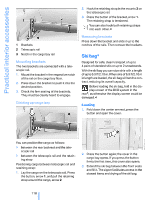
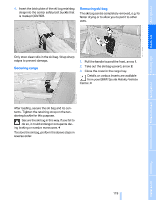
Practical interior accessories 2. Hook the retaining strap in the mounts 3 on the telescopic rail. 3. Press the button of the bracket, arrow 1. The retaining strap is tensioned. You can also hook both retaining straps into each other.< Removing brackets 1 2 3 Brackets Telescopic rail Notch in the cargo bay rail Press down the bracket and slide it up to the notches of the rails. Then remove the brackets. Ski bag* Designed for safe, clean transport of up to 4 pairs of standard skis or up to 2 snowboards. With the ski bag you can stow skis with a length of up to 6.9 ft/2.10 m. When skis of 6.9 ft/2.10 m in length are loaded, the ski bag will tend to contract, reducing its overall capacity. Before loading the ski bag, fold in the display screen of the DVD system in the rear*, as otherwise the display screen could be damaged.< Mounting brackets The two brackets are connected with a telescopic rail. 1. Mount the bracket in the respective notch of the rail on the cargo bay floor. 2. Press down the bracket to push it into the desired position. 3. Check the firm seating of the brackets. They must be clearly heard to engage. Dividing up cargo bay Loading 1. Fold down the center armrest, press the button and open the cover. You can position the cargo as follows: > between the rear backrest and the telescopic rail > between the telescopic rail and the retaining strap Positioning cargo between telescopic rail and retaining strap: 1. Lay the cargo on the telescopic rail. Press the button, arrow 1, and pull the retaining strap around the cargo, arrow 2. 2. Press the button again; the cover in the cargo bay opens. If you press the button firmly the first time, this cover also opens. 3. Extend the ski bag between the front seats and fill it. The zipper facilitates access to the stowed items and drying of the ski bag. 118 Online Edition for Part no. 01 41 0 012 501 - © 08/06 BMW AG
-
 1
1 -
2
-
3
-
4
-
5
-
6
-
7
-
8
-
9
-
10
-
11
-
12
-
13
-
14
-
15
-
16
-
17
-
18
-
19
-
20
-
21
-
22
-
23
-
24
-
25
-
26
-
27
-
28
-
29
-
30
-
31
-
32
-
33
-
34
-
35
-
36
-
37
-
38
-
39
-
40
-
41
-
42
-
43
-
44
-
45
-
46
-
47
-
48
-
49
-
50
-
51
-
52
-
53
-
54
-
55
-
56
-
57
-
58
-
59
-
60
-
61
-
62
-
63
-
64
-
65
-
66
-
67
-
68
-
69
-
70
-
71
-
72
-
73
-
74
-
75
-
76
-
77
-
78
-
79
-
80
-
81
-
82
-
83
-
84
-
85
-
86
-
87
-
88
-
89
-
90
-
91
-
92
-
93
-
94
-
95
-
96
-
97
-
98
-
99
-
100
-
101
-
102
-
103
-
104
-
105
-
106
-
107
-
108
-
109
-
110
-
111
-
112
-
113
-
114
-
 115
115 -
 116
116 -
 117
117 -
 118
118 -
 119
119 -
 120
120 -
 121
121 -
 122
122 -
 123
123 -
 124
124 -
 125
125 -
126
-
127
-
128
-
129
-
130
-
131
-
132
-
133
-
134
-
135
-
136
-
137
-
138
-
139
-
140
-
141
-
142
-
143
-
144
-
145
-
146
-
147
-
148
-
149
-
150
-
151
-
152
-
153
-
154
-
155
-
156
-
157
-
158
-
159
-
160
-
161
-
162
-
163
-
164
-
165
-
166
-
167
-
168
-
169
-
170
-
171
-
172
-
173
-
174
-
175
-
176
-
177
-
178
-
179
-
180
-
181
-
182
-
183
-
184
-
185
-
186
-
187
-
188
-
189
-
190
-
191
-
192
-
193
-
194
-
195
-
196
-
197
-
198
-
199
-
200
-
201
-
202
-
203
-
204
-
205
-
206
-
207
-
208
-
209
-
210
-
211
-
212
-
213
-
214
-
215
-
216
-
217
-
218
-
219
-
220
-
221
-
222
-
223
-
224
-
225
-
226
-
227
-
228
-
229
-
230
-
231
-
232
-
233
-
234
-
235
-
236
-
237
-
238
-
239
-
240
-
241
-
242
-
243
-
244
-
245
-
246
-
247
-
248
-
249
-
250
-
251
-
252
-
253
-
254
-
255
-
256
-
257
-
258
-
259
-
260
-
261
-
262
-
263
-
264
-
265
-
266
-
267
-
268
-
269
-
270
-
271
-
272
 |
 |
