2007 BMW X5 Owner's Manual - Page 64
2007 BMW X5 Manual
Page 64 highlights
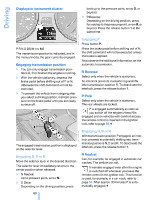
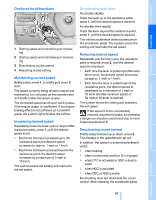
Driving Turn signals/headlamp flasher/high beams 3. Insert the releasing tool, contained in the onboard tool kit under the floor panel, refer to page 228, into the opening, arrow 1. 4. Turn the releasing tool as far as possible, arrow 2, and then press downward. The transmission lock is released. Lock the transmission lock after parking the vehicle at its destination. Otherwise there is a danger of the vehicle rolling.< 1 2 3 High beams Headlamp flasher Turn signals Using turn signals Press the lever beyond the resistance point. To switch off manually, press the lever up to the resistance point. Atypically rapid flashing of the indicator lamp indicates that a turn signal bulb needs to be replaced.< Locking Signaling briefly Press lever to resistance point and hold for as long as you wish to signal. 1. Pull out the releasing tool. The transmission lock is locked again. 2. Close the cover in the bottom of the cup holder and lay in the mat again. 3. Close the cover of the cup holder and stow the releasing tool. The display in the instrument cluster must change from N to P after locking the transmission lock. Otherwise there is a danger of the vehicle rolling.< Information on jump starting and towing from page 237. Triple turn signal activation Press the lever up to the resistance point; the turn signal flashes once. You can switch over this function so that the turn signal flashes three times. The setting is stored for the remote control currently in use. iDrive, for explanation of concept, refer to page 16. 1. Press the button. This opens the start menu. 2. Press the controller to open the menu. 3. Select "Settings" and press the controller. 4. Select "Vehicle / Tires" and press the controller. 62 Online Edition for Part no. 01 41 0 012 501 - © 08/06 BMW AG
-
 1
1 -
2
-
3
-
4
-
5
-
6
-
7
-
8
-
9
-
10
-
11
-
12
-
13
-
14
-
15
-
16
-
17
-
18
-
19
-
20
-
21
-
22
-
23
-
24
-
25
-
26
-
27
-
28
-
29
-
30
-
31
-
32
-
33
-
34
-
35
-
36
-
37
-
38
-
39
-
40
-
41
-
42
-
43
-
44
-
45
-
46
-
47
-
48
-
49
-
50
-
51
-
52
-
53
-
54
-
55
-
56
-
57
-
58
-
 59
59 -
 60
60 -
 61
61 -
 62
62 -
 63
63 -
 64
64 -
 65
65 -
 66
66 -
 67
67 -
 68
68 -
 69
69 -
70
-
71
-
72
-
73
-
74
-
75
-
76
-
77
-
78
-
79
-
80
-
81
-
82
-
83
-
84
-
85
-
86
-
87
-
88
-
89
-
90
-
91
-
92
-
93
-
94
-
95
-
96
-
97
-
98
-
99
-
100
-
101
-
102
-
103
-
104
-
105
-
106
-
107
-
108
-
109
-
110
-
111
-
112
-
113
-
114
-
115
-
116
-
117
-
118
-
119
-
120
-
121
-
122
-
123
-
124
-
125
-
126
-
127
-
128
-
129
-
130
-
131
-
132
-
133
-
134
-
135
-
136
-
137
-
138
-
139
-
140
-
141
-
142
-
143
-
144
-
145
-
146
-
147
-
148
-
149
-
150
-
151
-
152
-
153
-
154
-
155
-
156
-
157
-
158
-
159
-
160
-
161
-
162
-
163
-
164
-
165
-
166
-
167
-
168
-
169
-
170
-
171
-
172
-
173
-
174
-
175
-
176
-
177
-
178
-
179
-
180
-
181
-
182
-
183
-
184
-
185
-
186
-
187
-
188
-
189
-
190
-
191
-
192
-
193
-
194
-
195
-
196
-
197
-
198
-
199
-
200
-
201
-
202
-
203
-
204
-
205
-
206
-
207
-
208
-
209
-
210
-
211
-
212
-
213
-
214
-
215
-
216
-
217
-
218
-
219
-
220
-
221
-
222
-
223
-
224
-
225
-
226
-
227
-
228
-
229
-
230
-
231
-
232
-
233
-
234
-
235
-
236
-
237
-
238
-
239
-
240
-
241
-
242
-
243
-
244
-
245
-
246
-
247
-
248
-
249
-
250
-
251
-
252
-
253
-
254
-
255
-
256
-
257
-
258
-
259
-
260
-
261
-
262
-
263
-
264
-
265
-
266
-
267
-
268
-
269
-
270
-
271
-
272
 |
 |
