2003 Chevrolet Malibu Owner's Manual - Page 166
2003 Chevrolet Malibu Manual
Page 166 highlights
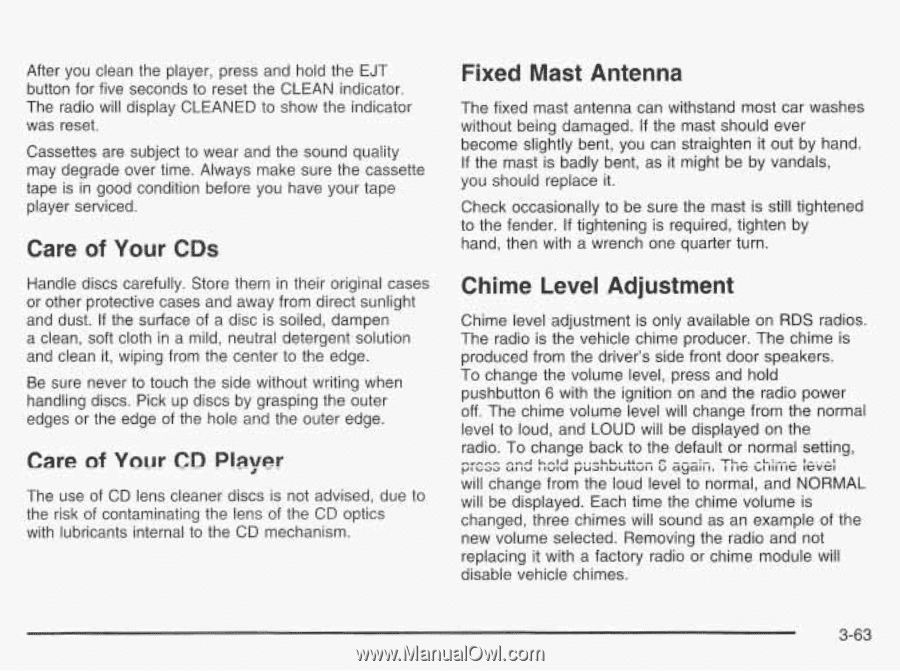
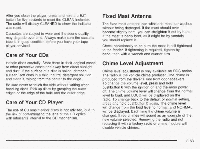
After you clean the player, press and hold the EJT button for five seconds to reset the CLEAN indicator. The radio will display CLEANED to show the indicator was reset. Cassettes are subject to wear and the sound quality may degrade over time. Always make sure the cassette tape is in good condition before you have your tape player serviced. Fixed Mast Antenna The fixed mast antenna can withstand most car washes without being damaged. If the mast should ever become slightly bent, you can straighten it out by hand. If the mast is badly bent, as it might be by vandals, you should replace it. Check occasionally to be sure the mast is still tightened to the fender. If tightening is required, tighten by hand, then with a wrench one quarter turn. Care of Your CDs Handle discs carefully. Store them in their original cases or other protective cases and away from direct sunlight and dust. If the surface of a disc is soiled, dampen a clean, soft cloth in a mild, neutral detergent solution and clean it, wiping from the center to the edge. Be sure never to touch the side without writing when handling discs. Pick up discs by grasping the outer edges or the edge of the hole and the outer edge. Chime Level Adjustment Chime level adjustment is only available on RDS radios. The radio is the vehicle chime producer. The chime is produced from the driver's side front door speakers. To change the volume level, press and hold pushbutton 6 with the ignition on and the radio power off. The chime volume level will change from the normal level to loud, and LOUD will be displayed on the radio. To change back to the default or normal setting, mrnTrTr PI G J J h n l A m.a,.hh..44..CAI IU I IWIU pua1 tuutcul I u ayall I . C ? ---:, TI^- -L:.-- I I IG L I 1 1 1 I le IGVCI I.-I -. The use of CD lens cleaner discs is not advised, due to the risk of contaminating the lens of the CD optics with lubricants internal to the CD mechanism. will change from the loud level to normal, and NORMAL will be displayed. Each time the chime volume is changed, three chimes will sound as an example of the new volume selected. Removing the radio and not replacing it with a factory radio or chime module will aisabie venicie chimes. 3-63
-
 1
1 -
2
-
3
-
4
-
5
-
6
-
7
-
8
-
9
-
10
-
11
-
12
-
13
-
14
-
15
-
16
-
17
-
18
-
19
-
20
-
21
-
22
-
23
-
24
-
25
-
26
-
27
-
28
-
29
-
30
-
31
-
32
-
33
-
34
-
35
-
36
-
37
-
38
-
39
-
40
-
41
-
42
-
43
-
44
-
45
-
46
-
47
-
48
-
49
-
50
-
51
-
52
-
53
-
54
-
55
-
56
-
57
-
58
-
59
-
60
-
61
-
62
-
63
-
64
-
65
-
66
-
67
-
68
-
69
-
70
-
71
-
72
-
73
-
74
-
75
-
76
-
77
-
78
-
79
-
80
-
81
-
82
-
83
-
84
-
85
-
86
-
87
-
88
-
89
-
90
-
91
-
92
-
93
-
94
-
95
-
96
-
97
-
98
-
99
-
100
-
101
-
102
-
103
-
104
-
105
-
106
-
107
-
108
-
109
-
110
-
111
-
112
-
113
-
114
-
115
-
116
-
117
-
118
-
119
-
120
-
121
-
122
-
123
-
124
-
125
-
126
-
127
-
128
-
129
-
130
-
131
-
132
-
133
-
134
-
135
-
136
-
137
-
138
-
139
-
140
-
141
-
142
-
143
-
144
-
145
-
146
-
147
-
148
-
149
-
150
-
151
-
152
-
153
-
154
-
155
-
156
-
157
-
158
-
159
-
160
-
 161
161 -
 162
162 -
 163
163 -
 164
164 -
 165
165 -
 166
166 -
 167
167 -
 168
168 -
 169
169 -
 170
170 -
 171
171 -
172
-
173
-
174
-
175
-
176
-
177
-
178
-
179
-
180
-
181
-
182
-
183
-
184
-
185
-
186
-
187
-
188
-
189
-
190
-
191
-
192
-
193
-
194
-
195
-
196
-
197
-
198
-
199
-
200
-
201
-
202
-
203
-
204
-
205
-
206
-
207
-
208
-
209
-
210
-
211
-
212
-
213
-
214
-
215
-
216
-
217
-
218
-
219
-
220
-
221
-
222
-
223
-
224
-
225
-
226
-
227
-
228
-
229
-
230
-
231
-
232
-
233
-
234
-
235
-
236
-
237
-
238
-
239
-
240
-
241
-
242
-
243
-
244
-
245
-
246
-
247
-
248
-
249
-
250
-
251
-
252
-
253
-
254
-
255
-
256
-
257
-
258
-
259
-
260
-
261
-
262
-
263
-
264
-
265
-
266
-
267
-
268
-
269
-
270
-
271
-
272
-
273
-
274
-
275
-
276
-
277
-
278
-
279
-
280
-
281
-
282
-
283
-
284
-
285
-
286
-
287
-
288
-
289
-
290
-
291
-
292
-
293
-
294
-
295
-
296
-
297
-
298
-
299
-
300
-
301
-
302
-
303
-
304
-
305
-
306
-
307
-
308
-
309
-
310
-
311
-
312
-
313
-
314
-
315
-
316
-
317
-
318
-
319
-
320
-
321
-
322
-
323
-
324
-
325
-
326
-
327
-
328
-
329
-
330
-
331
-
332
-
333
-
334
-
335
-
336
-
337
-
338
-
339
-
340
-
341
-
342
-
343
-
344
-
345
-
346
-
347
-
348
-
349
-
350
-
351
-
352
-
353
-
354
 |
 |