2005 Honda CR-V Owner's Manual - Page 66
2005 Honda CR-V Manual
Page 66 highlights
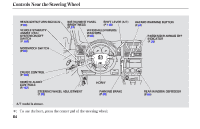
Gauges The temperature sensor is in the front bumper. Therefore, the temperature reading can be affected by heat reflection from the road surface, engine heat, and the exhaust from surrounding traffic. This can cause an incorrect temperature reading when your speed is under 19 mph (30 km/h). The sensor delays the display update until it reaches the correct outside temperature. This may take several minutes. If the outside temperature is incorrectly displayed, you can adjust it up 5°F in U.S. models ( 3°C in Canadian models) warmer or cooler. NOTE: The temperature must be stabilized before doing this procedure. To adjust the outside temperature display, press and hold the Select/ Reset button for 10 seconds. The following sequence will appear for one second each: 0, 1, 2, 3, 4, 5, 5, 4, 3, 2, 1, 0 (U.S.) or 0, 1, 2, 3, 3, 2, 1, 0 (Canada). When it reaches the desired value, release the Select/Reset button. You should see the new outside temperature displayed. In certain weather conditions, temperature readings near freezing (32°F, 0°C) could mean that ice is forming on the road surface. Check Fuel Cap Indicator If your fuel fill cap is loose or missing, a ''CHECK FUEL CAP'' message appears as text in the odometer/trip meter display after you start the engine. The message appears from CHECK to FUEL, then to CAP repeatedly. Turn the engine off and confirm the fuel fill cap is installed. If it is, loosen the cap, then retighten it at least 3 clicks. When you restart the engine, the message appears again. To clear, press and hold the Select/Reset button until the message is replaced by the odometer/trip meter display. If the system still detects a loose or missing fuel fill cap, the Malfunction Indicator Lamp (MIL) comes on. Turn the engine off and check or retighten the fuel fill cap at least 3 clicks. The MIL goes out after 3 days of normal driving once the cap is tightened or replaced. If it does not go out, have your dealer inspect the vehicle. For more information, see page 222 . Instruments and Controls 63
-
 1
1 -
2
-
3
-
4
-
5
-
6
-
7
-
8
-
9
-
10
-
11
-
12
-
13
-
14
-
15
-
16
-
17
-
18
-
19
-
20
-
21
-
22
-
23
-
24
-
25
-
26
-
27
-
28
-
29
-
30
-
31
-
32
-
33
-
34
-
35
-
36
-
37
-
38
-
39
-
40
-
41
-
42
-
43
-
44
-
45
-
46
-
47
-
48
-
49
-
50
-
51
-
52
-
53
-
54
-
55
-
56
-
57
-
58
-
59
-
60
-
 61
61 -
 62
62 -
 63
63 -
 64
64 -
 65
65 -
 66
66 -
 67
67 -
 68
68 -
 69
69 -
 70
70 -
 71
71 -
72
-
73
-
74
-
75
-
76
-
77
-
78
-
79
-
80
-
81
-
82
-
83
-
84
-
85
-
86
-
87
-
88
-
89
-
90
-
91
-
92
-
93
-
94
-
95
-
96
-
97
-
98
-
99
-
100
-
101
-
102
-
103
-
104
-
105
-
106
-
107
-
108
-
109
-
110
-
111
-
112
-
113
-
114
-
115
-
116
-
117
-
118
-
119
-
120
-
121
-
122
-
123
-
124
-
125
-
126
-
127
-
128
-
129
-
130
-
131
-
132
-
133
-
134
-
135
-
136
-
137
-
138
-
139
-
140
-
141
-
142
-
143
-
144
-
145
-
146
-
147
-
148
-
149
-
150
-
151
-
152
-
153
-
154
-
155
-
156
-
157
-
158
-
159
-
160
-
161
-
162
-
163
-
164
-
165
-
166
-
167
-
168
-
169
-
170
-
171
-
172
-
173
-
174
-
175
-
176
-
177
-
178
-
179
-
180
-
181
-
182
-
183
-
184
-
185
-
186
-
187
-
188
-
189
-
190
-
191
-
192
-
193
-
194
-
195
-
196
-
197
-
198
-
199
-
200
-
201
-
202
-
203
-
204
-
205
-
206
-
207
-
208
-
209
-
210
-
211
-
212
-
213
-
214
-
215
-
216
-
217
-
218
-
219
-
220
-
221
-
222
-
223
-
224
-
225
-
226
-
227
-
228
-
229
-
230
-
231
-
232
-
233
-
234
-
235
-
236
-
237
-
238
-
239
-
240
-
241
-
242
-
243
-
244
-
245
-
246
-
247
-
248
-
249
-
250
-
251
-
252
-
253
-
254
-
255
-
256
-
257
-
258
-
259
 |
 |
