2011 Kawasaki Teryx 750 FI 4x4 LE Owners Manual - Page 121
2011 Kawasaki Teryx 750 FI 4x4 LE Manual

Page 121 highlights
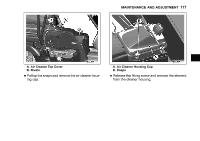
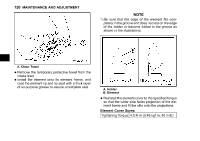
MAINTENANCE AND ADJUSTMENT 119 WARNING Gasoline or low flash-point solvent are extremely flammable and can be explosive under certain conditions. A fire or explosion can cause severe injury or death. Use a high flash-point solvent to clean the air cleaner element. Never use gasoline or low flash-point solvents. Clean the element in a well-ventilated area free from any source of flame or sparks; this includes any appliances with a pilot light. it dry in a clean towel. Do not wring the • Squeeze element or blow it dry; the element can be dam- j A. Air Cleaner Housing B. Intake Tract • WARNING If dirt or dust is allowed to pass through into the throttle body assembly, the throttle may become stuck, possibly causing accident. Be sure to keep the dust from entering during cleaning. aged. Inspect the element for damage. If it is torn, punctured, or hardened, replace it. NOTE żReplace the element after cleaning it five times or if it is damaged. cleaning, saturate the element with a high • After quality foam air filter oil, and make sure that the oil is evenly applied throughout the foam air cleaner element. Squeeze out the excess oil, but do not wring the foam air cleaner element as this could cause tearing. In this case, too much oil is better than too little. Finally pat the inside of the foam air cleaner element with a clean towel to remove any excess oil. NOTICE If dirt gets through into the engine, excessive engine wear and possibly engine damage will occur. the element in a bath of high flash-point sol• Clean vent using a soft bristle brush.
-
 1
1 -
2
-
3
-
4
-
5
-
6
-
7
-
8
-
9
-
10
-
11
-
12
-
13
-
14
-
15
-
16
-
17
-
18
-
19
-
20
-
21
-
22
-
23
-
24
-
25
-
26
-
27
-
28
-
29
-
30
-
31
-
32
-
33
-
34
-
35
-
36
-
37
-
38
-
39
-
40
-
41
-
42
-
43
-
44
-
45
-
46
-
47
-
48
-
49
-
50
-
51
-
52
-
53
-
54
-
55
-
56
-
57
-
58
-
59
-
60
-
61
-
62
-
63
-
64
-
65
-
66
-
67
-
68
-
69
-
70
-
71
-
72
-
73
-
74
-
75
-
76
-
77
-
78
-
79
-
80
-
81
-
82
-
83
-
84
-
85
-
86
-
87
-
88
-
89
-
90
-
91
-
92
-
93
-
94
-
95
-
96
-
97
-
98
-
99
-
100
-
101
-
102
-
103
-
104
-
105
-
106
-
107
-
108
-
109
-
110
-
111
-
112
-
113
-
114
-
115
-
 116
116 -
 117
117 -
 118
118 -
 119
119 -
 120
120 -
 121
121 -
 122
122 -
 123
123 -
 124
124 -
 125
125 -
 126
126 -
127
-
128
-
129
-
130
-
131
-
132
-
133
-
134
-
135
-
136
-
137
-
138
-
139
-
140
-
141
-
142
-
143
-
144
-
145
-
146
-
147
-
148
-
149
-
150
-
151
-
152
-
153
-
154
-
155
-
156
-
157
-
158
-
159
-
160
-
161
-
162
-
163
-
164
-
165
-
166
-
167
-
168
-
169
-
170
-
171
-
172
-
173
 |
 |
