2010 Mercedes C-Class Owner's Manual - Page 204
2010 Mercedes C-Class Manual
Page 204 highlights
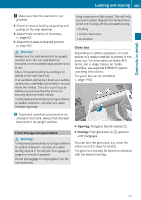
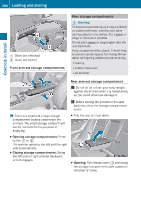
202 X X Loading and storing Switch on the ignition. Push and hold the roof panel switch in direction of arrow ; (Y page 199) until the roller sunblinds are fully retracted. X Push and hold the roof panel switch in direction of arrow ; until the tilt/sliding panel is opened approximately 4 inch (10 cm). X Pull and hold the roof panel switch in direction of arrow = until the tilt/sliding panel is fully closed. X Keep holding the roof panel switch in direction of arrow = for approximately 1 second. X Pull and hold the roof panel switch in direction of arrow = (Y page 199) until the roller sunblinds are fully extended. X Keep holding the roof panel switch in direction of arrow = for approximately 1 second. X Check the express operation feature of the tilt/sliding panel (Y page 200). If the tilt/sliding panel opens completely, the roof is synchronized. Otherwise repeat the above steps. The trunk is the preferred place to carry objects. Do not place anything on the rearwindow shelf. Never drive a vehicle with the trunk open. Deadly carbon monoxide (CO) gases may enter vehicle interior resulting in unconsciousness and death. Controls in detail Load distribution Loading and storing Loading instructions G Warning! Always fasten items being carried as securely as possible using fastening materials appropriate for the weight and size of the load. In an accident, during hard braking or sudden maneuvers, loose items will be thrown around inside the vehicle. This can cause injury to vehicle occupants unless the items are securely fastened in the vehicle. To help avoid personal injury during a collision or sudden maneuver, exercise care when transporting cargo. Do not pile luggage or cargo higher than the seat backrests. The total load weight including vehicle occupants and luggage/cargo should not exceed the total load limit indicated on the corresponding Tire and Loading Information placard located on the driver's door B-pillar (Y page 238). The handling characteristics of a fully loaded vehicle depend greatly on the load distribution. It is therefore recommended to load the vehicle according to the illustration shown. The heaviest items are to be placed towards the front of the vehicle. i The enlarged cargo area should only be used for items which do not fit in the trunk alone. Please pay attention to and comply with the following instructions when loading the vehicle and transporting cargo: RAlways place items being carried against front or rear seat backrests, and fasten them as securely as possible. RThe heaviest portion of the cargo should always be kept as low as possible against front or rear seat backrests.
-
 1
1 -
2
-
3
-
4
-
5
-
6
-
7
-
8
-
9
-
10
-
11
-
12
-
13
-
14
-
15
-
16
-
17
-
18
-
19
-
20
-
21
-
22
-
23
-
24
-
25
-
26
-
27
-
28
-
29
-
30
-
31
-
32
-
33
-
34
-
35
-
36
-
37
-
38
-
39
-
40
-
41
-
42
-
43
-
44
-
45
-
46
-
47
-
48
-
49
-
50
-
51
-
52
-
53
-
54
-
55
-
56
-
57
-
58
-
59
-
60
-
61
-
62
-
63
-
64
-
65
-
66
-
67
-
68
-
69
-
70
-
71
-
72
-
73
-
74
-
75
-
76
-
77
-
78
-
79
-
80
-
81
-
82
-
83
-
84
-
85
-
86
-
87
-
88
-
89
-
90
-
91
-
92
-
93
-
94
-
95
-
96
-
97
-
98
-
99
-
100
-
101
-
102
-
103
-
104
-
105
-
106
-
107
-
108
-
109
-
110
-
111
-
112
-
113
-
114
-
115
-
116
-
117
-
118
-
119
-
120
-
121
-
122
-
123
-
124
-
125
-
126
-
127
-
128
-
129
-
130
-
131
-
132
-
133
-
134
-
135
-
136
-
137
-
138
-
139
-
140
-
141
-
142
-
143
-
144
-
145
-
146
-
147
-
148
-
149
-
150
-
151
-
152
-
153
-
154
-
155
-
156
-
157
-
158
-
159
-
160
-
161
-
162
-
163
-
164
-
165
-
166
-
167
-
168
-
169
-
170
-
171
-
172
-
173
-
174
-
175
-
176
-
177
-
178
-
179
-
180
-
181
-
182
-
183
-
184
-
185
-
186
-
187
-
188
-
189
-
190
-
191
-
192
-
193
-
194
-
195
-
196
-
197
-
198
-
 199
199 -
 200
200 -
 201
201 -
 202
202 -
 203
203 -
 204
204 -
 205
205 -
 206
206 -
 207
207 -
 208
208 -
 209
209 -
210
-
211
-
212
-
213
-
214
-
215
-
216
-
217
-
218
-
219
-
220
-
221
-
222
-
223
-
224
-
225
-
226
-
227
-
228
-
229
-
230
-
231
-
232
-
233
-
234
-
235
-
236
-
237
-
238
-
239
-
240
-
241
-
242
-
243
-
244
-
245
-
246
-
247
-
248
-
249
-
250
-
251
-
252
-
253
-
254
-
255
-
256
-
257
-
258
-
259
-
260
-
261
-
262
-
263
-
264
-
265
-
266
-
267
-
268
-
269
-
270
-
271
-
272
-
273
-
274
-
275
-
276
-
277
-
278
-
279
-
280
-
281
-
282
-
283
-
284
-
285
-
286
-
287
-
288
-
289
-
290
-
291
-
292
-
293
-
294
-
295
-
296
-
297
-
298
-
299
-
300
-
301
-
302
-
303
-
304
-
305
-
306
-
307
-
308
-
309
-
310
-
311
-
312
-
313
-
314
-
315
-
316
-
317
-
318
-
319
-
320
-
321
-
322
-
323
-
324
-
325
-
326
-
327
-
328
-
329
-
330
-
331
-
332
-
333
-
334
-
335
-
336
-
337
-
338
-
339
-
340
-
341
-
342
-
343
-
344
-
345
-
346
-
347
-
348
-
349
-
350
-
351
-
352
-
353
-
354
-
355
-
356
-
357
-
358
-
359
-
360
-
361
-
362
-
363
-
364
 |
 |
