2003 Nissan Murano Owner's Manual - Page 114
2003 Nissan Murano Manual

Page 114 highlights
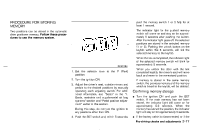
PROCEDURE FOR STORING MEMORY Two positions can be stored in the automatic drive positioner memory. Follow these procedures to use the memory system. push the memory switch 1 or 2 fully for at least 1 second. The indicator light for the pushed memory switch will come on and stay on for approximately 5 seconds after pushing the switch. After the indicator light goes off, the selected positions are stored in the selected memory (1 or 2). Pushing the unlock button on the keyfob within this 5 seconds, will link the selected memory to the keyfob. When the link is completed, the indicator light of the selected memory switch will blink for approximately 5 seconds. When you unlock the door with the link completed keyfob, the driver's seat will move back and move to the memorized position. If memory is stored in the same memory switch, the previous memory and the memory which is linked to the keyfob, will be deleted. SPA1584 1. Set the selector lever to the P (Park) position. 2. Turn the ignition ON. 3. Adjust the driver's seat, outside mirrors and pedals to the desired positions by manually operating each adjusting switch. For additional information, see "Seats" in the "1. Seats, restraints and supplemental air bag systems" section and "Pedal position adjustment" earlier in this section. During this step, do not turn the ignition to any positions other than ON. 4. Push the SET switch and, within 5 seconds, Confirming memory storage ¼ Turn the ignition ON and push the SET switch. If the main memory has not been stored, the indicator light will come on for approximately 0.5 seconds. When the memory has stored the position, the indicator light will stay on for approximately 5 seconds. ¼ If the battery cable is disconnected, or if the Pre-driving checks and adjustments 3-17
-
 1
1 -
2
-
3
-
4
-
5
-
6
-
7
-
8
-
9
-
10
-
11
-
12
-
13
-
14
-
15
-
16
-
17
-
18
-
19
-
20
-
21
-
22
-
23
-
24
-
25
-
26
-
27
-
28
-
29
-
30
-
31
-
32
-
33
-
34
-
35
-
36
-
37
-
38
-
39
-
40
-
41
-
42
-
43
-
44
-
45
-
46
-
47
-
48
-
49
-
50
-
51
-
52
-
53
-
54
-
55
-
56
-
57
-
58
-
59
-
60
-
61
-
62
-
63
-
64
-
65
-
66
-
67
-
68
-
69
-
70
-
71
-
72
-
73
-
74
-
75
-
76
-
77
-
78
-
79
-
80
-
81
-
82
-
83
-
84
-
85
-
86
-
87
-
88
-
89
-
90
-
91
-
92
-
93
-
94
-
95
-
96
-
97
-
98
-
99
-
100
-
101
-
102
-
103
-
104
-
105
-
106
-
107
-
108
-
 109
109 -
 110
110 -
 111
111 -
 112
112 -
 113
113 -
 114
114 -
 115
115 -
 116
116 -
 117
117 -
 118
118 -
 119
119 -
120
-
121
-
122
-
123
-
124
-
125
-
126
-
127
-
128
-
129
-
130
-
131
-
132
-
133
-
134
-
135
-
136
-
137
-
138
-
139
-
140
-
141
-
142
-
143
-
144
-
145
-
146
-
147
-
148
-
149
-
150
-
151
-
152
-
153
-
154
-
155
-
156
-
157
-
158
-
159
-
160
-
161
-
162
-
163
-
164
-
165
-
166
-
167
-
168
-
169
-
170
-
171
-
172
-
173
-
174
-
175
-
176
-
177
-
178
-
179
-
180
-
181
-
182
-
183
-
184
-
185
-
186
-
187
-
188
-
189
-
190
-
191
-
192
-
193
-
194
-
195
-
196
-
197
-
198
-
199
-
200
-
201
-
202
-
203
-
204
-
205
-
206
-
207
-
208
-
209
-
210
-
211
-
212
-
213
-
214
-
215
-
216
-
217
-
218
-
219
-
220
-
221
-
222
-
223
-
224
-
225
-
226
-
227
-
228
-
229
-
230
-
231
-
232
-
233
-
234
-
235
-
236
-
237
-
238
-
239
-
240
-
241
-
242
-
243
-
244
-
245
-
246
-
247
-
248
-
249
-
250
-
251
-
252
-
253
-
254
-
255
-
256
-
257
-
258
-
259
-
260
-
261
-
262
-
263
-
264
-
265
 |
 |
