2005 Nissan Pathfinder Owner's Manual - Page 25
2005 Nissan Pathfinder Manual
Page 25 highlights
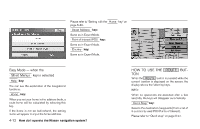
GUIDE VOICE button; refer to page 10-4. Provides voice guidance from the current location. ( ZOOM OUT ) button; refer to 10. page 11-6. Alters the scale of the map display. 11. ( ZOOM IN ) button; refer to page 11-6. Alters the scale of the map display. ( EJECT ) button; refer to page 12. 4-14. Ejects the DVD. 9. HOW TO USE THE JOYSTICK AND THE ENTER BUTTON LNV0003 NAMES OF THE COMPONENTS 1. ( DAY/NIGHT ) button; refer to vehicle's Owner's Manual. Changes display brightness. 2. PREV button; refer to page 4-8. Returns to the previous screen during setup. Finishes the setup after it is completed. 3. JOYSTICK and ENTER button; refer to the next section. Scrolls the map, selects and sets each setting item. 4. SETTING button; refer to page 4-8. Performs various adjustments and settings to help you use the navigation system more effectively. 5. TRIP button; refer to vehicle's Owner's Manual. Displays warning messages (if there are any) and displays TRIP 1 → TRIP 2 → FUEL ECONOMY → MAINTENANCE each time you press the button. 6. DEST button; refer to page 4-11. Displays the "Set a Destination" menu. 7. ROUTE button; refer to page 4-12. Displays the setting menu screen at the time of route calculation. 8. MAP button; refer to page 5-36. Toggles between the intersection and the map during route guidance. Returns to the map screen from the settings screen. The navigation system is operated by selecting keys on the screen with the joystick and pressing the joystick in to ENTER your selection. Be sure to understand the operation of the joystick before using the navigation system. Selecting the keys on the screen Use the joystick to select keys on the screen. The joystick can be tilted in eight directions. The selected key will be highlighted in yellow. INFO: Use the joystick to scroll the map. How do I operate the Nissan navigation system? 4-7
-
 1
1 -
2
-
3
-
4
-
5
-
6
-
7
-
8
-
9
-
10
-
11
-
12
-
13
-
14
-
15
-
16
-
17
-
18
-
19
-
 20
20 -
 21
21 -
 22
22 -
 23
23 -
 24
24 -
 25
25 -
 26
26 -
 27
27 -
 28
28 -
 29
29 -
 30
30 -
31
-
32
-
33
-
34
-
35
-
36
-
37
-
38
-
39
-
40
-
41
-
42
-
43
-
44
-
45
-
46
-
47
-
48
-
49
-
50
-
51
-
52
-
53
-
54
-
55
-
56
-
57
-
58
-
59
-
60
-
61
-
62
-
63
-
64
-
65
-
66
-
67
-
68
-
69
-
70
-
71
-
72
-
73
-
74
-
75
-
76
-
77
-
78
-
79
-
80
-
81
-
82
-
83
-
84
-
85
-
86
-
87
-
88
-
89
-
90
-
91
-
92
-
93
-
94
-
95
-
96
-
97
-
98
-
99
-
100
-
101
-
102
-
103
-
104
-
105
-
106
-
107
-
108
-
109
-
110
-
111
-
112
-
113
-
114
-
115
-
116
-
117
-
118
-
119
-
120
-
121
-
122
-
123
-
124
-
125
-
126
-
127
-
128
-
129
-
130
-
131
-
132
-
133
-
134
-
135
-
136
-
137
-
138
-
139
-
140
-
141
-
142
-
143
-
144
-
145
-
146
-
147
-
148
-
149
-
150
-
151
-
152
-
153
-
154
-
155
-
156
-
157
-
158
-
159
-
160
-
161
-
162
-
163
-
164
-
165
-
166
-
167
-
168
-
169
-
170
-
171
-
172
-
173
-
174
-
175
-
176
-
177
-
178
-
179
-
180
-
181
-
182
-
183
-
184
-
185
-
186
-
187
-
188
-
189
-
190
-
191
-
192
 |
 |
