3Com 3CRWDR101A-75-US User Guide - Page 21
Powering Up the Router, Connecting the Router - officeconnect
 |
UPC - 662705500058
View all 3Com 3CRWDR101A-75-US manuals
Add to My Manuals
Save this manual to your list of manuals |
Page 21 highlights
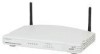
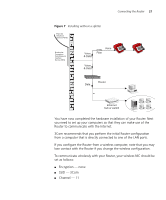
Powering Up the Router 19 Powering Up the Router To power up the Router: 1 Plug the power adapter into the power adapter socket located on the back panel of the Router. 2 Plug the power adapter into a standard electrical wall socket. 3 Press the power button located on the back of the Router. Connecting the Router The first step for installing your Router is to physically connect it to the telephone socket and then connect it to a computer in order to be able to access the Internet. See Figure 5: Figure 5 Connecting the Router Power Supply Unit Internet Telephone Socket Splitter/ Microfilter Block 3Com OfficeConnect ADSL Wireless 11g Firewall Router Your PC Wireless Users 1 Run the provided telephone cable from the wall jack providing ADSL service to the ADSL port on your Router. When inserting an ADSL RJ-11 plug, be sure the tab on the plug clicks into position to ensure that it is properly seated. If you are using splitterless ADSL service, add low-pass filters between the ADSL wall jack and your telephones. (These filters pass voice signals through but filter data signals out.) 2 Then: ■ If you are using a full-rate (G.dmt) connection, your service provider will attach the outside ADSL line to a data/voice splitter. In this case
-
 1
1 -
2
-
3
-
4
-
5
-
6
-
7
-
8
-
9
-
10
-
11
-
12
-
13
-
14
-
15
-
 16
16 -
 17
17 -
 18
18 -
 19
19 -
 20
20 -
 21
21 -
 22
22 -
 23
23 -
 24
24 -
 25
25 -
 26
26 -
27
-
28
-
29
-
30
-
31
-
32
-
33
-
34
-
35
-
36
-
37
-
38
-
39
-
40
-
41
-
42
-
43
-
44
-
45
-
46
-
47
-
48
-
49
-
50
-
51
-
52
-
53
-
54
-
55
-
56
-
57
-
58
-
59
-
60
-
61
-
62
-
63
-
64
-
65
-
66
-
67
-
68
-
69
-
70
-
71
-
72
-
73
-
74
-
75
-
76
-
77
-
78
-
79
-
80
-
81
-
82
-
83
-
84
-
85
-
86
-
87
-
88
-
89
-
90
-
91
-
92
-
93
-
94
-
95
-
96
-
97
-
98
-
99
-
100
-
101
-
102
-
103
-
104
-
105
-
106
-
107
-
108
-
109
-
110
-
111
-
112
-
113
-
114
-
115
-
116
-
117
-
118
-
119
-
120
-
121
-
122
-
123
-
124
-
125
-
126
-
127
-
128
-
129
-
130
-
131
-
132
-
133
-
134
-
135
-
136
-
137
-
138
-
139
-
140
-
141
-
142
-
143
-
144
-
145
-
146
 |
 |
