3Ware CBL-P-SATA Installation Guide - Page 22
BIOS Initialization Screen for RAID 5, Select striping size, Select write cache
 |
View all 3Ware CBL-P-SATA manuals
Add to My Manuals
Save this manual to your list of manuals |
Page 22 highlights
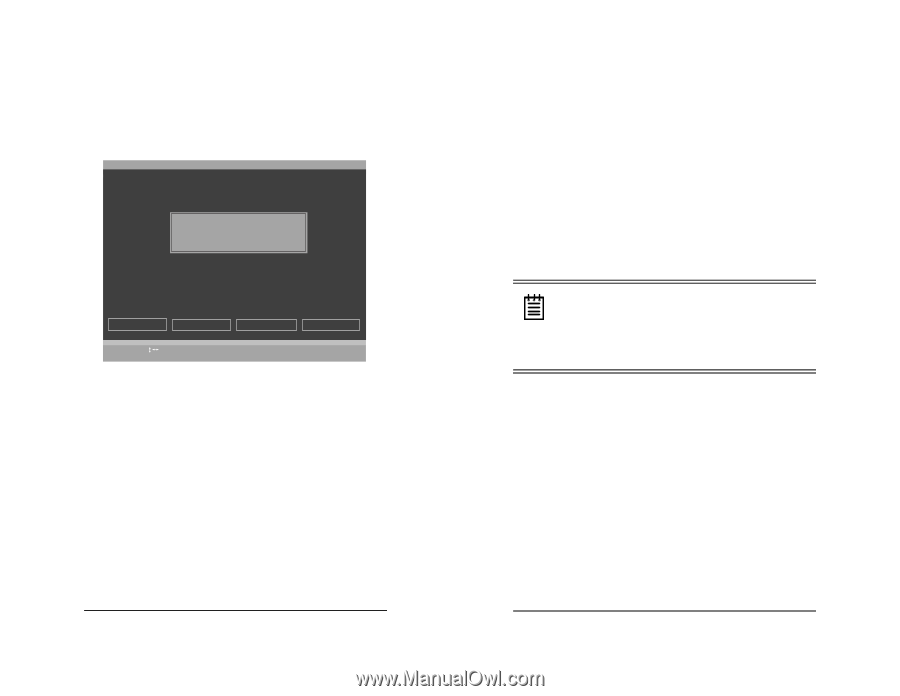
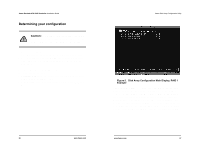
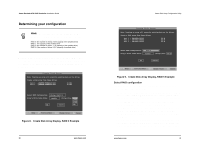
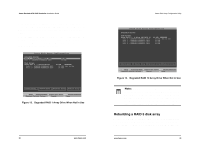
3ware Escalade ATA RAID Controller Installation Guide a single disk. RAID 5 arrays require a minimum of three drives. Configurations consist of at least 3 drives and up to 12 drives. 3ware Disk Array Configuration Available Drives: Port 0 - QUANTUM FIREBALLP KX27.3 512 M Disk Arrays: Array Unit 1 - 3 drive 64K RAID 5 Port 1 - IBM-DTLA-387815 Port 2 - IBM-DTLAI-n3i8t78R1A5ID5 Array Unit Port 3 - IBM-DTLA-387815 1.0GB 512 M 5112 M 512 M Percentage done : 25% Create Array Delete Array Maintain Array Rebuild Array Alt-F1 Help Previous/Next $ Toggle Hot Spare EnterSelect/Deselect F6 Restore Initial Values Esc Cancel F8 Done Figure 10. BIOS Initialization Screen for RAID 5 Select striping size For a RAID 0 or RAID 10 configuration select the striping size. Sizes of 64K, 128K, 256K, 512K or 1M are selected using the Stripe Size box shown in Figure 8. RAID 5 only allows a 64K stripe size. RAID 1 does not allow the user to select the striping size. Select write cache properties The Escalade ATA RAID Controller gives you a choice of disabling the write cache for your disk arrays. Write cache is used to store data locally on the drive before it is written to the disk, allowing the computer to continue with its next task. Enabling the write cache 32 www.3ware.com 3ware Disk Array Configuration Utility results in the most efficient access times for your computer system. There may be instances when you always want the computer to wait for the drive to write all the data to disk before going on to its next task. For this case, you must disable the write cache. To disable the write cache, select disable from the array's Write Cache State selection. The default for Write Cache State is enable. Confirm array configuration Select the OK button to confirm creating the array or Cancel to reject it. The array is not actually created and no data will be overwritten until you have finished making all your changes and select the F8 key. Note: The current limitation is 2 TB for any physical or logical unit. If you attempt to create an array over 2 TB the BIOS will display the following message: "The amount of disk space available exceeds the maximum allowable capacity. The array capacity will be limited to 2 TB." For RAID 5 Arrays Because of the Read-Modify-Write operations, zeros are first written to all drives in the array before the array is functional. The screen shown in Figure 10 appears after selecting OK to confirm array creation. If desired, the write-zeros operation can be aborted by rebooting the system. Once booted to the operating system, the array goes into initialization mode after a delay of up to ten minutes. The advantage of doing this is that the RAID 5 can be used immediately, although it will not be fault tolerant until the initialization is complete. The disadvantage of doing this is that it will take longer for www.3ware.com 33
-
 1
1 -
2
-
3
-
4
-
5
-
6
-
7
-
8
-
9
-
10
-
11
-
12
-
13
-
14
-
15
-
16
-
 17
17 -
 18
18 -
 19
19 -
 20
20 -
 21
21 -
 22
22 -
 23
23 -
 24
24 -
 25
25 -
 26
26 -
 27
27 -
28
-
29
-
30
-
31
-
32
-
33
-
34
-
35
-
36
-
37
-
38
-
39
 |
 |