AIWA CX-NA303 Operating Instructions
AIWA CX-NA303 Manual
 |
View all AIWA CX-NA303 manuals
Add to My Manuals
Save this manual to your list of manuals |
AIWA CX-NA303 manual content summary:
- AIWA CX-NA303 | Operating Instructions - Page 1
88-NF8-903-01 971120AMI-M-9 For assistance and information call toll free I-800-BUY-AIWA (United States and Puerto Rico) mm DIGITAL AIJDIO - AIWA CX-NA303 | Operating Instructions - Page 2
SERVICING TO QUALIFIED SERVICE PERSONNEL." Owner's record For your convenience, record the model number and serial number (you will find them on the rear of your set) in the space provided below. Please refer to them when you contact your Aiwa dealer in case of difficulty. Model No. CX-NA303 - AIWA CX-NA303 | Operating Instructions - Page 3
NEC SECTION 810-20) I /11 -i NEC-NATIONAL ELECTRICAL CODE ELECTRODE SYSTEM (NEC ART 250 PART H) Maintenance Clean the unit only as recommended Instructions. in the Operating Damaae Recwirinct Service Have the units serviced by a qualified service technician if: - The AC power cord or plug has - AIWA CX-NA303 | Operating Instructions - Page 4
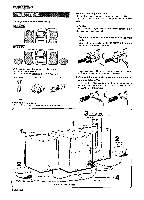
the right and left speakers to the main unit. Connect the right speaker cord to SPEAKERS R terminals, and left to SPEAKERS L terminals. CX-NA303 Compact disc stereo cassette reciever SX-NA302 Front speakers * SX-R275 Surround speakers (For NSX-A304 only) Remote control m AM antenna FM antenna - AIWA CX-NA303 | Operating Instructions - Page 5
be damaged. q Do not bring the FM antenna near metal objects or curtain rails. q Do not bring the AM antenna near other optional equipment, the stereo system itself, the AC cord or speaker cords, since noise will be picked up. q Do not unwind the AM antenna wire. ENGLISH '! - AIWA CX-NA303 | Operating Instructions - Page 6
remote controls are used nearby (those of a television, etc.) ,-~"- -. s POWER h ~ -/ -- !:-- --- CD I.n. CLOCIU DIMMER To turn the unit on Press one of the function buttons (TAPE, TUNER, VIDEO/AUX, CD). Playback of the inserted disc playing Demo game with your system. 1 Press >. Three numbers - AIWA CX-NA303 | Operating Instructions - Page 7
cyclically as follows. r ROCK- POP - CLASSIC- 7 GEQ OFF - (cancel) To select with the remote control press T-BASS while pressing SHIFT. m Low frequency sound may be distorted when the T-BASS system is used for a disc or tape in which low frequency sound is originally emphasized. In this case - AIWA CX-NA303 | Operating Instructions - Page 8
in to a station, the search stops. To stop the Auto Search manually, press+ DOWN or > UP. q The Auto Search may not stop at stations with very weak signals. When an FM stereo broadcast contains noise Press MONO TUNER on the remote control while pressing SHIFT so that "MONO appears on the display - AIWA CX-NA303 | Operating Instructions - Page 9
" \ ,, # .-. p:.....,, PRESET"'N'UM'BE'RTUNiNG" " .;, 4., =..,.,,! . Use the remote control to select the preset number directly. 1 Press BAND while pressing SHIFT to select a band. 2 Press numbered buttons O-9 and +1 O to select a preset number. Example: To select - AIWA CX-NA303 | Operating Instructions - Page 10
with the remote control 1 Press DISC DIRECT PLAY 1-3 to select a disc. 2 Press compact disc on one disc tray. q Do not tilt the unit with discs loaded. Doing so may cause malfunctions. Total number of tracks Load discs. To plav all discs in the disc com~artment, press -. Play begins with the disc - AIWA CX-NA303 | Operating Instructions - Page 11
, you cannot perform random play, checking the remaining time, and selecting a disc or track, u Use the remote control. 1 Press PRGM while pressing SHIFT in stop mode. "PRG" is displayed 2 Press DISC DIRECT PLAY 1-3 to select a disc. Go to the next step when the tray stops rotating. ENGLISH 1() - AIWA CX-NA303 | Operating Instructions - Page 12
prepare the source to be recorded. To record from a CD, press CD and load the disc(s). To record from a radio broadcast, press TUNER and tune in to a station. To again. Sound adjustment during recording The output volume and tone of the speakers or headphones may be freely varied without affecting - AIWA CX-NA303 | Operating Instructions - Page 13
1,3 s 2 m Set the tape to the point where recording will start. 1 Press TAPE. 2 Insert the original tape into deck 1 and the tape to be recorded on into deck 2. Insert the tapes with the sides to be played back or recorded on facing out from the unit. 3 Press TAPE/DECK 1/2 to select deck 1. "TP 1" - AIWA CX-NA303 | Operating Instructions - Page 14
2 and 3 to add more tracks. q When "PRGM" is displayed, pressing SHIFT again, press EDIT/CHECK while 4 Press DISC DIRECT PLAY 1-3 to select a disc, 5 Press numbered buttons O-9 on the remote control to designate the tape length, 10 to 99 minutes can be specified. Example: When using a 60-minute - AIWA CX-NA303 | Operating Instructions - Page 15
the tape with the side to be recorded on first facing out from the unit. 2 Press CD and load the disc(s). 3 Press EDIT/CHECK twice while pressing SHIFT on the remote control. "EDIT" and "PRGM" are displayed. c When "Al" is displayed, press EDIT/CHECK while pressing SHIFT again. 4 Press numbered - AIWA CX-NA303 | Operating Instructions - Page 16
, then press II SET within 4 seconds. The unit can be turned off automatically at a specified time. Use the remote control. 1 Press SLEEP while pressing SHIFT. When using the remote control Press CLOCK while pressing SHIFT, then press II SET !Mt!lin 4 seconds. 2 Press + DOWN or > UP to designate - AIWA CX-NA303 | Operating Instructions - Page 17
Prepare the source. To listen to a CD, load the disc to be played first on tray 1. To listen to a Make sure the clock is set correctly. Use the remote control. 1 Press TIMER to display 0, then press II to prepare the source, and adjust the volume and tone. q Timer playback and timer recording - AIWA CX-NA303 | Operating Instructions - Page 18
CD DIGITAL OUT (OPTICAL) vIDEO/AUX SURROUND SPEAKERS 1 POWER Refer to the operating instructions of the connected equipment for details. q The connecting cords are not supplied. Obtain the necessary connecting cords. q Consult your local Aiwa dealer for optional equipment. .-:*N :=: ,= 2. s - AIWA CX-NA303 | Operating Instructions - Page 19
the cleaned parts are completely discs q When a disc becomes dirty, wipe the disc from the center out with a cleaning cloth. If the unit fails to perform as described in these Operating Instructions, check the following guide speaker only. q Is the other speaker Is the system picking up external - AIWA CX-NA303 | Operating Instructions - Page 20
Cassette deck section Track format Frequency response Recording system Heads 4 tracks, 2 channels stereo 50 Hz - 10000 tiz AC bias Deck 1: Playback head x 1 Deck 2: Recording/playback head x 1, erase head x 1 Compact disc player section Laser Semiconductorlaser (1= 780 nm) D-A converter 1 bit - AIWA CX-NA303 | Operating Instructions - Page 21
- AIWA CX-NA303 | Operating Instructions - Page 22
BACK). NO USER-SERVICEABLE PARTS INSIDE. REFER SERVICING TO QUALIFIED SERVICE PERSONNEL." Anotacion Aiwa en caso de tener dificultades. / N." de modelo I CX-NA303 I SX-NA302 SX-R275 (NSX-A304 solamente) 1 ESPANOL I N." de serie (N." de Iote) I I I I I Lea cuidadosa y completamente el manual - AIWA CX-NA303 | Operating Instructions - Page 23
ELECTRICD (NEC, ARTICULO 250, PARTE H) Mantenimiento Limpie la unidad solo como se recomienda en el manual de instrucciones. Daiios que necesitan CONTROL REMOTO 5 ANTES DE LA OPERACION s......5 SONIDO AJUSTES DE AUDIO 61 ECUALIZADOR GRAFICO 6 RECEPCION DE LA RADIO SINTONIZACION MANUAL - AIWA CX-NA303 | Operating Instructions - Page 24
SPEAKERS L, CX-NA303 Sintonizador, amplificador, piatina de casete y reproductor de discos compactos esttfweo SX-NA302 Altavoces delanteros * SX-R275 Altavoces de sonido ambiental (para el NSX-A304 solamente) Control ambiental al terminal SURROUND SPEAKERS R O L. Manual de instrucciones. ,-etc. - AIWA CX-NA303 | Operating Instructions - Page 25
'% ",J J m q Aseaurese de conectar correctamente Ios cables de 10s altavoces, Las conexiones mal hechas podrian causar cortocircuitos en Ios terminals SPEAKERS. q No deje objetos que generen magnetism, tales como tarjetas de credito, cerca de Ios altavoces porque podrian estropearse. q No ponga - AIWA CX-NA303 | Operating Instructions - Page 26
de Ias pilas Quite la tapa de Ias pilas, ubicada en la parte trasera del control remoto, e inserte dos pilas R6 (tamafio AA). J s I7 -T I CD R6(AA) Cuando reemplazar Ias pilas La distancia maxima de operation entre el control remoto y el sensor de sefiales de la unidad principal debera ser de - AIWA CX-NA303 | Operating Instructions - Page 27
[ 8 - / SHIFT T-BASS VOLUME PHONES GEQ SHIFT Gire VOLUME de la unidad principal o pulseVOLUME del control remoto. El nivel de sonido se ROCK- POP- CLASSIC- GEQ OFF (cancelacion) Para seleccionar con el control remoto Pulse T-BASS mientras pulsa SHIFT. El sonido de baja frecuencia tal - AIWA CX-NA303 | Operating Instructions - Page 28
La bdsqueda automatic quiz4 no pare en emisoras cuyas sehales scan muy debiles. Cuando una radiodifusion estereo por FM tenga ruido Pulse MONO TUNER del control remoto mientras pulsa SHIFT para que "MONO aparezca en el visualizador. El ruido se reducira, pero la recepcion sera mono. Para reponer la - AIWA CX-NA303 | Operating Instructions - Page 29
SINTONIZACION MEDIANTE NUMERO DE PREAJUSTE Utilice el control remoto para seleccionar directamente el numero de preajuste. 1 Pulse BAND mientras seleccionar una banda, pulsa SHIFT para 2 Pulse Ios botones numerados O-9 y +1 O para seleccionar un numero - AIWA CX-NA303 | Operating Instructions - Page 30
visualizara. Para reponer la visuaiizacion del tiempo de reproduction, repita este procedimiento. Seleccion de una cancion con el control remoto 1 Pulse DISC DIRECT PLAY 1-3 para seleccionar un disco. 2 Pulse Ios botones numerados O-9 y +1Opara seleccionar una cancion. Ejemplo: Para seleccionar la - AIWA CX-NA303 | Operating Instructions - Page 31
un maximo de 30 canciones de cualquiera de Ios discos introducidos. ,* 2 Pulse DISC DIRECT PLAY 1-3 para seleccionar un disco. Vaya al paso siguiente cuando la comprobar el tiempo restante ni seleccionar un disco o cancion. Utilice el control remoto. 7 Pulse PRGM mientras modo de parada. "PRG" se - AIWA CX-NA303 | Operating Instructions - Page 32
Esta seccion explica como grabar del sintonizador, del reproductor de discos compactos o de equipos exteriors. 2 Preparation q Utilice solamente cintas tipo I (normales) q Bobine la cinta hasta el punto donde vaya a empezar la grabacion. q Tenga en cuenta que la grabacion solo se reaiiza en una cara - AIWA CX-NA303 | Operating Instructions - Page 33
I---r- -. -q 1,3 s -4 -3 2 -2 -2 k-- ---+-- Y )_ Ponga la cinta en el punto donde vaya a empezar la grabacion. 1 Pulse TAPE. 2 Inserte la cinta original en la platina 1 y la cinta que vaya a grabar en la platina 2. Inserte Ias cintas con Ias caras que vaya a reproducer o grabar hacia - AIWA CX-NA303 | Operating Instructions - Page 34
. "EDIT se visualizar~. . Cuando se visualice "PRGM", pulse EDIT/CHECK mientras pulsa de nuevo SHIFT. 4 Pulse DISC DIRECT PLAY 1-3 para seleccionar un disco. 5 Pulse Ios botones numerados O-9 del control remoto para designar la duration de la cinta. Se puede especificar una duration de 10 a 99 - AIWA CX-NA303 | Operating Instructions - Page 35
Cara de la cinta Numero de programa Tiempo de grabacion maximo para la cara A 5 Pulse DISC DIRECT PLAY 1-3 para seleccionar un disco. Luego, pulse Ios botones numerados O-9 y +10 del control remoto para programar una cancion. Ejemplo: Para seleccionar la cancion numero 10 del disco 2, pulse - AIWA CX-NA303 | Operating Instructions - Page 36
de aue pasen 4 seaundos. La unidad se podra apagar automaticamente despues de transcurrido un tiempo especificado. Utilice el control remoto. 1 Pulse SLEEP mientras pulsa SHIFT. Cuando se utilice el control remoto Pulse CLOCK mientras pulsa SHIFT, y Iuego pulse II SET antes de que pasen 4 seaundos - AIWA CX-NA303 | Operating Instructions - Page 37
la hors especificada todos Ios alias gracias al temporizador incorporado. Preparation Asegurese de que la hors del reloj sea corrects. Utilice et control remoto. 1 Pulse TIMER para visualizer 0, y Iuego pulse II SET antes de aue pasen 6 seaundos. O se visualizara y la hors parpadeara. m Si pulsa II - AIWA CX-NA303 | Operating Instructions - Page 38
CD DIGITAL OUT 'OpT'cAL) g IE ' Imm-1 VIDEO/AUX m - SURROUND SPEAKERS mI 4 Consulte el manual de instrucciones del equipo conectado para tener mas detalles. q Los cables de conexion no han sido suministrados. Obtenga Ios cables de conexi6n necesarios. q Consulte con su concesionario AIWA en - AIWA CX-NA303 | Operating Instructions - Page 39
algodon humedecido en Ifquido de Iimpieza, espere hasta que Ias partes Iimpiadas esten completamente secas antes de introducer Ias cintas. el centro hacia afuera. Si la unidad no funciona como se describe en este manual de instrucciones, compruebe la guia siguiente: ,,, I,1'! "; $,. ~ :d j# - AIWA CX-NA303 | Operating Instructions - Page 40
Unidad principal CX-NA303 Seccion del sintonizador Gama de sintonizacion Sensibilidad util (IHF) , 8 ohmios) 0,1% (15 W, 1 kHz, 6 ohmios, DIN AUDIO) VIDEO/AUX: 500 mV SPEAKERS: Acepta altavoces de 6 ohmios o mas SURROUND SPEAKERS: Acepta altavoces de 8 ohmios a 16 ohmios PHONES (toma estereo): - AIWA CX-NA303 | Operating Instructions - Page 41
- AIWA CX-NA303 | Operating Instructions - Page 42
numeros quand on contacte un distributeur Aiwa en cas de difficult. N" de modele CX-NA303 SX-NA302 SX-R275 (NSX- Chariot et support - Si I'appareil est pose ou monte sur un support ou un sur la Ientille du capteur du Iecteur de disques compacts quand: - I'appareil est deplace d'un endroit froid - AIWA CX-NA303 | Operating Instructions - Page 43
la terre. IJarticle 810 du code national d'electricity (NEC), ANSVNFPA du mat, de la structure de support et du conducteur arrivant a I'unite de SON REGLAGES AUDIO 6 EGALISEUR GRAPHK2UE DE DISQUES COMPACTS OPERATIONS DE PROBLEME m m18 SPECIFICATIONS 19 NOMENCLATURE Cowerture A dos 2 FRAIVf2Al$ - AIWA CX-NA303 | Operating Instructions - Page 44
principal. Connecter Ie cordon de I'enceinte droite aux bornes SPEAKERS R et celui de I'enceinte gauche aux bornes SPEAKERS L. CX-NA303 stereo SX-NA302 * SX-R275 Radio magnetocassette Iecteur de disques compacts Enceintes avant Enceintes surround (Pour NSX-A304 seulement) Telecommande Antenne - AIWA CX-NA303 | Operating Instructions - Page 45
Des connexions incorrectes peuvent provoquer des courtscircuits clans Ies bornes SPEAKERS. q Ne pas Iaisser d'objets produisant un champ Ne pas mettre I'antenne AM pres d'un appareil optionnel, de la chakre stereo proprement dite, du cordon secteur ou des cordons d'enceinte; elle pourrait capter - AIWA CX-NA303 | Operating Instructions - Page 46
Mise en place des piles Enlever Ie couvercle des piles du dos de la telecommande et mettre deux piles R6 (taille AA) en place. R6(AA) Quand remplacer Ies piles La distance maximale de fonctionnement de la telecommande entre cette derniere et Ie capteur situe sur I'appareil principal doit 6tre d' - AIWA CX-NA303 | Operating Instructions - Page 47
Quand on coupe I'alimentation alors que Ie niveau du volume est regle a 17 ou plus, ce niveau est accentue d'origine. Dans ce cas, annuler Ie systeme T-BASS. Pour assombrir I'eclairaae de I'afficha!ae 1 d'un casque Brancher un casque muni d'une fiche stereo standard (6,3 mm a) a la prise PHONES. - AIWA CX-NA303 | Operating Instructions - Page 48
regue, "TUNE est affiche pendant deux second es. Pendant la reception FM stereo, (iI@Il) est affiche. Lappareil peut memoriser un total de 32 stations kHz/ pas. Si on utilise cet appareil clans un endroit ou Ie systeme deallocation de frequencies est de 9 kHz/pas, changer I'intervalle d'accord. - AIWA CX-NA303 | Operating Instructions - Page 49
ACCORD SUR UNE STATION MEMORISEE Utiliser la telecommande prereglage directement. pour selectionner Ie numero de 1 Appuyer sur BAND tout en appuyant sur SHIFT pour selectionner une gamme. 2 A l'aide des touches numeriques O-9 et +10, selectionner un numero de prereglage. Exemple: Pour - AIWA CX-NA303 | Operating Instructions - Page 50
sur Ies plateaux 1 et 2. Pour Iire trois disaues, appuyer sur DISC CHANGE pour faire tourner Ies plateaux apres avoir mis deux disques en place clans Ie renfoncement circulaire du plateau. q Ne pas mettre plus d'un disque compact sur un plateau. c Ne pas incliner I'appareil avec des disques en - AIWA CX-NA303 | Operating Instructions - Page 51
de I'affichage. Pour Iire tous Ies disaues, appuyer sur > pour demarrer la lecture. Pour Iire un seul disaue, appuyer sur une des touches DISC DIRECT PLAY 1-3 pour demarrer la lecture. ~ Pendant la lecture aleatoire, ii est impossible precedemment Iue avec U. de sautera la plage On peut - AIWA CX-NA303 | Operating Instructions - Page 52
a partir de Iaquelle on veut enregistrer. Pour enreaistrer a ~artir d'un disque compact, appuyer sur CD et mettre Ie(s) disque(s) en place. Pour enreaistrer une emission du son pendant I'enregistrement On peut faire varier Iibrement Ie volume de sortie et la tonalite des enceintes ou du casque saris - AIWA CX-NA303 | Operating Instructions - Page 53
II-T T -) 1,3 s 2 L I \._--. ..' 1 ..-.-- I-IT.- i'T-- i 2 ',* ~,--... u II 1 { q 2 -.-.-- ~ Bobiner la cassette I'enregistrement. jusqu'a I'endroit ou on veut demarrer 1 Appuyer surTAPE. 2 Inserer la cassette originale clans la platine 1 et la cassette a enregistrer clans la - AIWA CX-NA303 | Operating Instructions - Page 54
. Uenregistrement de la cassette et la lecture du disque compact s'arr/?tent simultanement. Pour effacer Ie programme du montage telecommande pour selectionner la face A ou B, 2 Appuyer sur une des touches DISC DIRECT PLAY 1.3 pour selectionner un disque. 3 Selectionner Ies plages a I'aide - AIWA CX-NA303 | Operating Instructions - Page 55
REC/REC MUTE pour demarrwr I'enregistrement. La lectu~e de disque compact et I'enregistrement des plages montees pour la la premiere face demarrent . Exemple: pour selectionner la dixieme plage du disque 2, appuyer sur DISC DIRECT PLAY 2, puis appuyer sur +10 et Numero de plage Numeros - AIWA CX-NA303 | Operating Instructions - Page 56
TERIE II s 1,2,3 1 2 2,3 u- -- \ -.- 1 -w ! / -1 "'"B 1 Appuyer sur CLOCK puis appuyer sur II SET clans Ies auatre secondes. La minuterie d'arrix permet de mettre I'appareil hors tension automatiquement au bout d'un temps specifie. Utiliser la telecommande. 1 Appuyer sur SLEEP tout en - AIWA CX-NA303 | Operating Instructions - Page 57
est atteinte, I'appareil est mis sous tension et la lecture commence sur la source selectionnee. Quand on coupe I'alimentation alors que Ie niveau du volume est regle a 17 ou plus, ce niveau est automatiquement reglb a16. Pour contrder I'heure et la source specifiers Appuyer sur TIMER. Lheure de la - AIWA CX-NA303 | Operating Instructions - Page 58
VIDEO/AUX L. Pour connecter un tourne-disque Utiliser un tourne-disque Aiwa muni d'un amplificateur integre. a egaliseur PRISE CD DIGITAL OUT (OPTICAL) Cet appareil peut sortir Ies signaux sonores numeriques de disque compact par cette prise. Utiliser un ctible optique pour connecter un appareil - AIWA CX-NA303 | Operating Instructions - Page 59
decrit clans ce mode d'emploi, contr61er Ie guide suivant. GENERALITIES II n'y a pas de son n'est-elle pas en service? Le son ne sort que la distortion. q Le systeme ne capte-t-il pas elle pas sale? (+ page 18) PARTIE LECTEUR DE DISQUES COMPACTS La lecture ne fonctionne pas. * Le disque est-il - AIWA CX-NA303 | Operating Instructions - Page 60
CX-NA303 Partie AUDIO DIN) VIDEO/AUX: 500 mV SPEAKERS: acceptent des enceintes de 6 ohms ou plus SURROUND SPEAKERS: acceptent des enceintes de 8 ohms A 16 ohms PHONES (prise stereo Poids 235 x 324x 250 mm 3,2 kg Les specifications et I'aspect exterieur peuvent &re modifies saris preavis - AIWA CX-NA303 | Operating Instructions - Page 61
- AIWA CX-NA303 | Operating Instructions - Page 62
- AIWA CX-NA303 | Operating Instructions - Page 63
- AIWA CX-NA303 | Operating Instructions - Page 64
AUX 17 CD 9 0 POWER 5 0 DISC CHANGE 9 =OpEN/cLOsE 9 DISC DIRECT PLAY1-3 9,10,13,14 @ PHONES 6 ~ VOLUME 6 T.BASS 6 GRAPHIC EQUALIZER (ROCK, POP 7,8,9,15,16 s CLEAR 8-15 -PRESET 8-10 VOLUME(A,V) 6 c~// k)// free l-800-BUY-A/WA (United States and Puerto Rico) Printed in Malaysia
-
 1
1 -
 2
2 -
 3
3 -
 4
4 -
 5
5 -
 6
6 -
 7
7 -
8
-
9
-
10
-
11
-
12
-
13
-
14
-
15
-
16
-
17
-
18
-
19
-
20
-
21
-
22
-
23
-
24
-
25
-
26
-
27
-
28
-
29
-
30
-
31
-
32
-
33
-
34
-
35
-
36
-
37
-
38
-
39
-
40
-
41
-
42
-
43
-
44
-
45
-
46
-
47
-
48
-
49
-
50
-
51
-
52
-
53
-
54
-
55
-
56
-
57
-
58
-
59
-
60
-
61
-
62
-
63
-
64
 |
 |

88-NF8-903-01
971120AMI-M-9
For assistance
and information
call toll free
I-800-BUY-AIWA
(United States and Puerto Rico)
mm
DIGITAL
AIJDIO