AIWA CX-NA303 Operating Instructions - Page 18
Video/aux, Jacks, Cd Digital Out Optical - digital audio system
 |
View all AIWA CX-NA303 manuals
Add to My Manuals
Save this manual to your list of manuals |
Page 18 highlights
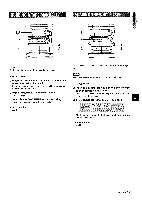
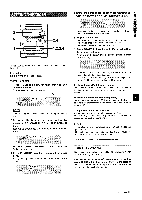
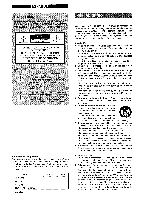
CD DIGITAL OUT (OPTICAL) vIDEO/AUX SURROUND SPEAKERS 1 POWER Refer to the operating instructions of the connected equipment for details. q The connecting cords are not supplied. Obtain the necessary connecting cords. q Consult your local Aiwa dealer for optional equipment. .-:*N :=: ,= 2. s - : -m- 7 2.:.=$ VIDEO/AUX JACKS '~'.-:=~fl= .J"-==*.'"' This unit can input analog sound signals through these jacks. Use a cable with RCA phono plugs to connect audio equipment (turntables, LD players, MD players, VCRs, TV, etc.). Connect the red plug to the VIDEO/AUX R jack, and the white plug to the VIDEO/AUX L jack. When connecting a turntable Use an Aiwa turntable equipped with a built-in equalizer amplifier. .T"zis:.u *X:.- " ',.; S.? .*.:*,%4 .-.- ..-:- : .,_.L-., CD DIGITAL OUT (OPTICAL) JACK . y,yJ- & :;! This unit can output CD digital sound signals through this jack. Use an optical cable to connect digital audio equipment (DAT deck, MD recorder, etc.). Remove the dust cap @ from the CD DIGITAL OUT (OPTICAL) jack. Then, connect an optical cable plug to the CD DIGITAL OUT (OPTICAL) jack. To play equipment connected to the VIDEO/AUX jacks proceed as follows. 1 Press VIDEO/AUX. "VIDEO" or "AUX appears on the display. 2 Play the connected equipment. To change a source name in the display When VIDEO/AUX is pressed, "VIDEO or "AUX is displayed initially. It can be changed to "VIDEO, "AUX or "TV. With the power on, press POWER while pressing VIDEO/AUX. Repeat the procedure to select one of the names. When the CD DIGITAL OUT (OPTICAL) jack is not being used Attach the SUppllMt O'USt cap. 17 ENGLISH
-
 1
1 -
2
-
3
-
4
-
5
-
6
-
7
-
8
-
9
-
10
-
11
-
12
-
 13
13 -
 14
14 -
 15
15 -
 16
16 -
 17
17 -
 18
18 -
 19
19 -
 20
20 -
 21
21 -
 22
22 -
 23
23 -
24
-
25
-
26
-
27
-
28
-
29
-
30
-
31
-
32
-
33
-
34
-
35
-
36
-
37
-
38
-
39
-
40
-
41
-
42
-
43
-
44
-
45
-
46
-
47
-
48
-
49
-
50
-
51
-
52
-
53
-
54
-
55
-
56
-
57
-
58
-
59
-
60
-
61
-
62
-
63
-
64
 |
 |
