ASRock 4Core1333-Viiv User Manual - Page 42
Serial A, Serial ATA SA, A SATA / Serial A, A / Serial A, A / Serial ATAII SA, AII SA, AII SATAII
 |
View all ASRock 4Core1333-Viiv manuals
Add to My Manuals
Save this manual to your list of manuals |
Page 42 highlights
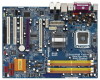
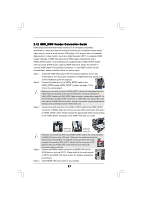
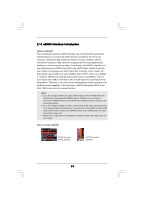
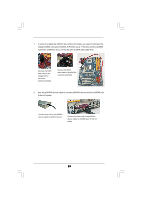
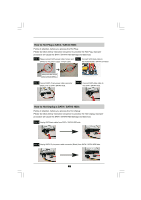
2.15 Serial ATA (SATA) / Serial ATAII (SATAII) Hard Disks Installation This motherboard adopts Intel® ICH8DH south bridge chipset that supports Serial ATA (SATA) / Serial ATAII (SATAII) hard disks and RAID (RAID 0, RAID 1, RAID 10, RAID 5, and Intel Matrix Storage) functions. You may install SATA / SATAII hard disks on this motherboard for internal storage devices. This section will guide you to install the SATA / SATAII hard disks. STEP 1: Install the SATA / SATAII hard disks into the drive bays of your chassis. STEP 2: Connect the SATA power cable to the SATA / SATAII hard disk. STEP 3: Connect one end of the SATA data cable to the motherboard's SATAII connector. STEP 4: Connect the other end of the SATA data cable to the SATA / SATAII hard disk. 1. If you plan to use RAID 0, RAID 1, or Intel Matrix Storage function, you need to install at least 2 SATA / SATAII hard disks. If you plan to use RAID 5 function, you need to install at least 3 SATA / SATAII hard disks. If you plan to use RAID 10 function, you need to install at least 4 SATA / SATAII hard disks. 2. It is not recommended to switch the "Configure SATAII as" setting between AHCI, RAID, and IDE mode after OS installation. 42
-
 1
1 -
2
-
3
-
4
-
5
-
6
-
7
-
8
-
9
-
10
-
11
-
12
-
13
-
14
-
15
-
16
-
17
-
18
-
19
-
20
-
21
-
22
-
23
-
24
-
25
-
26
-
27
-
28
-
29
-
30
-
31
-
32
-
33
-
34
-
35
-
36
-
 37
37 -
 38
38 -
 39
39 -
 40
40 -
 41
41 -
 42
42 -
 43
43 -
 44
44 -
 45
45 -
 46
46 -
 47
47 -
48
-
49
-
50
-
51
-
52
-
53
-
54
-
55
-
56
-
57
-
58
-
59
-
60
-
61
-
62
-
63
-
64
-
65
-
66
-
67
-
68
 |
 |
