Actiontec ScreenBeam Pro Business Edition User Manual - Page 27
Setting up Managed Meetings
 |
View all Actiontec ScreenBeam Pro Business Edition manuals
Add to My Manuals
Save this manual to your list of manuals |
Page 27 highlights
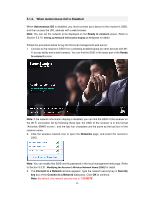
5.3.4. Setting up Managed Meetings The Managed Meetings is available when AGO is enabled. There are two options: Enable and Disable. Enable: The Managed Meetings function is available. Disable: The Managed Meetings function is not available. The Managed Meetings function allows meeting participants to share the wireless display interactively. For more information about Managed Meetings, refer to Section 4.1. Intel Pro WiDi and Managed Meetings. 1. Go to the Features tab page by clicking the Features tab. 2. To enable/disable Managed Meetings, set the Managed Meetings function to Enable/Disable. 3. For better communication, you can define a port (Managed Meetings Port) for the Managed Meetings, as shown below: 4. Click the Apply button, and then click OK on the pop-up message box to confirm. 5. The receiver reboots, and new settings take effect after the reboot. 24
-
 1
1 -
2
-
3
-
4
-
5
-
6
-
7
-
8
-
9
-
10
-
11
-
12
-
13
-
14
-
15
-
16
-
17
-
18
-
19
-
20
-
21
-
 22
22 -
 23
23 -
 24
24 -
 25
25 -
 26
26 -
 27
27 -
 28
28 -
 29
29 -
 30
30 -
 31
31 -
 32
32 -
33
-
34
-
35
-
36
-
37
-
38
-
39
-
40
-
41
-
42
-
43
-
44
-
45
-
46
-
47
 |
 |
