Adaptec 3405 User Guide - Page 73
Disk Drive Failure in a RAID 0 Array, Multiple Failures in the Same Array, Failed Drive in MaxIQ Pool - driver problem
 |
UPC - 760884155028
View all Adaptec 3405 manuals
Add to My Manuals
Save this manual to your list of manuals |
Page 73 highlights
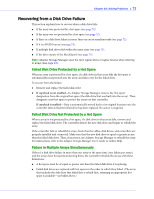
Chapter 10: Solving Problems ● 73 If there are more disk drive failures than hot spares, see Failed Disk Drive Not Protected by a Hot Spare. If copyback is enabled, data is moved back to its original location once the controller detects that the failed drive has been replaced. Disk Drive Failure in a RAID 0 Array Because RAID 0 volumes do not include redundancy, if a disk drive fails in a RAID 0 array, the data can't be recovered. Correct the cause of the failure or replace the failed disk drives. Then, restore your data (if available). Multiple Failures in the Same Array Except in RAID 6 and RAID 60 arrays (see page 82), if more than one disk drive fails at the same time in the same array, the data normally can't be recovered. You may be able to recover the data by forcing the logical drive online or by recreating the logical drive without the initialization step. You can use the BIOS utility, ACU (see page 69), the command-line utility, ARCCONF, or Adaptec Storage Manager. For more information, refer to the Adaptec RAID Controller Command Line Interface User's Guide and the Adaptec. Storage Manager User's Guide. Note: In some instances, RAID 10 and RAID 50 arrays may survive multiple disk drive failures, depending on which disk drives fail. Failed Drive in MaxIQ Pool Because Solid State Drives (SSD) in the MaxIQ pool are used just for caching, not permanent storage, no data recovery or rebuilding is necessary. Once you identify the failed SSD, for example, by using Adaptec Storage Manager's rapid fault isolation feature, replace the failed SSD with a new one (see page 48), then add the SSD to the MaxIQ pool following the instructions on page 96 or by using Adaptec Storage Manager. Resetting the Controller This section explains how to reset (or Mode 0 flash) your Adaptec RAID controller. You may want to do this if the controller becomes inoperable, or if a firmware upgrade is unsuccessful. To reset your Adaptec RAID controller: 1 Download the firmware version currently installed on your controller from www.adaptec.com 2 Extract the downloaded files to a folder on your local hard drive (for example, C:\Download\Drivers). 3 Create a bootable DOS floppy disk and copy the AFU.exe file to it. Copy the first firmware image to the same floppy disk. 4 Create additional bootable DOS floppy disks and copy each additional firmware image to its own floppy disk. 5 Power off your computer, disconnect the power cord, then open the cabinet following the manufacturer's instructions.
-
 1
1 -
2
-
3
-
4
-
5
-
6
-
7
-
8
-
9
-
10
-
11
-
12
-
13
-
14
-
15
-
16
-
17
-
18
-
19
-
20
-
21
-
22
-
23
-
24
-
25
-
26
-
27
-
28
-
29
-
30
-
31
-
32
-
33
-
34
-
35
-
36
-
37
-
38
-
39
-
40
-
41
-
42
-
43
-
44
-
45
-
46
-
47
-
48
-
49
-
50
-
51
-
52
-
53
-
54
-
55
-
56
-
57
-
58
-
59
-
60
-
61
-
62
-
63
-
64
-
65
-
66
-
67
-
 68
68 -
 69
69 -
 70
70 -
 71
71 -
 72
72 -
 73
73 -
 74
74 -
 75
75 -
 76
76 -
 77
77 -
 78
78 -
79
-
80
-
81
-
82
-
83
-
84
-
85
-
86
-
87
-
88
-
89
-
90
-
91
-
92
-
93
-
94
-
95
-
96
-
97
-
98
-
99
-
100
-
101
-
102
-
103
-
104
-
105
-
106
-
107
-
108
-
109
-
110
-
111
-
112
-
113
-
114
-
115
-
116
-
117
-
118
-
119
-
120
-
121
-
122
-
123
-
124
-
125
-
126
-
127
-
128
-
129
-
130
-
131
-
132
-
133
-
134
-
135
-
136
-
137
-
138
-
139
-
140
-
141
-
142
-
143
-
144
-
145
-
146
-
147
-
148
-
149
-
150
-
151
-
152
-
153
-
154
-
155
-
156
-
157
-
158
 |
 |