Akai PDP4273M1 Operating Instructions - Page 13
Remote Control - model
 |
View all Akai PDP4273M1 manuals
Add to My Manuals
Save this manual to your list of manuals |
Page 13 highlights
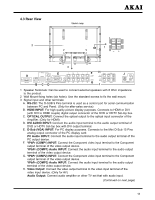
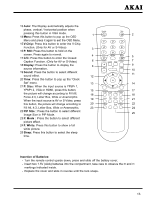
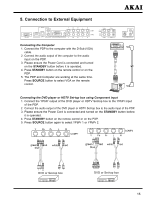
I. Video Input: Connect the video input terminal to the video output terminal of the video output device. Video Audio Input: Connect the audio input terminal to the audio output terminal of the video output device. J. S-Video INPUT: Connect the Y/C S-Video input terminal to the S-Video output terminal of the video output device. S-Video Audio INPUT: Connect the audio input terminal to the audio output terminal of the video output device. 4.4 Remote Control 1 Standby( ): Press this button to turn off to standby and turn on from standby. 2 Mute( ): Press this button to quiet the sound system. Press again to reactivate the sound system. 3 Number buttons: Use these buttons to enter the password. 4 PIP POS. : Press the button to select different Image Position in PIP Mode. 5 Source: Press this button and use ▲ / ▼ button to select the signal sources. AV, S-Video, YPbPr 1, YPbPr 2, VGA or HDMI. 6 Layout: Press this button to pop up Layout menu. 7 Swap: Press this button to switch the Main window or Sub window pictures in PIP and Split Screen. 8 VOL +/- : Press these buttons to increase or decrease the volume. 9 W. Sele: Press this button to select the Main Window or Sub Window. 10 S. Sele: Press this button to select the sound output from Main Window or Sub Window. 11 PIP: Press this button to change different Picture Mode. 12 OK : Press to enter or confirm They are used as ◄ / ► buttons in the OSD Menu screen They are used as ▲ / ▼ buttons in the OSD Menu screen. They also can be used for the selection of the program when the OSD Menu is not shown on the screen, but only for the Model with Tuner. (Continued on next page) 12
-
 1
1 -
2
-
3
-
4
-
5
-
6
-
7
-
 8
8 -
 9
9 -
 10
10 -
 11
11 -
 12
12 -
 13
13 -
 14
14 -
 15
15 -
 16
16 -
 17
17 -
 18
18 -
19
-
20
-
21
-
22
-
23
-
24
-
25
-
26
-
27
-
28
-
29
-
30
-
31
-
32
-
33
-
34
-
35
-
36
 |
 |
