Akai PDP4273M1 Operating Instructions - Page 14
Insertion of Batteries, V-Chip, P. Still, Display, Sound, P. Size, PIP Size, P. Mode, F. White, - has no picture or sound
 |
View all Akai PDP4273M1 manuals
Add to My Manuals
Save this manual to your list of manuals |
Page 14 highlights
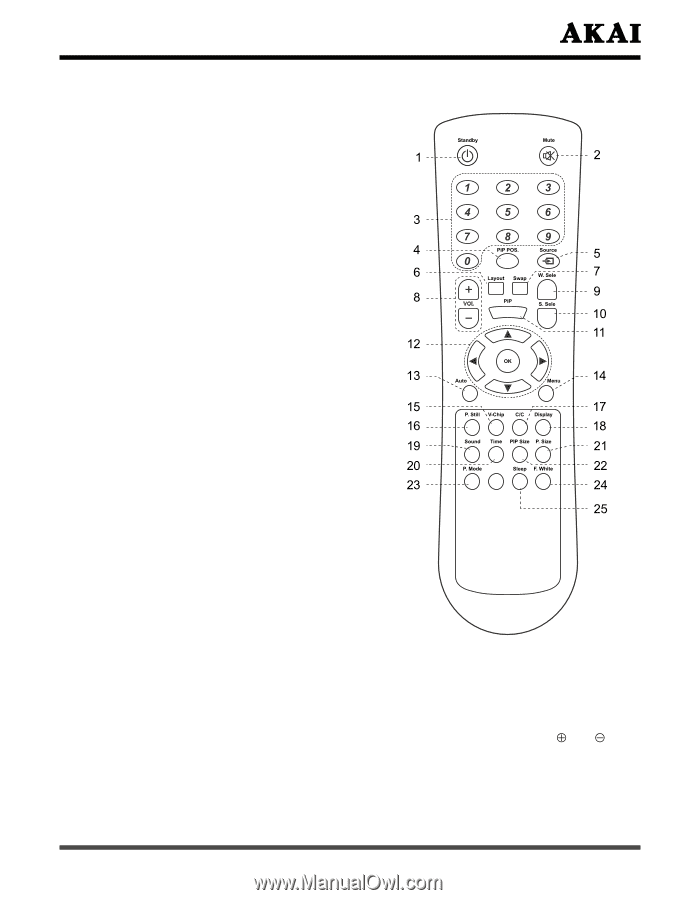
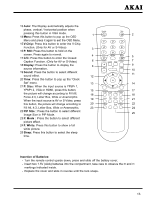
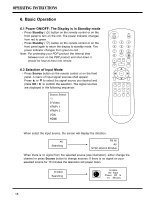
13 Auto: The Display automatically adjusts the phase, vertical / horizontal position when pressing this button in VGA mode. 14 Menu: Press this button to pop up the OSD Menu and press it again to exit the OSD Menu. 15 V-Chip: Press this button to enter the V-Chip Function. (Only for AV or S-Video) 16 P. Still: Press this button to hold on the screen. Press again to normal. 17 C/C: Press this button to enter the Closed Caption Function. (Only for AV or S-Video) 18 Display: Press the button to display the source information. 19 Sound: Press the button to select different sound effect. 20 Time: Press this button to pop up the "Clock Set" menu. 21 P. Size: When the input source is YPbPr 1, YPbPr 2, VGA or HDMI, press this button, the picture will change according to Fill All, Force 4:3, Letter Box, Wide or Anamorphic. When the input source is AV or S-Video, press this button, the picture will change according to Fill All, 4:3, Letter Box, Wide or Anamorphic. 22 PIP Size : Press the button to select different Image Size in PIP Mode. 23 P. Mode : Press the button to select different picture effect. 24 F. White: Press this button to show a full white picture. 25 Sleep: Press this button to select the sleep time. Insertion of Batteries: - Turn the remote control upside down, press and slide off the battery cover. - Insert two 1.5V (AAA) batteries into the compartment, take care to observe the and markings indicated inside. - Replace the cover and slide in reverse until the lock snaps. 13
-
 1
1 -
2
-
3
-
4
-
5
-
6
-
7
-
8
-
 9
9 -
 10
10 -
 11
11 -
 12
12 -
 13
13 -
 14
14 -
 15
15 -
 16
16 -
 17
17 -
 18
18 -
 19
19 -
20
-
21
-
22
-
23
-
24
-
25
-
26
-
27
-
28
-
29
-
30
-
31
-
32
-
33
-
34
-
35
-
36
 |
 |