Alesis DM8 USB Kit Operation Manual - Page 10
Kits, Voices, Accompaniment & Instruments
 |
View all Alesis DM8 USB Kit manuals
Add to My Manuals
Save this manual to your list of manuals |
Page 10 highlights
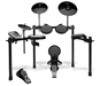
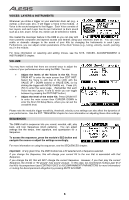
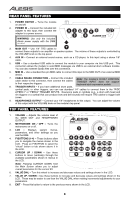
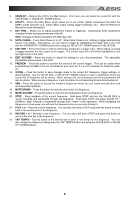
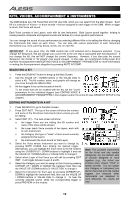
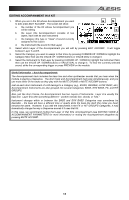
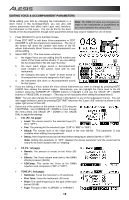
KITS, VOICES, ACCOMPANIMENT & INSTRUMENTS The DM8 Module has 100 Preset Kits and 100 User Kits, which you can select from the Main Screen. Each Kit is a collection of Voices - or drum sounds - that are assigned to each trigger on the DM8. When a trigger is struck, that Voice will sound. Each Voice consists of two Layers, each with its own Instrument. Both Layers sound together, helping to create powerful composite and layered sounds and timbres for a more dynamic performance. You can change the sound of your performance by selecting different Kits or by editing the Kits by changing the Instruments that make up each Voice. You can also edit various parameters of each Instrument themselves (e.g., level, panning, decay, reverb, etc.) in each Kit. IMPORTANT: At any given time, the DM8 module has a Kit selected and a Sequence selected. If you change the Sequence, this will change your current Kit to the one that is associated with that Sequence. If you change the Kit, this will NOT change the current Sequence. However, if you then play the current Sequence, the chords or "hit groups" may sound unusual. In this case, we recommend muting Layer B of that Kit's Accompaniment (see EDITING VOICE & ACCOMPANIMENT PARAMETERS for more information) or muting the Accompaniment altogether by pressing MUTE ACCOMP. SELECTING A KIT 1. Press the DRUM KIT button to bring up the Main Screen. 2. Use the VALUE UP / DOWN buttons or the VALUE DIAL to select a Kit. The Kit number, name, and graphic will change as you move through the different Kits. 3. Hit the triggers to try out the sounds of the Kit. To set levels that can be recalled with the Kit, set the "Level" parameters for the individual triggers (see EDITING VOICE & ACCOMPANIMENT PARAMETERS in this chapter) and/or the entire Kit (see DRUM KIT SETUP in this chapter). EDITING INSTRUMENTS IN A KIT 1. Press DRUM KIT to go to the Main Screen. 2. Press EDIT INST. The top of the screen will show the number and name of the Kit whose Instruments (drum voices) you will be editing. 3. Select INST (F1). The new screen will show: a. the trigger Voice you are editing (the Kit number and name of the Voice will be shown) b. the Layer (each Voice consists of two layers, each with its own Instrument) c. the Category (the type or "class" of drum sound currently assigned to that Layer) d. the Instrument (the drum sound for that Layer) a b c d 4. Select the Voice whose Instrument you want to change by pressing NOTE CHASE then striking the desired trigger. Alternatively, you can highlight the Voice (next to the Kit number) using the CURSOR UP / DOWN buttons to highlight it and use the VALUE UP / DOWN buttons or VALUE DIAL to change it. Note: The available Instruments for the hi-hat and ride cymbal Categories are pre-defined sets 5. Select which Layer of that Voice you will edit by pressing EDIT of sounds designed to work INST. It will toggle between Layer A and B. together (e.g., the hi-hat can 6. Select the Category you want to assign to that Voice by pressing produce open, closed, "chick" or CURSOR UP / DOWN to highlight the Category field, then use splash sounds). You can assign the VALUE UP / DOWN buttons or VALUE DIAL to change it. any Category or Instrument you 7. Select the Instrument for that Layer by pressing CURSOR UP / like for the hi-hat and ride cymbal DOWN to highlight the Instrument field, then use the VALUE UP triggers, but because other / DOWN buttons or VALUE DIAL to change it. To hear the Instruments are designed to currently selected sound, strike the corresponding trigger or work differently, the results will press PREVIEW on the module. vary. 10
-
 1
1 -
2
-
3
-
4
-
 5
5 -
 6
6 -
 7
7 -
 8
8 -
 9
9 -
 10
10 -
 11
11 -
 12
12 -
 13
13 -
 14
14 -
 15
15 -
16
-
17
-
18
-
19
-
20
-
21
-
22
-
23
-
24
-
25
-
26
-
27
-
28
-
29
-
30
-
31
-
32
-
33
-
34
-
35
-
36
-
37
-
38
-
39
-
40
-
41
-
42
-
43
-
44
-
45
-
46
-
47
-
48
 |
 |