Alesis DM8 USB Kit Operation Manual - Page 4
Getting Started
 |
View all Alesis DM8 USB Kit manuals
Add to My Manuals
Save this manual to your list of manuals |
Page 4 highlights
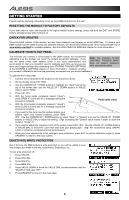
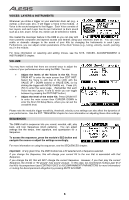
GETTING STARTED Please read the following instructions to set up your DM8 module for its first use! RESETTING THE MODULE TO FACTORY DEFAULTS If you ever need to return the module to its original default factory settings, press and hold the EXIT and STORE buttons simultaneously while turning it on. CHECK FOR UPDATES Since the initial release of this module, we may have released new firmware or sound ROM files. To ensure your DM8 module has the latest sounds and software features, we recommend checking the "Docs & Downloads" tab of www.alesis.com/dm8 for available updates. See the UPDATING THE MODULE chapter for more information. CALIBRATE YOUR HI-HAT PEDAL The first time you connect a hi-hat pedal to the DM8 module, we recommend calibrating it so the module can "read" the pedal's movement optimally. If you use the same hi-hat each session (even if you have disconnected and reconnected it), then you shouldn't need to calibrate each time as long as you store your trigger settings after calibrating (see STORING TRIGGER SETTINGS Note: The module's HI-HAT CONTROL TRIGGER INPUT does not support keyboardstyle expression pedals. in the STORING & COPYING chapter for more information). However, anytime you connect a different hi-hat from the previously connected one, you should calibrate it. To calibrate the hi-hat pedal: 1. Connect the hi-hat pedal to the module but do not press it down. 2. On the module, press EXT TRIG. 3. Use the CURSOR UP / DOWN buttons to highlight the "Input" field at the top of the screen then use the VALUE UP / DOWN buttons or VALUE DIAL to select "HiHat." 4. Press CAL (F1). 5. With the hi-hat pedal completely raised ("open"), Open press OPEN (F1) and wait for a message saying the process is complete. Closed 6. With the hi-hat pedal completely pressed ("closed"), press CLOS (F2) and wait for a message saying the process is complete. Pedal (side view) 7. If you want to fine-tune how the module detects your pedal's "open" and "closed" positions, press TRIM (F3). Use the CURSOR UP / DOWN buttons to select "Open" or "Closed" and use the VALUE UP / DOWN buttons or VALUE DIAL to adjust the setting. (Tip: Increasing the "Closed" value makes it easier to close the hi-hat or "choke" it.) 8. If you want to adjust the response curve of the pedal, press CURV (F4). Use the VALUE UP / DOWN buttons or VALUE DIAL to select the curve that best suits your playing style. (Tip: We recommend using LINEAR, LOG1 or LOG2 for conventional hi-hat performance.) 9. When you have adjusted the hi-hat settings to your preference, press EXIT to exit the calibration page (or press DRUM KIT to return to the main screen). DEACTIVATE WRITE PROTECTION Out of the box, the DM8 module is write-protected, so you will be unable to save any changes you make to the Kits, Instruments, Sequences, etc. To turn write protection off: 1. Press UTILITY. 2. Press SYS (F4). 3. Press O/S (F3). 4. Press MEM (F4). 5. Press VALUE DOWN or move the VALUE DIAL counterclockwise until the "WriteProt" field says "OFF." 6. Press DRUM KIT to return to the main page. 4
-
 1
1 -
 2
2 -
 3
3 -
 4
4 -
 5
5 -
 6
6 -
 7
7 -
 8
8 -
 9
9 -
 10
10 -
11
-
12
-
13
-
14
-
15
-
16
-
17
-
18
-
19
-
20
-
21
-
22
-
23
-
24
-
25
-
26
-
27
-
28
-
29
-
30
-
31
-
32
-
33
-
34
-
35
-
36
-
37
-
38
-
39
-
40
-
41
-
42
-
43
-
44
-
45
-
46
-
47
-
48
 |
 |
