Alesis Q88 User Guide - Page 4
Rear Panel Overview, Top Panel Overview, Selecting & Editing Midi Commands - used
 |
View all Alesis Q88 manuals
Add to My Manuals
Save this manual to your list of manuals |
Page 4 highlights
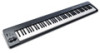
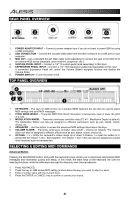
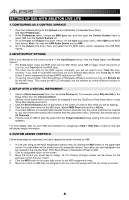
REAR PANEL OVERVIEW 1 2 3 9V DC 500mA ON/OFF 4 5 6 VOLUME POWER 1. POWER ADAPTER INPUT - Connect a power adapter here if you do not want to power Q88 by using a USB connection. 2. USB CONNECTION - Connect the included USB cable here and then connect it to a USB port on your computer. 3. MIDI OUT - Use a standard five-pin MIDI cable (sold separately) to connect this jack to the MIDI IN of an external MIDI device (keyboard, drum machine, sequencer, etc.). 4. SUSTAIN PEDAL INPUT - Connect a 1/4" TS sustain pedal (sold separately) to this input. 5. EXPRESSION PEDAL INPUT - Connect a 1/4" TRS expression pedal (sold separately) to this input. A connected Expression Pedal will control the Volume Slider's assigned function and disable the Volume Slider. 6. POWER SWITCH - Turns the power on/off. TOP PANEL OVERVIEW 4 5 VOLUME 6ADVANCED OCTAVE 23 1 1. KEYBOARD - The keys on Q88 function as a standard MIDI keyboard but can also be used to adjust MIDI settings and send MIDI messages. 2. PITCH BEND WHEEL - Transmits MIDI Pitch Bend information to temporarily raise or lower the pitch of a note. 3. MODULATION WHEEL - Transmits continuous controller data (CC #1 - Modulation Depth by default). The Modulation Wheel can also be assigned to different parameters such as pan, attack, reverb, chorus, etc. 4. ADVANCED - Use this button to access the advanced MIDI settings listed above the keys. 5. VOLUME SLIDER - Transmits continuous controller data (CC#7 - Volume by default). The Volume slider can also be assigned to different effects such as pan, attack, reverb, chorus etc. 6. OCTAVE - / + - Shifts the keyboard's octave range up or down 3 octaves. To reset the octave to 0, press both the Octave + and - keys together. The Octave + and - keys can also be assigned to control other functions such as transposition. SELECTING & EDITING MIDI COMMANDS Advanced Button Pressing the ADVANCED button, along with the keyboard's keys, allows you to adjust and send precise MIDI messages and information quickly and easily. In this mode, the black keys on the keyboard are used for selecting functions, while the white keys are used for data entry and channel selection. 1. Press ADVANCED. 2. Press the key on Q88 whose MIDI setting (printed above the key) you want to adjust or send. 3. Enter a number value with the numeric keys. 4. Press the ENTER or CANCEL key to confirm or cancel your choice. 4
-
 1
1 -
 2
2 -
 3
3 -
 4
4 -
 5
5 -
 6
6 -
 7
7 -
 8
8 -
 9
9 -
 10
10 -
11
-
12
-
13
-
14
-
15
-
16
-
17
-
18
-
19
-
20
-
21
-
22
-
23
-
24
-
25
-
26
-
27
-
28
-
29
-
30
-
31
-
32
-
33
-
34
-
35
-
36
-
37
-
38
-
39
-
40
-
41
-
42
-
43
-
44
-
45
-
46
-
47
-
48
-
49
-
50
 |
 |
