Alesis Q88 User Guide - Page 8
Setting Up Q88 With Ableton Live Lite - midi controller
 |
View all Alesis Q88 manuals
Add to My Manuals
Save this manual to your list of manuals |
Page 8 highlights
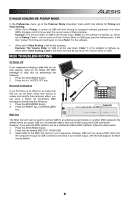
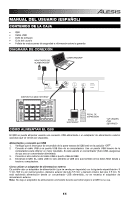
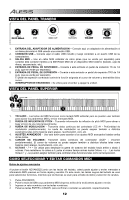
SETTING UP Q88 WITH ABLETON LIVE LITE 1. CONFIGURING AS A CONTROL SURFACE 1. Open the software and go to the Options menu (Windows) or Live Lite menu (Mac), and select Preferences. 2. In the Preferences menu, choose the MIDI Sync tab, and then open the Control Surface menu to select Q88 from the Control Surface list. 3. Go to the Input and Output drop-down menus. On the Input drop-down menu, select Q88 as the MIDI input device. Note: You may see USB Audio Device and not Q88. 4. Go to the Output drop-down menu and select the first MIDI output (which represents the USB MIDI signal). 2. INPUT/OUTPUT OPTIONS Q88 is now selected as the control surface. In the Input/Output menus, view the Track, Sync, and Remote options: 1. The Track option routes any MIDI notes sent by Q88. When using Q88 to trigger virtual instruments in Live Lite, turn Track On for the MIDI input. 2. The same can be done for the MIDI outputs. Generally, you will not need to turn Track On here. However, if you need to route MIDI notes back out to an external MIDI device, turn Track On for MIDI Output 2 (which represents the physical MIDI output port on Q88). 3. To use the Volume Slider, Pitch Bend Wheel, or Modulation Wheel to control Live Lite, turn Remote On for the MIDI Input. This routes the MIDI CC messages into the software to control different functions in the software. 3. SETUP WITH A VIRTUAL INSTRUMENT 1. Select a Virtual Instrument from Live Lite's Live Devices list. For example, select Billy the Kid (in the Brass folder) from the Instrument Rack. 2. Add the virtual instrument to your project by dragging it over the Clip/Device Drop Area (where it says "Drop Files and Devices Here"). 3. Click the Record Enable button at the bottom of the screen (in order to hear what you will be playing). 4. Click the drop-down menu for the MIDI input, labeled MIDI From and set this to All Ins. 5. If you have Q88 set to a specific MIDI channel that you would like only this virtual instrument to respond to, you can choose the specific MIDI channel from the drop-down menu. Generally, this should stay on All Channels. 6. Play the keys on Q88 to hear the audio from the Virtual Instrument track coming from your computer speakers. For more details, refer to Live's Help documentation by navigating to Help > Help View. A pane on the right will display helpful information. 4. CUSTOM ASSIGN CONTROLS Follow these steps to customize Live Lite to respond to certain controls on Q88: 1. In Live Lite, bring up the MIDI assignment options menu by clicking the MIDI button in the upper right corner. A purple sheen will be placed over the assignable options. Any option you see highlighted can be mapped to the Volume Slider, Pitch Bend Wheel, or Modulation Wheel on Q88. 2. Click an assignable option on the screen. 3. Move the control you would like to assign. Its CC (Control Change) number will be shown for the particular control that you moved. 4. Click the MIDI button in the upper right corner to exit MIDI assignment mode. 5. Move the control on Q88 that you assigned it will now move the assignment that you chose on-screen. 8
-
 1
1 -
2
-
 3
3 -
 4
4 -
 5
5 -
 6
6 -
 7
7 -
 8
8 -
 9
9 -
 10
10 -
 11
11 -
 12
12 -
 13
13 -
14
-
15
-
16
-
17
-
18
-
19
-
20
-
21
-
22
-
23
-
24
-
25
-
26
-
27
-
28
-
29
-
30
-
31
-
32
-
33
-
34
-
35
-
36
-
37
-
38
-
39
-
40
-
41
-
42
-
43
-
44
-
45
-
46
-
47
-
48
-
49
-
50
 |
 |