Asus AP160R-S User Guide - Page 19
Motherboard Placement
 |
View all Asus AP160R-S manuals
Add to My Manuals
Save this manual to your list of manuals |
Page 19 highlights
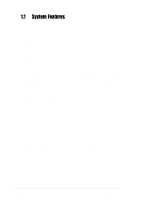
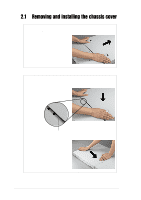
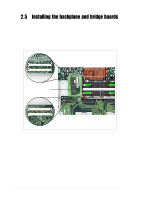
2.2 Motherboard Placement NOTE The motherboard and other internal components of the AP160RS server are already installed as indicated in section "1.4 Internal Features". Refer to the motherboard user's manual for detailed technical information about the motherboard. Placement Direction When installing the motherboard, make sure that you place it into the chassis correctly. The edge with the external ports goes to the rear part of the chassis. Place this side towards the rear of the chassis NOTE You must remove the protruding screws (indicated by black circles above) on the serial port, VGA port, and high-density SCSI connector before installing or removing the motherboard. Otherwise, you cannot properly install or remove the motherboard. Motherboard Screws Place seven (7) screws in the holes indicated by circles to secure the motherboard to the chassis. Do not overtighten the screws. Doing so may damage the motherboard. ASUS AP160R-S 1U Rackmount Server 19
-
 1
1 -
2
-
3
-
4
-
5
-
6
-
7
-
8
-
9
-
10
-
11
-
12
-
13
-
 14
14 -
 15
15 -
 16
16 -
 17
17 -
 18
18 -
 19
19 -
 20
20 -
 21
21 -
 22
22 -
 23
23 -
 24
24 -
25
-
26
-
27
-
28
-
29
-
30
-
31
-
32
-
33
-
34
-
35
-
36
-
37
-
38
-
39
-
40
-
41
-
42
-
43
-
44
-
45
-
46
 |
 |