Asus AP160R-S User Guide - Page 30
Installing the front bezel and rack ears
 |
View all Asus AP160R-S manuals
Add to My Manuals
Save this manual to your list of manuals |
Page 30 highlights
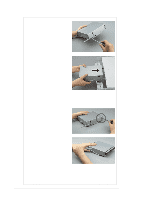
2.8 Installing the front bezel and rack ears 1. Secure a metal handle to one end of the front bezel using two small screws that came with the accessory box. Do the same to secure a metal handle to the other end of the bezel. 2. Fit the front bezel to the chassis together with the mounting ear by matching the screw holes. Secure the mounting ear using two screws. Do the same to secure the other mounting ear. 3. Press the black peg to fasten the front bezel to the mounting ear. Do the same to the other peg. Mounting ear To remove the front bezel, pull the black pegs on each end to release, then use your two hands to pull out the front bezel as shown. 30 Chapter 2: Hardware Setup
-
 1
1 -
2
-
3
-
4
-
5
-
6
-
7
-
8
-
9
-
10
-
11
-
12
-
13
-
14
-
15
-
16
-
17
-
18
-
19
-
20
-
21
-
22
-
23
-
24
-
 25
25 -
 26
26 -
 27
27 -
 28
28 -
 29
29 -
 30
30 -
 31
31 -
 32
32 -
 33
33 -
 34
34 -
 35
35 -
36
-
37
-
38
-
39
-
40
-
41
-
42
-
43
-
44
-
45
-
46
 |
 |

30
Chapter 2:
Hardware Setup
2.8
Installing the front bezel and rack ears
1.
Secure a metal handle to one
end of the front bezel using two
small screws that came with
the accessory box. Do the
same to secure a metal handle
to the other end of the bezel.
2.
Fit the front bezel to the
chassis together with the
mounting ear by matching the
screw holes. Secure the
mounting ear using two
screws. Do the same to secure
the other mounting ear.
3.
Press the black peg to fasten
the front bezel to the mounting
ear. Do the same to the other
peg.
Mounting ear
To remove the front bezel, pull the
black pegs on each end to release,
then use your two hands to pull out
the front bezel as shown.