Asus AP160R-S User Guide - Page 38
Removing the power supply
 |
View all Asus AP160R-S manuals
Add to My Manuals
Save this manual to your list of manuals |
Page 38 highlights
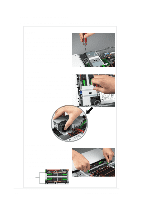
3.3 Removing the power supply Follow these steps in case you need to remove the power supply in the future. NOTES Remove all system components that overlap with the power supply. Remove all power cable connections. Refer to the previous sections for instructions on removing system components. 1. Remove the screw that secures the power supply to the chassis base. 2. Remove the screw that secures the power supply to the rear panel. 3. Carefully lift the power supply from the chassis. 38 Chapter 3: Powering Up
-
 1
1 -
2
-
3
-
4
-
5
-
6
-
7
-
8
-
9
-
10
-
11
-
12
-
13
-
14
-
15
-
16
-
17
-
18
-
19
-
20
-
21
-
22
-
23
-
24
-
25
-
26
-
27
-
28
-
29
-
30
-
31
-
32
-
 33
33 -
 34
34 -
 35
35 -
 36
36 -
 37
37 -
 38
38 -
 39
39 -
 40
40 -
 41
41 -
 42
42 -
 43
43 -
44
-
45
-
46
 |
 |

38
Chapter 3:
Powering Up
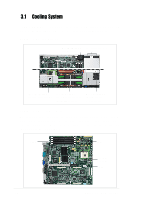
3.3
Removing the power supply
Follow these steps in case you need to remove the power supply in the
future.
1.
Remove the screw that
secures the power supply to
the chassis base.
2.
Remove the screw that
secures the power supply to
the rear panel.
3.
Carefully lift the power supply
from the chassis.
Remove all system components that overlap with the power supply.
Remove all power cable connections.
Refer to the previous sections for instructions on removing system
components.
NOTES